


⛄ Happy CRAFTmas Creative Friends 🎄 


The Majestic Bow Make-a-Bow "Colourize It" SVG Cutz set includes 3 sizes to take the guess work out for you, just pick which size works best for you and start cutting immediately, or you can resize any of them to suit your needs too! The Majestic Bow I'm demoing today is about 6 x 6 inches in size and the smallest one included in the set.


Our Christmas creativities are in full swing with TWO Challenges for you to play in through Dec 24th! Also enjoy 35% off in LeighSBDesigns December Sale with code LeighSBDesignsDec23 through Dec 31st! Come join us and countdown to Christmas in LeighSBDesigns style🎅
⛄ 🎄⛄ 🎄 ⛄ 🎄 ⛄ 🎄 ⛄ 🎄 ⛄ 🎄 ⛄ 🎄 ⛄ 🎄 ⛄ 🎄 ⛄

"Majestic Bow"
SVG Cutz
Assembly Tutorial
with Leigh
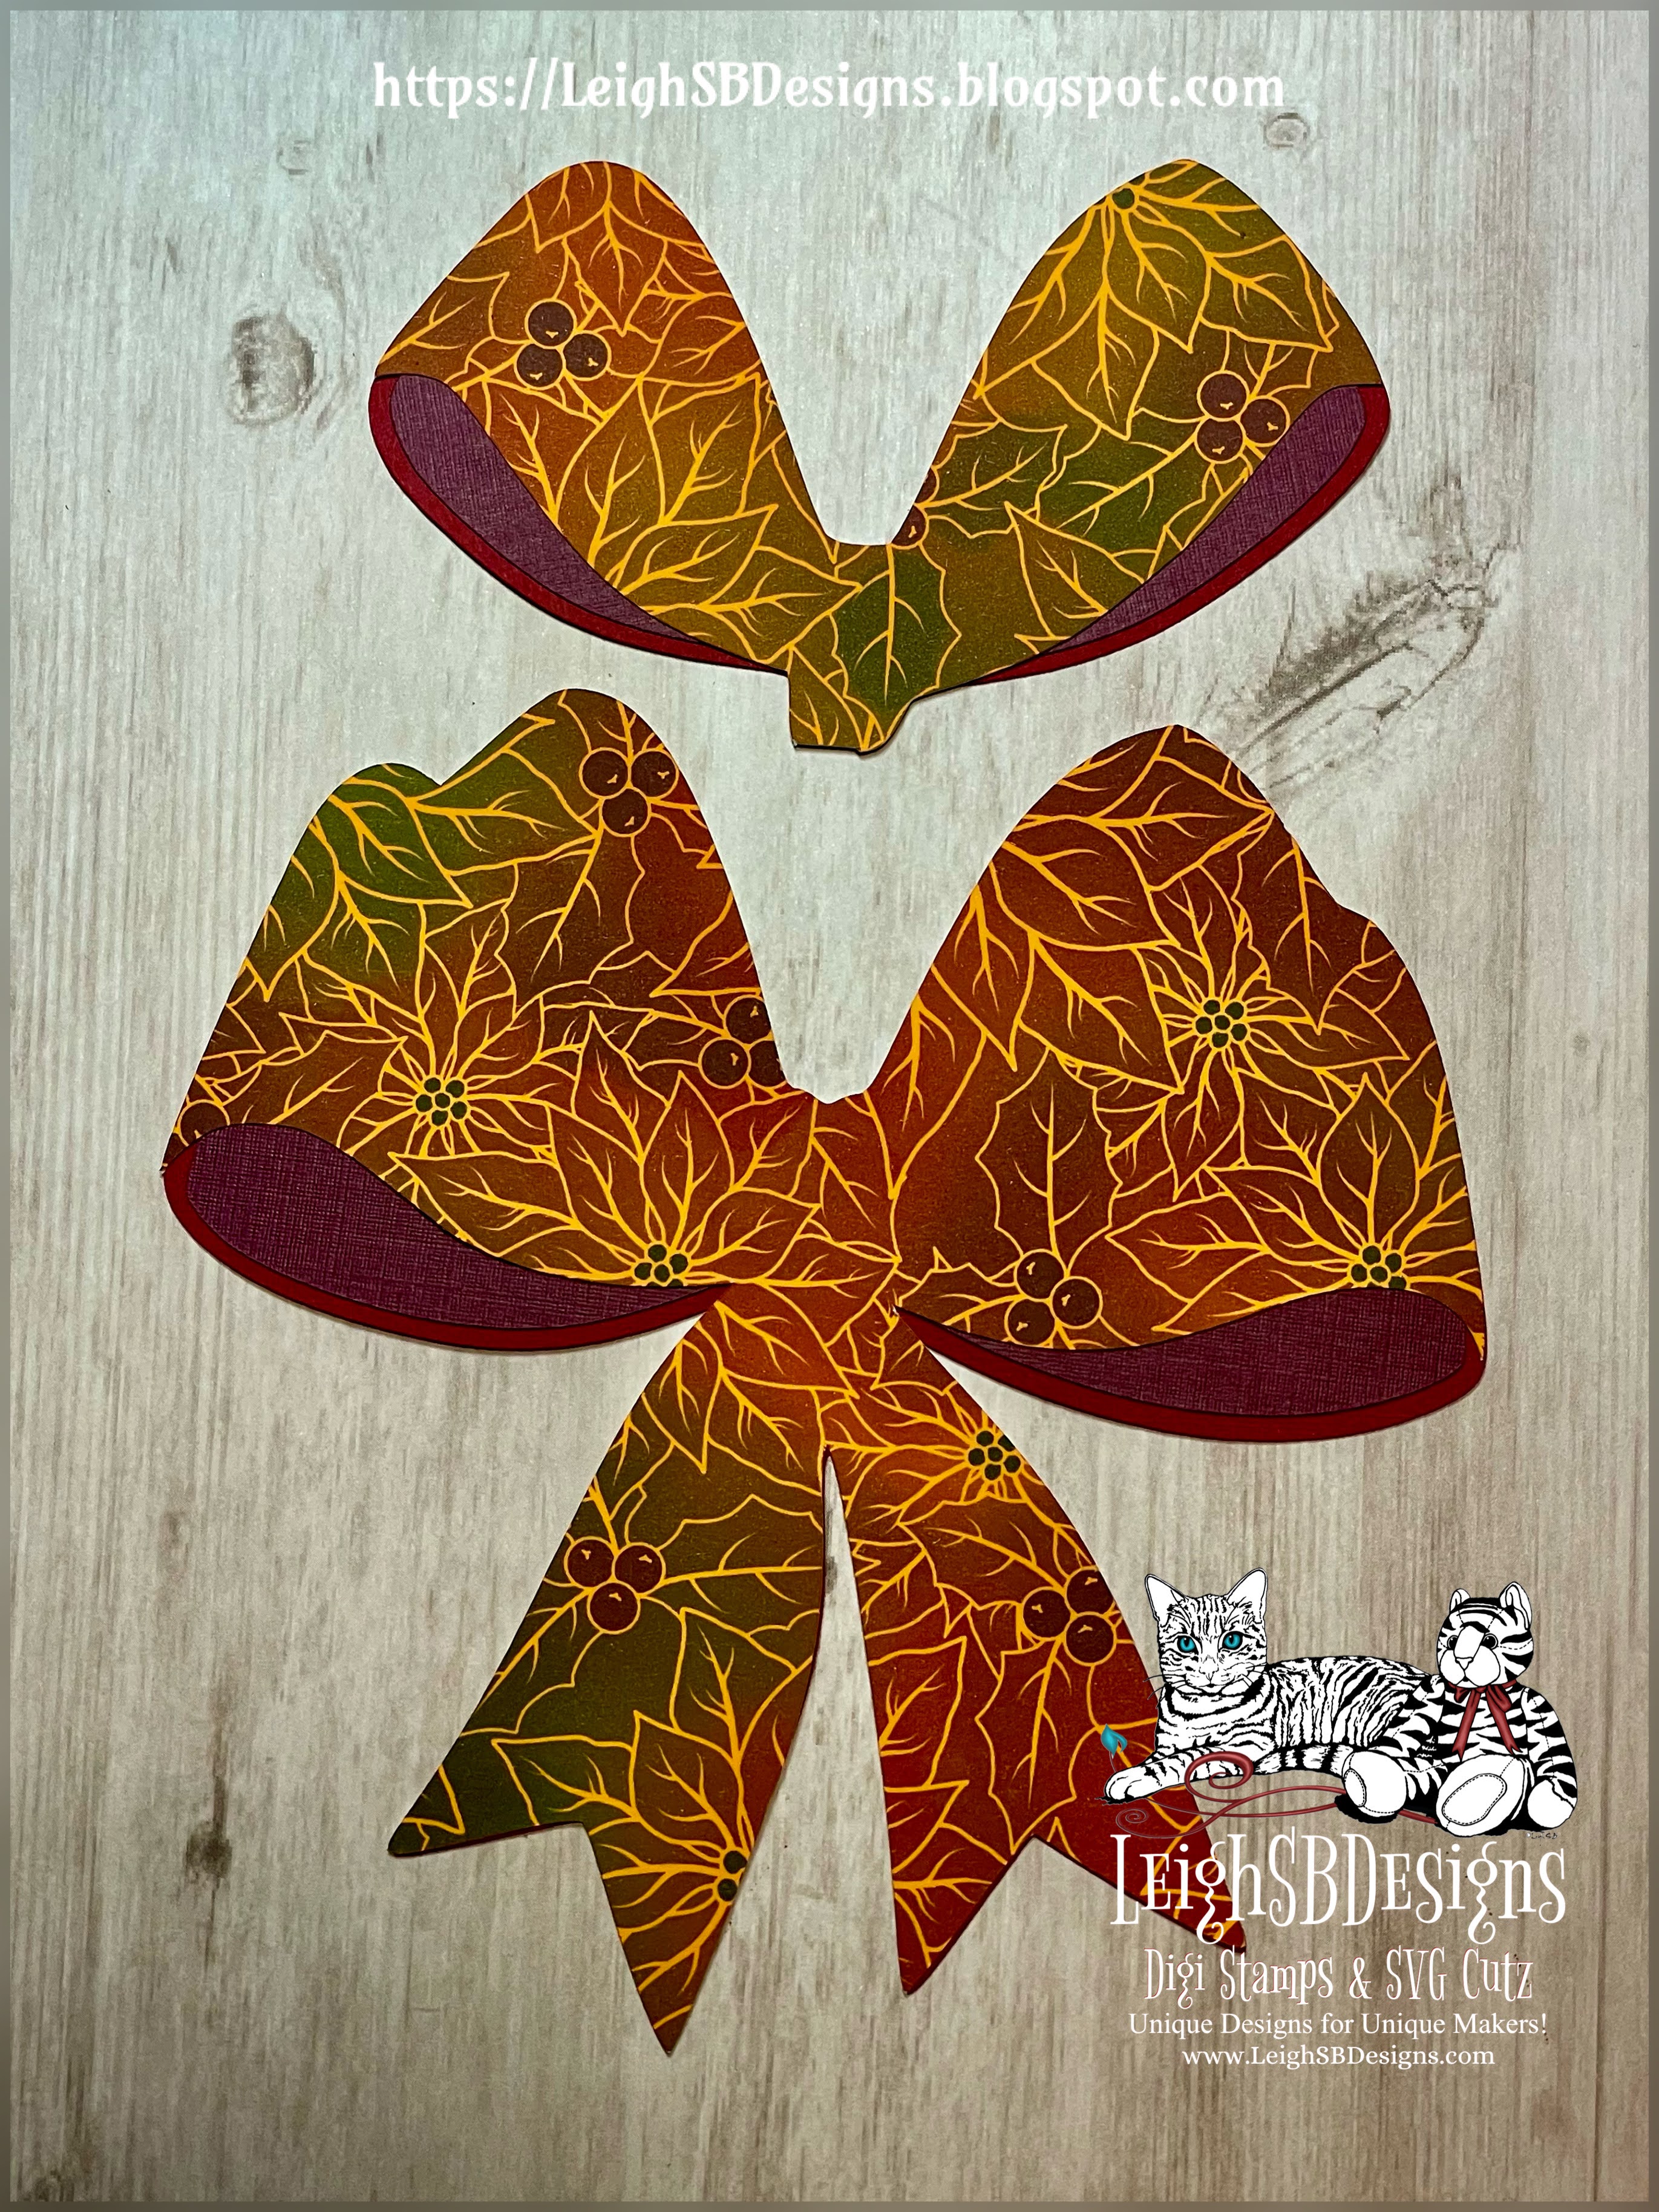
Today I'm demonstrating how to cut out and assemble the fabulous Majestic Bow Make-a-Bow "Colourize It" SVG Cutz set from my new Poinsettia and Holly Christmas Collection.
The Majestic Bow is a double bow that can literally be customized to suit any occasion that you could possibly need a bow for like birthdays and weddings, etc! My bow today is Christmas themed and made for my fabulous 12 inch Christmas Wreath which I'll be blogging about over the weekend! It's gorgeous and you don't want to miss learning how I made it 😁
I also made a "Majestic Bow SVG Cutz Assembly Guide" video you can use as a quick reference while making your own Majestic Bows too!
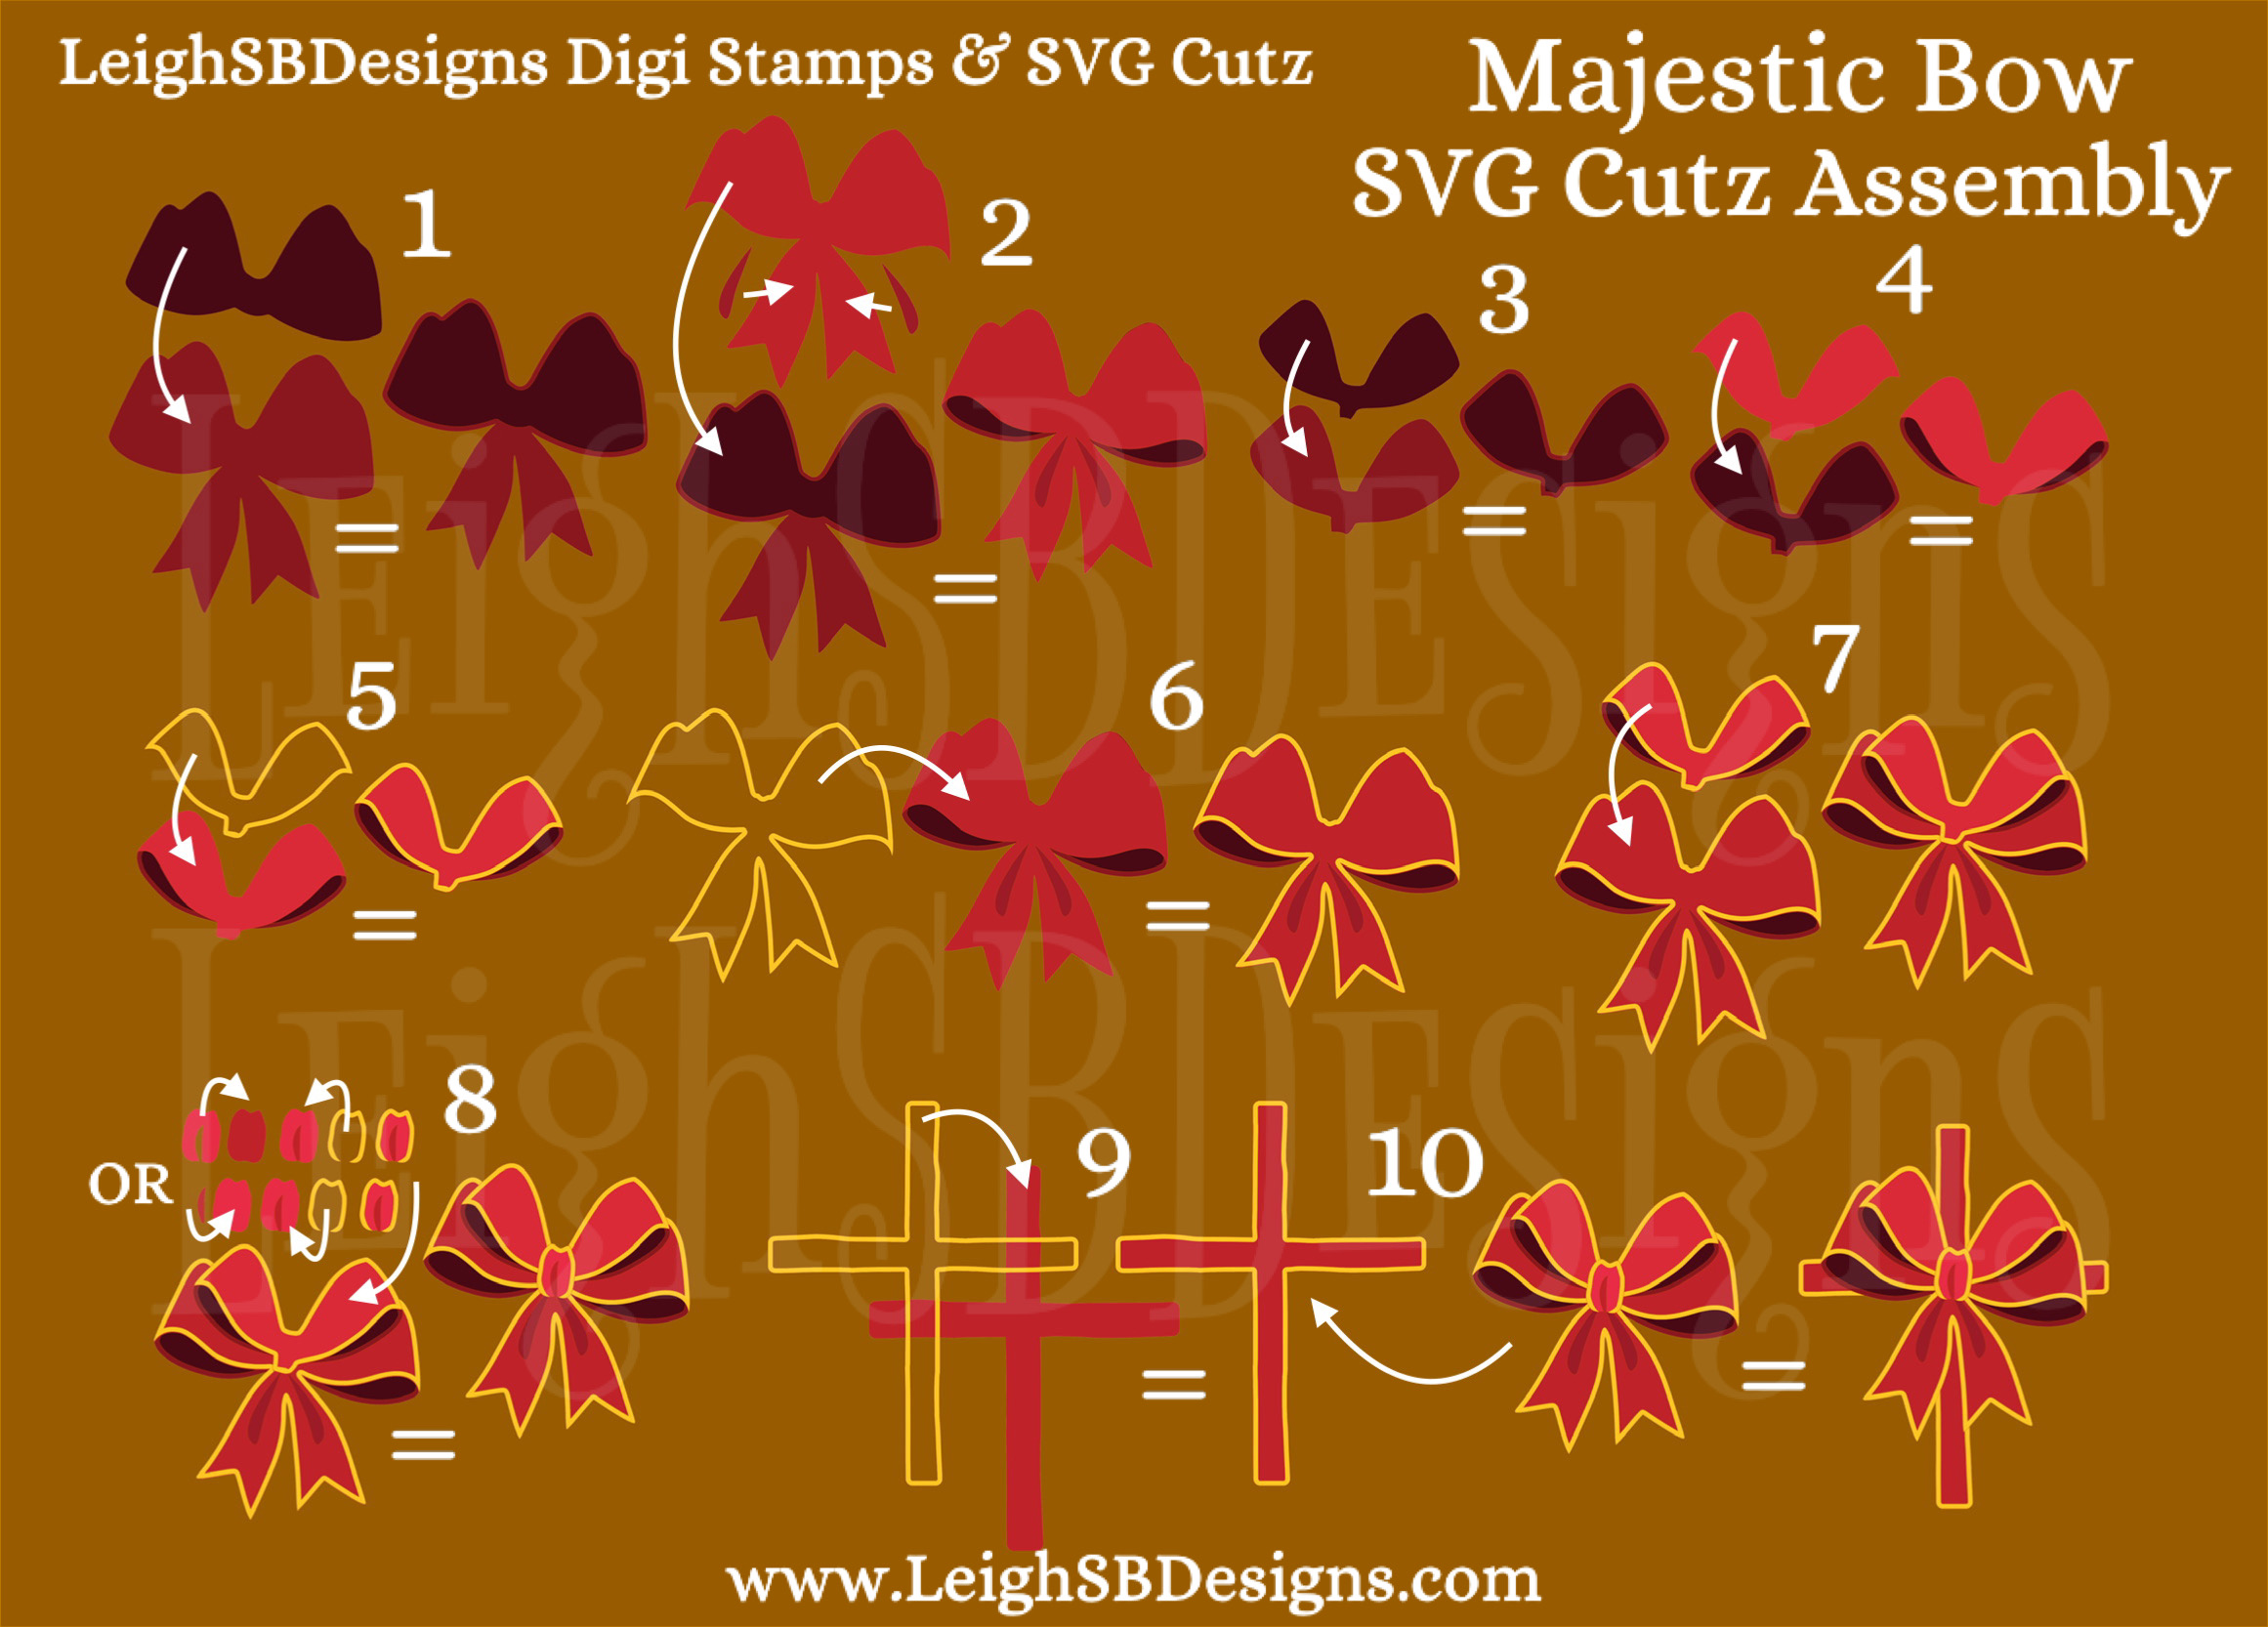
Majestic Bow
Make-a-Bow "Colourize It" SVG Cutz
This photo guide shows all the elements included in the set as well as the assembly and is included in the download when you add this wonderful SVG Cutz set to your collection.
Resizing Pro Tip
Center all the cut elements on your onscreen cut area and enlarge or reduce them all together as a group to ensure each part is resized correctly!
Step 1
Using your electronic cutting machine, I'm using my Silhouette Cameo 4, start by cutting out the large Bow base, which is about 6 x 6 inches, and the top Bow base from red cardstock. The bases are both the foundation of the Bow where you will adhere all the cut pieces too as well as the lighter outer area of the "inside" folds of both of the bows.

Step 2
Cut the "shadow" layers for the top and bottom bows from a darker red or plum cardstock. These are the pieces that create the deep shadow areas inside each bow loop.

Step 3
These pieces represent the decorative side of the "ribbon" so cut them out of patterned cardstock. I cut the bottom Bow, the top Bow as well as the shadow layer and top layer of the bow knot from an 8.5 x 11 inch print of one of the two "gold" versions included in my new Poinsettia and Holly Festive Metals Decorative Paper pack.
Poinsettia and Holly Festive Metals
Decorative Digi Paper Pack

Step 4
The final cut pieces are the ribbon's Trim which gives the Bow a luxurious decorative edging. I cut the bottom Bow, the top Bow and the Knot trim out of yellow pearlescent cardstock.

Step 5
Center the shadow layers onto the base layers and adhere them in place.
Step 6
Then adhere the decorative top layers next. Line up the decorative layer ribbon tails with the base tails to get the correct placement and for the top Bow, line up the top edge while ensuring the left and right pointy edges line up to create the bow loops.
Glue Pro Tip
I recommend using wet glue that's not super grabby for assembly coz it gives you some wiggle room to get the placement of the layers just right! Remember the beauty of crafting is that nothing has to be perfect but if there's any spots that bother you where you didn't get the layers aligned then just trim the overhang away with scissors!


Step 7
Cut the layers for creating the bow's Knot.
The SVG Cutz set includes 2 styles: #1 has the shadow fold as a cut piece you adhere onto the top layer while #2 has the fold cut out of the top layer allowing the base layer to show through to create the shadow effect. Here I used style #2 with the darker decorative layer beneath the top decorative layer creating the illusion of a fold. The Trim layer is cut from the yellow pearlescent cardstock.

Step 8
Adhere the Trim layers to the base Bow and the top Bow and then adhere the top Bow to the bottom Bow with foam tape.

Step 9
Then adhere the Knot in place with foam tape to give the assembled Bow lots of layered dimension.

Step 10
The final step is to cut out the 2 shadow fold pieces for the ribbon tails. You can cut these from either the red cardstock or the darker shadow plum cardstock depending on how dark you want the "folds" to appear. I used the red cardstock and adhered them to the ribbon tails with the pointy ends tucked under the Knot.

You now have a wonderful Majestic Bow perfect for decorating your wreaths, cards, gifts and so much more!

⛄ 🎄⛄ 🎄 ⛄ 🎄 ⛄ 🎄 ⛄ 🎄 ⛄ 🎄 ⛄ 🎄 ⛄ 🎄 ⛄ 🎄
There's just 3 days left to play in our TWO Challenges this month! Both linkies are in the same post so do come and join the fun for the chance to win
LeighSBDesigns prizes!

Shop LeighSBDesigns new website store and get 35% off your entire purchase with code LeighSBDesignsDec23
Sale ends Dec 31st at 11:55pm pacific
⛄ 🎄⛄ 🎄 ⛄ 🎄 ⛄ 🎄 ⛄ 🎄 ⛄ 🎄 ⛄ 🎄 ⛄ 🎄 ⛄ 🎄 ⛄
Check out my fabulous new
Poinsettia and Holly Collection

The Poinsettia and Holly 2023 Collection of 3 festive Digi Stamps, 3 packs of Decorative Digi Papers and 5 SVG Cutz sets are
here to fill you with festive warmth and the spirit of the season!


Festive Robin - Digi Stamp

Poinsettia Holly Snowflakes Festive Garland - Digi Stamp

Poinsettia and Holly Festive Metals
Decorative Digi Paper Pack


Pastel Blizzard
Decorative Digi Paper Pack

Poinsettia and Holly Slimline Card
Make-a-Card SVG Cutz

Majestic Bow
Make-a-Bow "Colourize It" SVG Cutz

Poinsettia and Holly Botanicals and Bow Set
"Colourize It" SVG Cutz

Majestic Snowflakes SVG Cutz

Winter Sparkle Snowflakes SVG Cutz
Snowflakes Set #1 and Set #2

Winter Sparkle Snowflakes SVG Cutz
Snowflakes Set #3 and Set #4
❄️ ❄️ ❄️ ❄️ ❄️ ❄️ ❄️ ❄️ ❄️ ❄️ ❄️ ❄️
Thanks for visiting with us today!
Merry Christmas and Happy Creating!
 THE SHARPIE DOMINO QUEEN
No comments:
Post a Comment
Thank you for visiting and leaving us some love, your comments are always most appreciated!
Happy Stamping!
Leigh S-B