News
The Summer BUZZ Collection
Re-Release Sale-bration thru July 19!
The Gilded Raven Release!
"Rocky Mountain Christmas"
Winter 2025 Collection
Adopt all the Loveleigh Kitties, they're PURRfect for every occasion!
Showing posts with label Steampunk Easter Bunny digi stamp. Show all posts

Sunday, April 7, 2019

Steampunk Easter Bunny - masculine card by Val!

Howzit Creative Friends!
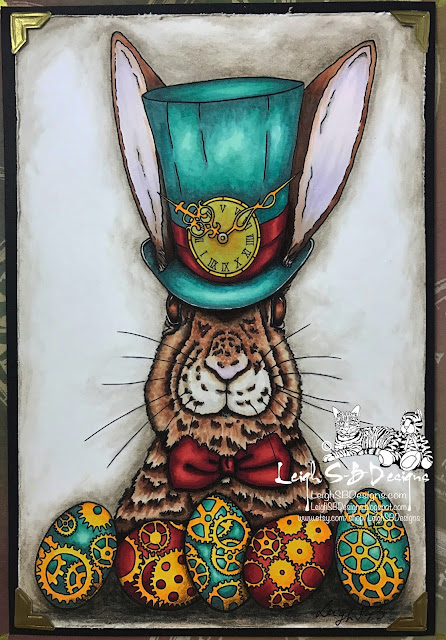
LeighSBDesigner Val has a fabulous Easter card with more of a masculine vibe for your inspiration today! Creating cards for guys is always rather challenging but you can't go wrong with the Steampunk theme and my Steampunk Easter Bunny is perfect for your masculine projects!

 
Materials used:
Spectrum Noir markers:  TN3, TN4, TN5,CR5, CR4, CR2, IG5 and GB1
Promarkers:  Ice Grey4 and Amethyst
Distress Oxides:  Mustard Seed and Squeezed Lemonade
Americana Tripple Thick Glossy Accent
Happy Easter stamp
Bakers Twine
Neenah white cardstock
Yellow cardstock
Black cardstock

https://www.etsy.com/uk/listing/510997680/whimsical-steampunk-easter-bunny-digi?ref=shop_home_feat_4

Thanks for stopping by to see today's featured project!
Happy Creating!
THE SHARPIE DOMINO QUEEN

Saturday, March 31, 2018

Steampunk Easter Bunny card by Val!

Happy Easter Weekend🐰

If you are in need of some inspiration for a last minute Easter card this weekend then look no further, check out this fabulous card created by LeighSBDesigner Val featuring Steampunk Easter Bunny🐰

Steampunk Easter Bunny is on FLASH SALE until midnight (pacific) tonight🐰


I love all the fussy cut elements and the glossy details!  Steampunk Easter Bunny is looking so dashing!


STEAMPUNK EASTER BUNNY

Val used these supplies to create this beauty!

Spectrum Noir markers
Sky Blue, Faded Jeans and Fire Brick Distress Inks
Smoothie ink applicator
3D Triple Glossy Accents
White gel pen
X-Cut Scallop Nesting Die
Neenah White cardstock
Black cardstock
 
Thanks for stopping by to see Val's project today!
See you tomorrow for the start of our month long Birthday Celebrations🎉

Happy Stamping!
THE SHARPIE DOMINO QUEEN

Tuesday, March 27, 2018

Tutorial Tuesdays: Steampunk Bunny - 3D Carrot Ornament by Leigh!

Hiya Creative Friends!
For today's Tutorial Tuesday I've got a 3D carrot ornament project to share featuring LeighSBDesigns Steampunk Easter Bunny🐰

Steampunk Easter Bunny is on FLASH SALE until midnight (pacific) tonight so snap him up and make some super cool and fun Steampunk Bunny 3D carrots for Easter🐰


I love making boxes and had a blast creating this ornament box that can either hang, stand on its own or be given as a treat box stuffed with mini Easter eggs.  Lets get started😋


Start off by creating a long triangular shaped box.  You can make them any size and have a whole collection of different shaped carrots.  My box measurements are:
Total length of the longest panel including flaps is 7 inches and the total width of the entire box is 8.5 inches so you can easily make this box using a standard 8.5 x 11 inch sheet of cardstock.  Assembled the box measurements are 2 x 2 inches at the top and 5/8 x 5/8 inches at the base.


Cut notches into the 2 longest flaps at the top and assemble the box using your favourite adhesive.


Apply Tea Dye Distress Ink to all the edges.


Print out 4 Steampunk Easter Bunnies onto white cardstock and cut 4 panels about 2/8 of an inch smaller than the box sides and one square blank panel for the top of the box.


Colour the Steampunk Easter Bunnies with Copics.  Alternate the colours of the hat band and the bow tie just for a bit of variation.  Add white highlights to the whole image and metallic gold to the clock centers with gel pens.  I also added clear Wink of Stella to the clocks, the bow ties and Easter eggs for a touch of magical shimmer as well.


Apply Tea Dye Distress Ink to the edges of all the panels.


Adhere the panels to black cardstock and trim leaving a 1/8 inch border.


Stamp "Happy Easter" onto the Square panel for the top of the box.  I used my Tim Holtz stamp platform and masked off each word before inking up with Teal Zeal Memento Ink. 


Edge the panel with Tea Dye DI as well.  Then mat on black cardstock and trim leaving a 1/8 inch border.  Cut the panel in half and punch two half-holes on the "middle" edges.  You'll see why just now.


Create "carrot greenery" with loops of green ribbon and secure the ends with wire.  Make sure the end part is wider than the hole punched into the box lid so the greenery doesn't pull out the hole, especially if you want to hang the ornament.


Insert the greenery into the hole at the top of the box and adhere the box lid flaps together securing the greenery inside.  You'll want to leave the flaps unglued if you make treat boxes!  Adhere the sentiment panel to the box top.  Now you can see why we cut it in half.


 Then adhere all the Steampunk Easter Bunny panels to the box sides and voilà, how cool and fun is that🐰


You can see the Wink of Stella shimmer and touches of gold in these photos.


Supplies used:
LeighSBDesigns Steampunk Easter Bunny

  Shop my Blick Art Materials affiliate link for the best Copic deals and Joggles for great sales, deals and "15% off retail every day" on some of the supplies I used today😘

HAPPY EASTER - Tim Holtz Stampers Anonymous Crazy Talk set
Tea Dye Distress Ink
Teal Zeal Memento Ink
Copics
Metallic gold gel pen
Ranger white gel pen
Clear Wink of Stella
Green ribbon
Neenah white cardstock
Orange cardstock
Black cardstock
Scotch Quick Dry Adhesive
Tim Holtz Tonic Stamp Platform
masking tape
craft wire
scissors
standard size hole punch


Thanks for stopping by to see my project today!
Happy Stamping!
THE SHARPIE DOMINO QUEEN
Friday, April 14, 2017

LeighSBDesigns Art Stamps Grand Opening with Freebies!

Howzit Stamping Friends!

Today is a big day for me, I'm so very excited to announce the grand opening and launch of my new stamp company, LeighSBDesigns Art Stamps🎉

This is a long over due dream come true for me and I'm thrilled it's finally happening!  I hope you will love my designs and will join me on my grand new Creative Adventure😊

https://www.etsy.com/shop/LeighSBDesigns

LeighSBDesigns Art Stamps are available for instant download at my Etsy Boutique, I'm currently offering digi stamps for now and will expand my line into rubber too.

My unique collection of whimsical and quirky original designs are based on my drawings and photography!  It will constantly be morphing and expanding as inspiration takes me off on new adventures.  I see beauty in everything from cute kitties to creepy skulls and my collection of themes, styles and genres will be sure to appeal to everyone.

Let's get the grand opening celebrations underway!
Join me as I release a new digi image every 3 days until my Etsy Boutique is stocked with all the designs I'm excited to offer you😊  You will have 3 days to take advantage of my special release prices until I release the next new image on the 4th day.

Here's my first release....of course it had to be a Steampunk Easter Bunny, I hope you love him!

https://www.etsy.com/listing/510997680/whimsical-steampunk-easter-bunny-digi?ref=shop_home_feat_1


https://www.etsy.com/listing/510997680/whimsical-steampunk-easter-bunny-digi?ref=shop_home_feat_1

 Now coz it's Easter Weekend I've got Easter themed freebies for you!
Receive this freebie Steampunk Easter Egg digi when you join my LeighSBDesigns Facebook Fan Group!


Help me spread my grand opening news and receive this cute freebie Easter Bunny digi!  Do me the honour of writing a post on your blogs, tell you readers all about LeighSBDesigns Art Stamps and how they too can receive these freebies!  Post links to your blog posts in the LeighSBDesigns FB Fan Group and this Easter Bunny is all yours!
 

Here's two cards I made featuring this cutie!


On the pink card I cut out the interior of the eggs and added decorative paper to show you how versatile this Bunny is😋


I've been super busy over the last 2 months designing and creating my new website at LeighSBDesigns.com which is now my online home.  There you will find links to everything as well as Stamping Galleries for all my current and past design team projects, non-DT projects and also some examples of my Fine Art and more.  I've got years of art to upload to the Galleries but I've added quite a bit already.  Pop on over and check it out, I hope you'll enjoy browsing and getting to know me better😉

leighsbdesigns.com

In case you missed my previous announcement...all my design team blogging will now be taking place over at Velvet Paw Creations.com so pop on over and follow me to continue seeing my DT projects.

http://www.velvetpawcreations.com/

See you in my LeighSBDesigns FB Fan Group soon and don't forget to come back on Monday for my next new release!  I hope you'll stay and follow me on my new adventure!
Happy Stamping and have an Egg-Tastic holiday weekend!
THE SHARPIE DOMINO QUEEN