News
The Summer BUZZ Collection
Re-Release Sale-bration thru July 19!
The Gilded Raven Release!
"Rocky Mountain Christmas"
Winter 2025 Collection
Adopt all the Loveleigh Kitties, they're PURRfect for every occasion!
Showing posts with label TECHNIQUES: Distress Stains. Show all posts

Monday, October 31, 2016

"Kissed by a Rose on a Grave" Coffin Trinket Box for 31 Days of Halloween - Lost Coast Designs/Carmen's Veranda DT


WOOHOO, it's Halloweeeeeeen and today I'm sharing my finale project for Lost Coast Portal to Creativity's particiption in the annual 31 Days of Halloween blog hop!  If you've missed all the excitement then dash on over and start your Monster Binge on the Day 1 post!  Leave a comment on all 31 days and be in the drawing for a TREAT, you've got until Nov 5th to comment and be included in the drawing and one winner will receive $5 LCD/CV Bucks to spend in the LCD/CV online stores!  Plus, our October Challenge ends tonight at 5 to midnight....enter your Halloween projects for the chance at winning TWO PRIZES!  So dash on over to LCPtoC and join the fun!

Now for my finale project inspired by one of my fave Seal songs, "Kiss From a Rose".

"Kissed by a Rose on a Grave" Coffin Trinket Box


Featuring the following stamps:
Lost Coast Designs
large Articulated Skeleton
long stemmed Rose Bud
large Spiderwebs background

Carmen's Veranda
large Heads and Roses background


I found these really cool coffin boxes in the dollar deals section of Target and started out by dismantling the box by removing the hinges and the latch and used the box pieces themselves to create a template.  I traced each section of the box;  the top, sides, base etc onto white cardstock and stamped the large Heads and Roses background on the lid part in Tuxedo Black Memento ink a few times to cover the entire area and the large Spiderwebs background on the back and all the sides.  I coloured the Heads and Roses image with Copics and then cut out all the panels and adhered them to the box with Scotch Quick Dry adhesive, trimmed away any excess overlap and then applied Tea Dye, Aged Mahogany and Black Soot Distress Inks to the entire piece with foam ink applicators.  I then reassembled the box and got to work on the 3D lid decoration.

First, I embellished the lid front and the back with a large self-adhesive design in black jewels by Recollections.  I stamped the large Articulated Skeleton and the Rose Bud in Tuxedo Black Memento ink twice each onto white cardstock and coloured with Copics.  I then fussy cut out all the pieces, curved the skull, hands, rose bud and the leaves to enhance the 3D effect I was going for and assembled the pieces to form a skeleton hugging a rose to its chest and adhered everything to the lid with Quick Dry adhesive and pop dots.  I love how it turned out.


Thanks for stopping by to see my project today!

HAPPY HAUNTING!

 Leigh S-B

THE SHARPIE DOMINO QUEEN
I design for * Lost Coast Designs * Carmen's Veranda * The East Wind * Delicious Doodles *

Monday, September 16, 2013

"Haunted Within" Dark Etchings Altered Bird House + Smudgy Antics Embellishments Challenge!

Howzit Friends!  

The last couple of weeks I've been working on a series of artwork I've called Dark Etchings because they remind me of the etched prints I created as a Fine Art student.  

It's week 2 of Smudgy Antics current challenge "Use Embellishments" and my DT inspiration for you is an altered 'Dark Etching' bird house called "Haunted Within" which symbolizes being trapped by fear inside your own mind.

"Within" is one of Smeared Inks newest digital images.  My Dark Etchings so far were all rubber stamped and I'm creating the same 'faux etchning' look this time using digitally printed images instead.

Wednesday, April 10, 2013

"Bird Wings" Window Hanging for Blockheads

Hello Friends!
This month the Blockheads design team are featuring projects created with Grungeboard.  Last week I shared my faux metal scraps photo frame and this week I've been playing with Grungeboard Alphabets, Distress Stains and Crackle Paint, StazOn ink, Blockheads Bird stamps and recycled acetate!


My "Bird Wings" window hanging is sort of along the lines of a sun catcher except it is more of an art piece that allows you to still view the nature out the window through the acetate frame!

Thursday, April 4, 2013

Nightmare Fun House featuring new Smeared Ink digi images!

Hello Friends!
Today I'm excited to share my bizarre Nightmare Fun House with a scary attraction hidden inside so keep reading if you dare!  I've been a fan of Stephen King forever and my Fun House is something that would definitely mysteriously appear on the outskirts of Derry....dare to enter at your own peril haaaaahaaaaaa!


 I'm featuring some of Smeared Inks newest digi releases so if you like quirky and bizarre then you're going to want to check these out ;0)  I used images from two of their new releases.  Most are from the  Circus Procession set and I used the large mask collage image from the Venice set.  The Ring Mistress is from their Femdom set.


Wednesday, April 3, 2013

Industrial Grunge Photo Frame with Grungeboard Scraps

Hello Friends!

 Today I'm sharing an Industrial Grunge style photo frame I've created for Blockheads Paper Arts.  The Blockheads team are featuring Grungeboard this month so I went with a faux scrap metal look using scraps of Grungeboard and metallic Distress Stains. 


Monday, April 1, 2013

Colourful French Fairies with Smeared Ink!

Happy Monday Everyone!

We're now into the 2nd week of Smudgy Antics "Make It Colourful with a twist" challenge!  The twist is you can't use markers or pencils!  Of course there's plenty of ways to make your projects colourful and the Smeared Ink design team has you covered with some fantastic ideas and here's mine using Distress Stains and transparencies!


Saturday, March 17, 2012

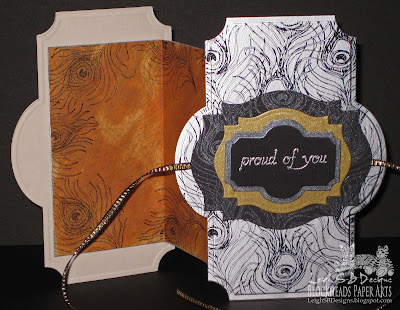
"Proud Of You" Art Deco Accordion Card!

Hello Bloggers!

 Over the last few days we've (the Blockheads Design Team) been sharing our 'Different Points of View' in celebration of the launch of the "Proud As A Peacock" stamp set!  It's a horrible wet and wintery day here in San Diego and I'm so happy I'm indoors and sharing my 3rd Peacock inspired
project that has an Art Deco feel to it and this one also features a stamp from Blockheads "Botanical Silhouettes" set which launched last week!

"Proud of You" Art Deco Accordion Card

Click on the pics below of my first two projects if you missed them:  
"Twilight Serenade" and "We're So Proud"

"Proud As A Peacock"
"Botanical Silhouettes" 

Sunday, November 20, 2011

"Santa's Key" Christmas Card featuring the Sanded Colour Block Technique! Join us for a Blockheads Technique Challenge Blog Hop!

Hi Everyone!


I've been gone a while coz I had abdominal surgery on Nov 12.   I'm okay and recovering nicely and finally getting around to letting you all know about a fun series of Technique Challenges that we've started with Blockheads Paper Arts!  The first challenge has begun already (on Nov 17th) but you've still got plenty of time to join the fun!

The first Challenge technique is called "Sanded Colour Block".  
To take the Challenge visit the Distress Stain Sanded Colour Block Technique Page at Blockheads Paper Arts and create your own "Sanded Colour Block" project.  The card I'm sharing today features the technique!

For this series of challenges we're trying a different kind of Blog Hop by providing you with html code to include in your project blog post!  This way any one can join in the Hop and by including the code in your post it will automatically link you up with everyone else taking part in the Hop!  How cool is that ;0)  The code is at the bottom of this post!

Once you've posted your project featuring the "Sanded Colour Block" technique on your blog please pop on over to the Blockheads Blog and add your blog post URL link via the linkie button.  You will then be in the running for an awesome prize!  The Blockheads Design Team, that's me, Karen and some new members yet to be announced) will then select a winner who will receive a $25 Blockheads gift certificate...Woohoo!  Awesome right, so I hope you'll join the fun!  Don't forget to include
Here's my card I made using the featured Challenge technique "Sanded Colour Block".
The Santa Face, Snowflakes and Christmas sentiment stamps I used are exclusive Blockheads Paper Arts images from their new An Illustrated Christmas and Christmas Morning sets! 

Santa's Key
 

You will need the following materials to do this technique:
Any brand of Embossing Folder like Cuttlebug or Tim Holtz' Texture Fades
Bone Folder or some kind of burnishing tool
Sand Paper
Glossy Cardstock
One or more colours of either Distress Stains or Distress Inks (or both if you want)
Masking/painter's tape
Rubber stamps to complete your project

I decided to try the Technique out on the Christmas words embossing folder by Cuttlebug and created the colour blocking effect by masking each section with painter's tape.  I used Distress Stains:  Bundled Sage, Stormy Sky, Fired Brick and Tea Dye.  I didn't burnish my painter's tape enough on the 'Holidays' block and had some bleed into the neighbouring blocks but I wasn't worried coz I decided that's where my ribbon would go to cover up the 'mistake'.  I tried to fix it but didn't like the darker lines that I ended up with.  The painter's tape also peeled off some of the top layer in places too coz I burnished too much but that didn't bother me either coz I was going for a distressed effect for my card anyway and most is hidden by the bow too.


 I trimmed the "Sanded Colour Block" panel and distressed the edges with a Tim Holtz Distress tool and applied Vintage Photo Distress Ink to the edges with an Ink Blending tool.


Cut a mat for the "Sanded Colour Block" panel from brown cardstock and emboss it with a snowflake Cuttlebug embossing folder and distress the edges with the Distress tool.  Apply Fired Brick Distress Ink to just the embossed areas and to the edges of the mat.


Adhere the "Sanded Colour Block" panel to the mat with permanent adhesive tape just to hold it in place.  Run the panels through a sewing machine without thread to punch the holes and then hand stitch the panels together with red thread.  You can sew the card on your machine if you want to put I didn't have a bobbin set up with red thread and didn't feel like getting one ready ;0)


Adhere the snowflake ribbon (Michaels) to the panels with double-sided tape and attach a Tim Holtz Idea-ology charm clip to the ribbon before sticking it down. 


Die cut a tiny tag with a Cuttlebug die cut from cream cardstock and a mat slightly larger from brown cardstock.  Distress the edges on the both with the Distress tool and hand write 'Dear Santa' in a kid's handwriting style with a red Prismacolor pencil.


 Apply Fired Brick Distress Ink to both and adhere the tag to the mat with permanent adhesive tape.  Attach the tag and the key charm to the charm clip with a large jump ring.


Stamp the Santa Face onto Neenah Solar White cardstock with Rich Cocoa Memento ink.  Tear the edges of the stamped image to continue with the distressed look.


Colour Santa with Marvy Le Plume Permanent markers or Copics except for the berries.  I coloured them with a dark red Prismacolor pencil and added highlights with a white gel pen.  Apply Judikins Diamond Glaze to just the berries and holly to add some dimension to the image.

I'm very excited to let you know that later this week I'll be sharing a Marvy Le Plume Permanent marker tutorial called "How to Colour A Vintage Santa" over on the Blockheads Blog.  The step-by-step photos will show exactly how I coloured my Santa.  I'll let you know when the tutorial is up so stay tuned for that ;0)


Apply Tea Dye Distess Ink to age and distress the Santa image.  Adhere the image to the front of the card with double-side tape then adhere the bow with a glue dot.  Gather up the ribbon tails and adhere in place with glue dots too.  Embellish the left side of the card with amber self-adhesive rhinestones.


Make a folded card from cream cardstock and stamp the snowflake design around the outer edges on the front of the card and all over the back of the card with Fired Brick Distress Ink and distress the edges with the same ink.  Do the same to the inside of the card too!


For the inside of my card I stamped the Christmas sentiment onto a piece of matching cardstock in Fired Brick Distress Ink and trimmed and distressed it.  Cut a slightly larger mat from brown cardstock and distress the edges too.  Then apply Fired Brick Distress Ink to all the edges.  Adhere the sentiment to the mat with permanent adhesive tape and adhere it inside the card with tape too. 


Here's some more photos of my finished card!


That was a really fun technique to do.  I also tried it out on another brand of glossy cardstock which didn't sand so well but still produced an interesting background for a future card ;0)


I hope you enjoyed seeing my project and are inspired to give it a try.  Then come and join the Challenge Blog Hop for a chance to win the $25 Blockheads gift certificate!  Remember to include the html code in your blog post coz links added to the Blockheads Blog without the code will be removed, so don't forget!

I can't wait to see your projects and good luck ;0)

I've entered this card into Challenge #9 - I'm Dreaming of a White Christmas at Fashionable Stamping Challenges


Happy Stamping!

THE SHARPIE DOMINO QUEEN
I design for Blockheads Paper Arts * Third Coast Rubber Stamps * About Art Accents

Wednesday, November 9, 2011

"Say Oink Oink If You're Thankful for Football!" A Blockheads DT Project!

Howzit Stampers!
It's nearly time for the big Thanksgiving game!  Do you need some card inspiration for the guys in your life?  Will a Thanksgiving card that involves Football score a touchdown for you?  Then I've got a manly Thanksgiving card to share with you ;0)


I designed this little cutie just for the guys and used the Pumpkin digi stamp and Naughty Pig rubber stamp available exclusively from Blockheads Paper Arts.

NAUGHTY PETS

SUPPLIES
White and Black cardstock
Neenah Solar White cardstock
Tim Holtz Alterations Pocket Watches and Steampunk Texture Fades set
Memento Tuxedo Black ink pad
Distress Ink Pads:  Fired Brick and Vintage Photo
Tea Dye Distress Stain
Black Micron pen
Marvy Le Plume Permanent Markers:
O835, R812, R803, OY848, E858 and E859
Orange Watercolour pencil
Turquoise Prismacolor pencil
Dove Blender Pen
Pencil
Tim Holtz Distress Tool
Inkssentials Ink Blending Tool and Foam pads
Tiny Black brads and tiny hole punch
Spellbinders Square dies
Black pop dots
Double Sided tape
Raffia
Painter's Tape/masking tape


Lay out 4 digi stamp Pumpkins and print them out onto white cardstock.  Die cut the panel out with a Spellbinders Square die.  Emboss the left hand side of the panel with Tim Holtz' Pocket Watch Texture Fade.


Decorate the two pumpkins on the right hand side with Tangle patterns.  Use a black Micron pen to draw and colour in the black areas and a pencil for the rest and for shading.  Use Orange (O835) Marvy Le Plume Permanent marker to colour in some of the Tangled areas and sections of the pumpkins on the left hand side too.  I used the following more masculine patterns on the top pumpkin:  Baton, Barbershop and Boomerangs.  On the bottom pumpkin:  Boomerangs, Ambler and Jonqal.  No floral swirly whirls for the guys ;0)


Mask off the embossed side with painters tape and apply Vintage Photo Distress Ink to the panel with an Ink Blending tool.  Remove the tape and mask off the stained side and apply Tea Dye Distress Stain directly to the cardstock in a random fashion.  Leave areas of white and apply more Tea Dye Stain with a piece of paper towel so that some areas aren't as saturated.  Apply Fired Brick Distress Ink to the just the embossed areas with a Ink Blending tool and remove the masking tape.


Rough up the edges of the panel with a Tim Holtz Distressing Tool and ink up the distressed edges with Fired Brick Distress ink.  Add more pencil shading to the Tangled pumpkins.  Punch tiny holes into all 4 corners and add tiny matte black brads.  Wrap raffia around the panel along the dividing line and adhere in place with double sided tape.


Stamp the Naughty Pig from the Naughty Pets collection onto Neenah Solar White cardstock with Memento Tuxedo Black ink.  Die cut out the panel with a Square Spellbinders die and a slightly larger square from black cardstock.  Colour in the image with Marvy Le Plume Permanent markers.  Pig:  R812 and R803, Football:  OY848, E858 and E859.  Colour the eyes with a Turquoise Prismacolor pencil and add background to the image with an Orange Watercolour pencil and blend with a Dove Blender Pen.  Roughen up the edges on both the panel and the black mat with the Distress tool and apply Fired Brick Distress Ink with the Ink Blending tool.  Adhere the image panel to the mat with double sided tape.  Punch tiny holes in all 4 corners and add tiny brads.


Make a folded card from black cardstock and adhere the large panel to it with double sided tape.
Adhere the Naughty Pig to the card with black pop dots.  Finished!  A manly mans Thanksgiving card that will surely delight the guy in your life, and if not, oh well at least you tried, right ;0)

This little cutie fits the bill for this weeks Fall/Winter Challenge over at Mark's Finest Papers!

Christmas is coming!  Christmas is coming!
Stay tuned coz I'm going to be getting all wintery with lots of seasonal creations!!!

My team mate, Karen, has already started getting into the Christmas spirit so hop on over to her blog for a look see!

Design Team Call for Blockheads Paper Arts!
We're looking for 3 creative artists to join our amazing Design Team! 

Get the scoop on the DT details here!
Happy Stamping!

THE SHARPIE DOMINO QUEEN
I design for Blockheads Paper Arts * Third Coast Rubber Stamps * About Art Accents

Monday, November 7, 2011

Holiday Beverage Sleeve and matching Gift Card Holder for Feline Lovers - A Third Coast Creative Coterie Creation!

Howzit Stampers!

Winter definitely arrived over the weekend down here in San Diego with lots of rain...bbbrrr!
The inspiration for this Holiday Beverage Sleeve and matching Gift Card Holder came to me while savoring my first Eggnog latte of the season, oh yeah!


My kitty winter themed combo creation would be perfect as gifts for feline loving co-works, friends and family!  I used the quirky little cat image called Mini Me (ES-200-I) by Third Coast Rubber Stamps as the star of the show and a Snowflake Cuttlebug Embossing Folder for the rest.


Stamp the Mini Me kitty twice onto white cardstock with Memento Tuxedo Black ink.  Trim one by closely following the outline of the image and die cut out the second with a small Spellbinders Label 8 die.   Emboss both kitties with the Snowflake design and paint the debossed areas with Distress Stain Stormy Sky and the little kitty with Distress Stain Bundled Sage.  


Apply more Stormy Sky to the background of the 2nd image to make it darker.  Drybrush over the embossed snowflakes on both kitties with white acrylic paint to highlight them.  Draw over the stamped lines where needed with a black Sharpie to make the image stand out again.  Add a magical and wintery sparkle to both with a light misting of Vanilla Shimmer Smooch Spritz.  Edge the die cut one with a black Sharpie marker.


Adhere the cut out kitty to a blueish-sage piece of paper with a glue stick and trim.  For the second kitty die cut a slightly larger mat from the blue-sage paper and adhere it to the paper mat.  


Die cut two slightly larger Spellbinders Label 8 mats from metallic blue cardstock and distress the edges on both with white acrylic paint.  


To make the Belly Band for the Gift Card holder sandwich a length of "Let It Snow" silk ribbon (Michaels) between the kitty panel and the metallic mat as shown.  Adhere the mats together with the ribbon in place with Crafter's Pick The Ultimate glue.  Trim the ends of the ribbon into dove tail points.


Use a beverage sleeve as a template and cut a piece of white cardstock slightly larger.  Run the piece through a Xyron to add permanent adhesive and adhere it to a sheet of the same blue-sage paper.  Emboss the snowflake design into the panel.  Apply Stormy Sky Distress Stain directly to the cardstock in a random fashion so that some areas are more saturated than others.  Apply a small amount of Distress Stain Bundled Sage for a variegated effect and allow to dry.  Run the cardstock through a Xyron again and adhere it to the original cardboard beverage sleeve. Trim away the excess cardstock and drybrush over the embossed snowflakes and the edges of the sleeve with white acrylic paint.  Spritz the sleeve with Vanilla Shimmer Smooch Spritz.  


Adhere another piece of the "Let It Snow" ribbon around the center of the sleeve with a glue stick.  Overlap the ends of the sleeve and adhere together with The Ultimate glue.  To complete the Beverage Sleeve adhere the kitty panel to the front with TU glue.


Now for the Gift Card Holder.
I made a template based on a standard gift card and traced the shape onto a piece of white cardstock. Run it through a Xyron to add permanent adhesive.  


Adhere the panel to the same blue-sage paper and and score and crease two folds to form the flaps.  Cut 4 notches into the center section with an Xacto knife - this is where the gift card will sit.  


Emboss the panel with the snowflake design and cut out the Gift Card Holder.  Apply the same colour treatment to the Holder as I described above for the Beverage Sleeve.  


Complete the Gift Card Holder by inserting the gift card inside and securing the holder closed with the Kitty Belly Band and finish with a bow tied at the back.


I really had lots of fun creating this little combo gift set and now I'm ready for another Eggnog 
latte...hhmmm yummy ;0)

I'm entering my creations in the following Challenges:
Fall/Winter Challenge over at Mark's Finest Papers
Wee Memories Challenge #75 WMC75
Happy Stamping!

THE SHARPIE DOMINO QUEEN
I design for Blockheads Paper Arts * Third Coast Rubber Stamps * About Art Accents