July CREATivities
The Summer BUZZ Collection
Re-Release Sale-bration thru July 19!
The Gilded Raven Release!
"Rocky Mountain Christmas"
Winter 2025 Collection
Adopt all the Loveleigh Kitties, they're PURRfect for every occasion!
Showing posts with label 3rd Coast Creative Coterie. Show all posts

Friday, June 8, 2012

'Melia Amulet' Bendomino Necklace Published in Altered Arts Magazine...a 3rd Coast Creative Coterie project!

Happy Friday Everyone!


I'm very pleased to finally be able to share my altered bendomino necklace that was published in Altered Arts Winter 2011-12 issue with you all and also share the news that I'm on Third Coast Rubber Stamps Creative Coterie again this year, woohoo ;0)

Before you dash over to DominoART to check out my tutorial I just want to quickly remind you all that I've got a DominoART design team call going on at the moment!  I've got 2 wonderful DominoARTists signed up already and will be introducing them very soon so stay tuned for that!  All the DT info is here if you're interested in becoming a DominoARTist too! 

Please stop by my DominoART blog for the full tutorial on how to create this eye-catching necklace featuring my signature "Sharpie Domino Queen" technique!

Stamps used are available from Third Coast Rubber Stamps
VB-011-K Melia Mermaid
VB-013-G Seashorse 


Happy Stamping!
 THE SHARPIE DOMINO QUEEN
I design for Blockheads Paper Arts * Third Coast Rubber Stamps * About Art Accents

Wednesday, December 28, 2011

Ice Roses And Holly - A Winter Card for the Holidays designed for the 3CCC

Happy Holidays Everyone!

I hope Santa was good to everyone this year and you got lots of crafty goodness in your stockings ;0)
I'm on vacation at the moment and you are all probably super busy with your holiday festivities so I'm popping in today to share a quick project with you ;0)


The "Ice Roses and Holly" winter card I designed for the Third Coast Creative Coterie is really beautiful but it doesn't take ages to make so drop what you're doing and grab your supplies and get in a little stamping Me time!

Monday, December 12, 2011

"Percy On Ice" Removable Christmas Tree Ornament Card designed for the 3CCC!

Happy Rainy Monday!
It's pouring down outside so I'm in a winter mood today and thought I'd share this project I designed for the Third Coast Creative Coterie!


I also created this one with a special little someone in mind, Daniel my 4 yr old nephew ;0)  This is his Christmas card this year!  The ornament comes displayed on the card and then it's easily removed for hanging on the Christmas tree!  I think he'll love it, don't you :0)


Thursday, November 24, 2011

"Faera the Tiger Fairy" Fall & Winter Art Card - a Third Coast Creative Coterie project!

Happy Thanksgiving Everyone!

Today I'm sharing my non-traditional 'two seasons merged into one' Tiger Fairy art card designed for
Third Coast Rubber Stamps Creative Coterie!

Faera the Tiger Fairy

The Tiger Fairy is a very rare species but if you time it just right you might be lucky enough to catch a glimpse of one when they come out to play just as Fall turns into Winter!


I based my design on the colours of the gorgeous ribbon which represent the end of Fall and by including the Christmas Rose and Holly stamp as my background image I moved the design into Winter too!  I think this one would be perfect as a non-traditional Thanksgiving or Christmas card ;0)
 
The featured stamps are all from
Third Coast Rubber Stamps
Fairy Faera CH-717-H
Tiger Eyes lg CH-684-H
Christmas Rose and Holly DP-003-R


Stamp Fairy Faera onto Neenah Solar White cardstock with Tuxedo Black Memento ink and colour with Copic markers.  I used the following Copics:  Hair:  E11, 13, 15, Skin: E000, 00, 02, Wings: G000, GY11, Clothes: G21, 82 and 85.  Add tiger stripes to the fairy's clothing with a black Copic Multiliner.  Colour the background with Cedar Green Derwent Watercolour pencil and blend with a Dove Blender pen.  Add white highlights with a Gel pen.  Die cut the panel with a Spellbinders Label 8 die and apply Peeled Paint Distress Ink to the die cut edge with a Blending tool.  Use the same Spellbinder Label 8 die as a template and trace the shape onto copper cardstock, cut out and then adhere the Fairy panel to it with permanent adhesive tape.


Cut rectangle mats from olive green, dark lime green and copper cardstock.  Stamp the Tiger Eyes image with Tuxedo Black Memento ink onto the dark lime green panel and mask the eyes.  Stamp the rest of the panel with the Christmas Rose and Holly image multiple times in Ancient Page Leaf Green ink, masking each area before continuing.  Distress the edges of the panel with a Distress tool and then apply Peeled Paint Distress ink with a Blending tool.  Add highlights to the eyes with a white gel pen to make them really pop.  Adhere the Tiger Eyes panel to the copper mat and then to the olive green mat with permanent adhesive tape.

Cut a length of the gorgeous Ribbon that has velvety stripes (Michaels) and adhere it to the panel with double-sided tape and secure the ends to the back of the panel with tape too.  Adhere the entire layered panel to a black folded card blank.  Then adhere the Fairy panel to the front of the card with pop dots.  Die cut assorted Sizzix flourishes from the two green cardstocks and distress gently with Peeled Paint Distress Ink.  Adhere the flourishes to the card with small dabs of glue.
Embellish the card with 3 Recollections paper roses in 3 shades of green. 


I'm entering this card into the following challenges:
Challenge #14 Thanksgiving, Thank you or Sketch - Crafting for All Seasons Challenge Blog
Free For All with Creative Craft Challenges
Challenge #89 Anything Goes - One Stitch At a Time
Challenge #58 Anything Goes - Lollipop Crafts 
Challenge #71 Anything Goes - Fresh Brewed Designs
Challenge #68 Snow Angels - Use a Fairy or Angel - Wags n Whiskers Rubber Stamps
Flutter By Wednesdays #181 Butterfly/Fairy/Angel 

Enjoy your holiday weekend!
Happy Stamping!

THE SHARPIE DOMINO QUEEN
I design for Blockheads Paper Arts * Third Coast Rubber Stamps * About Art Accents

Monday, November 7, 2011

Holiday Beverage Sleeve and matching Gift Card Holder for Feline Lovers - A Third Coast Creative Coterie Creation!

Howzit Stampers!

Winter definitely arrived over the weekend down here in San Diego with lots of rain...bbbrrr!
The inspiration for this Holiday Beverage Sleeve and matching Gift Card Holder came to me while savoring my first Eggnog latte of the season, oh yeah!


My kitty winter themed combo creation would be perfect as gifts for feline loving co-works, friends and family!  I used the quirky little cat image called Mini Me (ES-200-I) by Third Coast Rubber Stamps as the star of the show and a Snowflake Cuttlebug Embossing Folder for the rest.


Stamp the Mini Me kitty twice onto white cardstock with Memento Tuxedo Black ink.  Trim one by closely following the outline of the image and die cut out the second with a small Spellbinders Label 8 die.   Emboss both kitties with the Snowflake design and paint the debossed areas with Distress Stain Stormy Sky and the little kitty with Distress Stain Bundled Sage.  


Apply more Stormy Sky to the background of the 2nd image to make it darker.  Drybrush over the embossed snowflakes on both kitties with white acrylic paint to highlight them.  Draw over the stamped lines where needed with a black Sharpie to make the image stand out again.  Add a magical and wintery sparkle to both with a light misting of Vanilla Shimmer Smooch Spritz.  Edge the die cut one with a black Sharpie marker.


Adhere the cut out kitty to a blueish-sage piece of paper with a glue stick and trim.  For the second kitty die cut a slightly larger mat from the blue-sage paper and adhere it to the paper mat.  


Die cut two slightly larger Spellbinders Label 8 mats from metallic blue cardstock and distress the edges on both with white acrylic paint.  


To make the Belly Band for the Gift Card holder sandwich a length of "Let It Snow" silk ribbon (Michaels) between the kitty panel and the metallic mat as shown.  Adhere the mats together with the ribbon in place with Crafter's Pick The Ultimate glue.  Trim the ends of the ribbon into dove tail points.


Use a beverage sleeve as a template and cut a piece of white cardstock slightly larger.  Run the piece through a Xyron to add permanent adhesive and adhere it to a sheet of the same blue-sage paper.  Emboss the snowflake design into the panel.  Apply Stormy Sky Distress Stain directly to the cardstock in a random fashion so that some areas are more saturated than others.  Apply a small amount of Distress Stain Bundled Sage for a variegated effect and allow to dry.  Run the cardstock through a Xyron again and adhere it to the original cardboard beverage sleeve. Trim away the excess cardstock and drybrush over the embossed snowflakes and the edges of the sleeve with white acrylic paint.  Spritz the sleeve with Vanilla Shimmer Smooch Spritz.  


Adhere another piece of the "Let It Snow" ribbon around the center of the sleeve with a glue stick.  Overlap the ends of the sleeve and adhere together with The Ultimate glue.  To complete the Beverage Sleeve adhere the kitty panel to the front with TU glue.


Now for the Gift Card Holder.
I made a template based on a standard gift card and traced the shape onto a piece of white cardstock. Run it through a Xyron to add permanent adhesive.  


Adhere the panel to the same blue-sage paper and and score and crease two folds to form the flaps.  Cut 4 notches into the center section with an Xacto knife - this is where the gift card will sit.  


Emboss the panel with the snowflake design and cut out the Gift Card Holder.  Apply the same colour treatment to the Holder as I described above for the Beverage Sleeve.  


Complete the Gift Card Holder by inserting the gift card inside and securing the holder closed with the Kitty Belly Band and finish with a bow tied at the back.


I really had lots of fun creating this little combo gift set and now I'm ready for another Eggnog 
latte...hhmmm yummy ;0)

I'm entering my creations in the following Challenges:
Fall/Winter Challenge over at Mark's Finest Papers
Wee Memories Challenge #75 WMC75
Happy Stamping!

THE SHARPIE DOMINO QUEEN
I design for Blockheads Paper Arts * Third Coast Rubber Stamps * About Art Accents

Monday, October 31, 2011

Kid's Treat Box Card featuring Third Coast Rubber Stamps!

The Trick or Treating continues with a definite treat in this case ;0)

Check out the Treat Box Card I designed for the Third Coast Creative Coterie design team that's perfect for kid's of all ages ;0)


I made this one especially for my 4 year old nephew, Daniel, and it went all the way to the UK and arrived in time and in one piece, phew! 

All the stamps used are by Third Coast Rubber Stamps:
AP-479-P Free Parking
AP-523 Broomstick Dog
VB-041-EE Happy Bat Sm


I stamped the scene onto white cardstock with a Tuxedo Black Memento ink pad and did all the colouring with Derwent Watercolour pencils and a Dove Blender pen.   I drew in the curvy trail line with a few scattered leaves to give the impression that the Broomstick Dog had just whooshed in then added highlights with a white gel pen.  I then distressed the edges of the panel with Black Soot Distress Ink.


I cut some panels from Halloween themed decorative paper and adhered them to the black folded card and mounted the panel onto the card with double-sided tape.


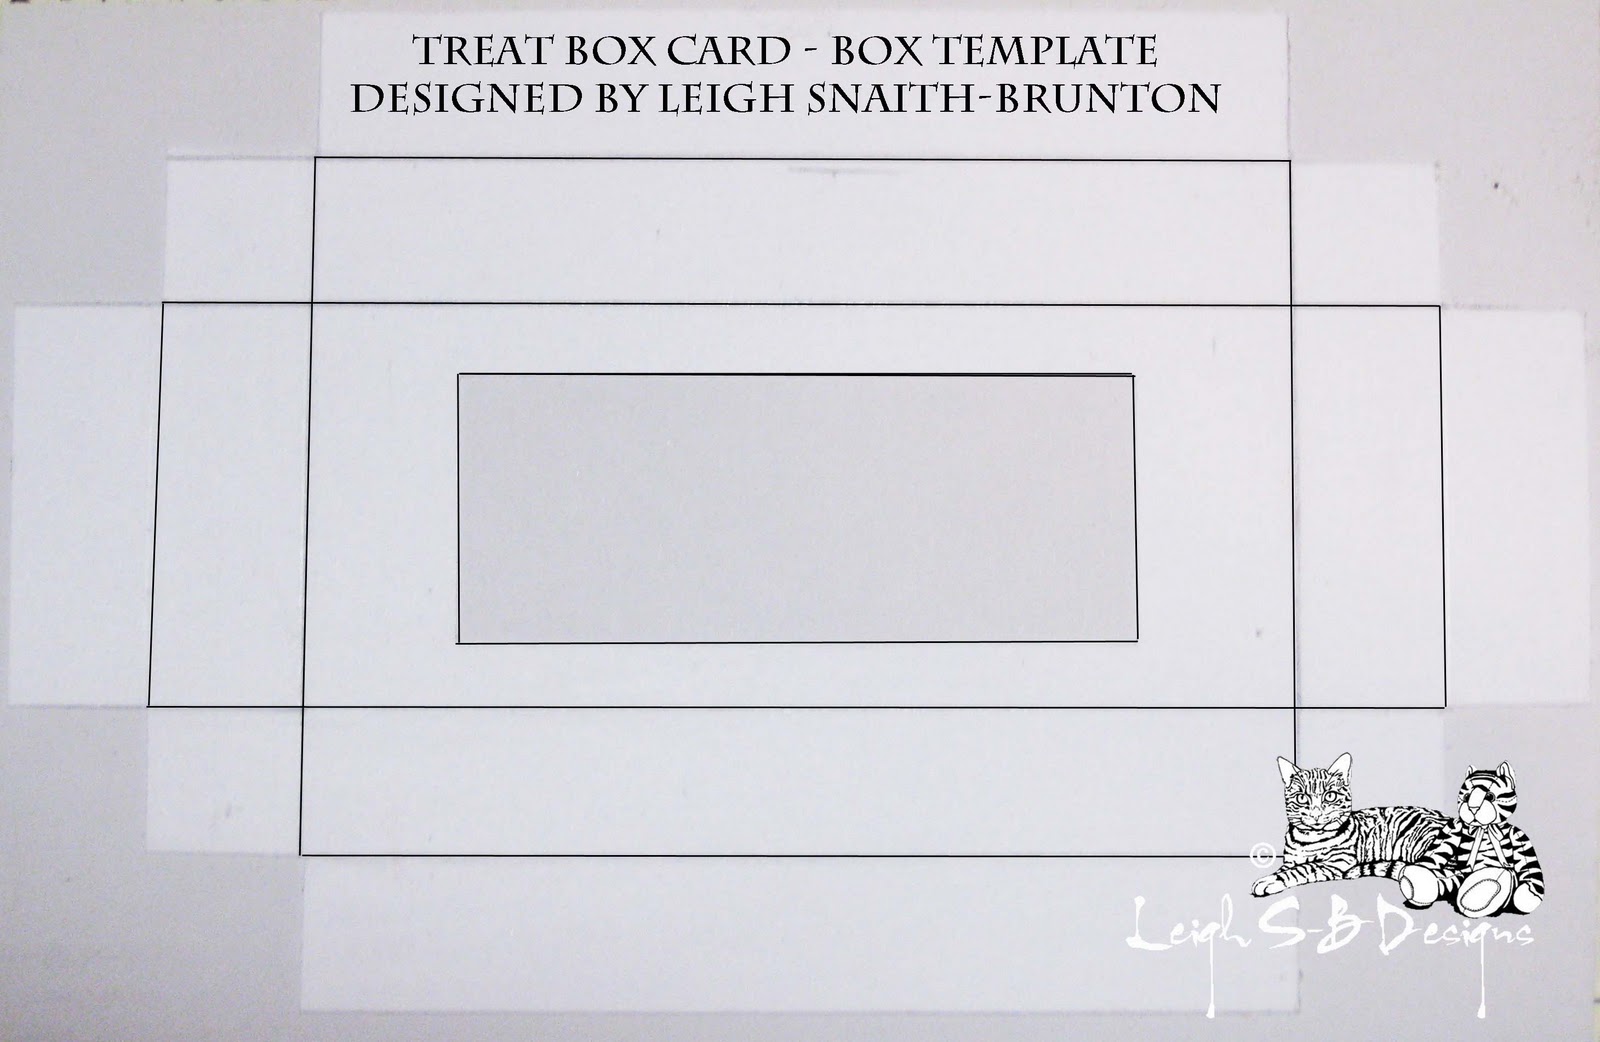
I then constructed a box for the treat based on the size of the actual chocolate from white cardstock which I then covered with the decorative spider web paper.


I cut an X slit in the window, trimmed the flaps, folded and adhered the flaps with a glue stick.


I then constructed the box and adhered the sections together with a glue stick. 


Only one side of the box can be opened to get the chocolate out so I drew in an arrow and wrote 'Open' on the side to be opened.  


I then adhered the treat box to the front of the card with double-sided tape and added the Martha Stewart Crafts self-adhesive bat border along the top of the card and the skulls border on both sides of the treat box.

After I took all my photos I decided to bling the card up a bit and made it more magical!  I added glitter glue around the edge of the stamped panel, edged the matte bats, edged the window on the treat box and also added glitter glue to the moon.  It was just the finishing touch that was needed ;0)

Thanks for joining me on this spooktacular Halloween night!
Sleep tight and don't let the boogie man bite ;0)

THE SHARPIE DOMINO QUEEN
I design for Blockheads Paper Arts * Third Coast Rubber Stamps * About Art Accents

The Finale of 31 Days of Halloween - "Keeper of Lost Souls" Super-sized Mixed Media Domino Sculpture!

Happy Halloween Everyone!

It's Day 31 of DominoART's Spooktacular 31 Days of Halloween extravaganza over on the DominoART Blog!

I hope everyone has enjoyed checking out all the DominoART eye-candy all month long!
It has been a real treat and I want to thank everyone for sharing their wonderful DominoART creations with us!  Each project is listed by day in the left hand sidebar if you've missed some projects.  Just click on the artist's name and the link will take you straight to the featured project!
Here's the grand finale creation for Day 31 of Halloween by me!

The Keeper Of Lost Souls

The Keeper of Lost Souls is a Nature Goddess and she protects the souls of people who have left this world but they're missing and are still waiting to be found by their loved ones.
   
This is an eerie mixed media sculpture that incorporates a skeleton with an altered super-sized domino and is a Third Coast Creative Coterie design team project.

I used a portion of the gorgeous rubber stamp image called Bromberrie's Web (VW-019-N) available from Third Coast Rubber Stamps which can be found in the Summer 2006 catalog.  
Isn't she stunning!!


Hop on your broomsticks and dash on over to the DominoART Blog to see all the details and photos for this project!
Best Witches and Happy Stamping!


THE SHARPIE DOMINO QUEEN
I design for Blockheads Paper Arts * Third Coast Rubber Stamps * About Art Accents

Saturday, October 22, 2011

'Winter Dragon' Domino Pendant - A Third Coast Creative Coterie Project!

Happy Saturday Everyone!

It's been quite chilly here in San Diego this week with lots of foggy mornings so I was inspired to share a wintery Third Coast Creative Coterie design team project with you today!

I designed a DominoART pendant featuring the gorgeous Dragon Orb (CH-696-H) rubber stamp by Third Coast Rubber Stamps.
I'm absolutely crazy for dragons and Third Coast has a large selection of gorgeous dragons to choose from ;0)

Winter Dragon
DominoART Pendant

I used my signature 'Sharpie Domino Queen' Technique to alter the domino so no surface preparation was needed and I stamped the image directly onto the shiny standard sized domino with Coal Black Ancient Page dye ink and heat set with my favourite heat gun called the Heat It.  I coloured the dragon and the background (upper and lower left side of the domino) with a combination of Ocean Blue and Sky Blue Sharpie markers.  I used Purple and Lilac to colour the details on the dragon and the orb in the background.


I painted the large orb on the upper right of the design with purple pearlescent glass paint and used an extra-fine point metallic silver paint pen on the tiny orb the dragon is clutching in its right claw.  I then used Stickles glitter glue to create the magical wintery crystal orb the dragon is holding in its left claw.  I love how the orb glows and sparkles!  I highlighted the dragon's eyes with an extra-fine gold paint pen to give the impression that the dragon's eyes are reflecting the glow from the crystal orb.  I then edged the domino with a broad point metallic silver paint pen.  Once everything was dry I applied a coat of Judikins Diamond Glaze.


I then fashioned a bale from metallic midnight/cobalt blue wire and free-form wrapped the wire around the domino so that it was encased inside the wire 'cage'.  I curled the one end to mirror the curl of the dragon's tail and also mirrored the curve of the orb in the background where the wire wrapped around the domino.


On the back of the domino I looped the wire to form the bale and hooked the other end of the wire beneath the back section.  Once the wire was snug against the domino I applied a small amount of Judikins Diamond Glaze beneath the curled wire end on the front of the domino so that it would adhere to the domino and further secure the wire in place.

I finished off my necklace with a turquoise velvet cord with a silver lobster claw clasp.

Have a great weekend!
Happy Stamping!

THE SHARPIE DOMINO QUEEN

I design for Blockheads Paper Arts * Third Coast Rubber Stamps * About Art Accents

Monday, October 3, 2011

The Tale of the Naughty Witch Who Cast A Spell - A Third Coast Creative Coterie project!

Hello Everyone!
Let me tell you a little story about how this card came about!


This is the Tale of the Naughty Witch who cast a Spell...for Personal Gain....gasp!
Tired of paying for parking every where she went she decided to conjure up a special tree where she could park her broomstick for free and invited all her friends to use it!  But...oh no...how could this spell go horribly wrong you are wondering coz everyone knows when a good witch casts a spell for personal gain it always backfires on her!
What happened you ask?  Well let me tell you...the tree picked up it's roots and stalked off with all her friends broomsticks and she ended up having to replace them all...oh the horror of it!
Giggle, I couldn't resist a bit of silliness ;0)


The cute little Witch and Tree are available from Third Coast Rubber Stamps:
Witchy Sprite VB-038-I
Free Parking AP-479-P

Supplies
Best Witches sentiment - Inkadinkado
Peach, Purple, Metallic Blue cardstocks
Neenah Solar White Cardstock
Recollections Flourish Paper Border
Memento Tuxedo Black ink pad
Copic Sketch markers:
Witch:  BG07, YR02, BV13, 110 and E19
Sky:  C3 and 5, Blender Pen
Grass:  G21, 24 and 28
Tree and Brooms:  E02, 09, 11, 15, 18, 41 and 49
Copic Black Multi-liner and White Gelly Roll Pen, metallic silver paint pen
Prismacolor pencils: Cream, Aquamarine, Pink, Scarlet Lake
Glitter Glue, Judikins Diamond Glaze
Purple Silk Ribbon
Spellbinders dies:  Deckle Rectangles, Circle, Lace Circle
Martha Stewart Deep Edge Lattice punch
Paper Trimmer and Scoreboard
Pop Dots and Glue Dots, Permanent Adhesive Tape, Xyron permanent adhesive


I started off by stamping all the images with Memento Tuxedo Black ink on Neenah solar white cardstock that's suitable for Copic markers.  I used a Copic Multi-liner to draw in the same landscape details found in the Free Parking stamp behind the Witch and continued the little magic star-bursts from the Witch image across to the Tree panel so that there is no doubt that the tree is magical.


I die cut the two main panels with Spellbinders Deckle Rectangles - a large standard rectangle for the Witch and a Mega large rectangle for the Tree and a Circle die for the sentiment.  I coloured everything with Copic markers but used Prismacolor pencils to colour the Witch's face, neck and hands.  I added white highlights with a Jelly Roll pen and applied a coat of Judikins Diamond Glaze to the tree and broomsticks for dimension and to make it look all sparkly and new.  I added even more sparkle to all the star-bursts and edged all the panels with glitter glue.
 

 I then die cut a slightly larger circle die mat for the sentiment and larger Deckle mats for the two main panels out of the gorgeous metallic blue cardstock and a Lace Circle mat out of purple cardstock.  I also punched the Lattice trim with a Martha Stewart Deep Edge Punch out of the purple cardstock and applied glitter glue to the Lace loops on both the trim and the Lace Circle mat. 
I used permanent adhesive tape to layer all the mats and panels and ran the Lattice Trim through my Xyron to add permanent adhesive and adhered all the pieces including the grey Flourish Border and purple satin ribbon to a folded card made from peach cardstock.  I completed my magical Halloween card with a purple satin ribbon.


Thanks for stopping by my blog today and checking out my 3CCC project!  For more Third Coast inspiration pop on over to the 3CCC Blog where my fellow Creative Coterie Design Team members are sharing their Halloween themed cards too!


I'm also hosting a spooktacular 31 Days of Halloween event over on my DominoART blog!  Hop onto your broomsticks and go and check out all the Halloween eye-candy we'll be sharing all month long!

Happy Halloween Stamping!

THE SHARPIE DOMINO QUEEN
I design for Blockheads Paper Arts, Third Coast Rubber Stamps and About Art Accent

Saturday, September 17, 2011

Trick or Treat DominoART ATCs - A Third Coast Creative Coterie DT Project

Howzit Stampers!


Halloween is coming and I've been scaring up a storm in my studio!  I'm thrilled to share these double trouble DominoART ATCs with you today!  I designed these for Third Coast Rubber Stamps as a proud member of their Third Coast Creative Coterie design team.  We have our own Blog now so go check out all the spooktacular eye candy :0)

SUPPLIES
All the stamps I used are available from Third Coast Rubber Stamps
Free Parking AP-479-P
Spider Web AP-522
Broomstick Dog Ap-523
Cat from the Scary Hairy Girl Duo VB-321-P
Happy Bat sm VB-041-EE
Tree of Dread sm VB-054-C
Boo S. Postal Service WS-146-D
Sizzix Bigz Die Trick or Treat 
Standard Double 6 White Dominoes
Black glitter cardstock
Green Glitter Jelly Roll Pen
DCWV Old World Mat Stack Decorative Cardstock
Strathmore Bristol Vellum Surface ATC blanks
White Prismacolor pencil
Versafine Onyx Black ink pad
Ancient Page Coal Black and Mandarin ink pads
ColorBox Fluid Chalks:  Wisteria, Lavender, Prussian Blue, Yellow Ochre
Sharpie Markers:  Orange, Leg Warmer Orange, Banana Clip Yellow, Stingray, Valley Girl Violet, Slate Grey, Brown, Coconut, Argyle Green, Jellie Pink
Sharpie Black Paint Pen - Oil Based Medium Point
Metallic Copper and Silver Paint Pens - Extra Fine Points
Judikins Diamond Glaze
Recollections Brads:  Black Fleur De Lis, Black Glitter Flourish, Tiny White Buttons
Micro Pop Dots, Glue Dots
Permanent Adhesive Tape
Heat It Embossing Tool


I started with the ATCs first and stained them with various inks using a combination of the DTP method (direct to paper) and applying the ink with a scrunched up piece of paper towel.  The Purple one is a combination of ColorBox Fluid Chalks:  Prussian Blue, Wisteria and Lavender.


The Yellow one is a combination of ColorBox Fluid Chalks:  Wisteria and Yellow Ochre with Ancient Page Mandarin.

I stamped all the images with Versafine Onyx Black ink and coloured in some of the images with a Black Sharpie coz I just wanted silhouettes instead of details for the backgrounds.  You can see I started colouring in the Happy Bats on the Yellow one above and coloured the broomstick handles on the Purple one.  I then added glitter details to both with a green glitter Jelly Roll pen.


Die cut the large Sizzix Trick or Treat saying from black glitter cardstock and adhere them to the ATCs with micro pop dots.  If you don't have these micro dots you NEED them, I don't know how I managed without them!!


Now for the dominoes.  I used 2 standard double 6, brand new straight out of the tin, dominoes for this project and coloured them using my signature Sharpie Domino Queen technique!  Check out all my Sharpie Tutorials here on my blog and also on my website, Velvet Paw Creations, for more info on how to do my technique.  I'm still in the middle of re-designing my entire website so some links aren't ready yet but you'll find those tutorials here on my blog too!


Stamp just the Moon portion of the Free Parking rubber stamp onto both dominoes with Ancient Page Coal Black dye ink.  Then stamp the Cat on one domino and the dog on the other and heat set the ink with an embossing tool, I'm a huge fan of the Heat It embossing tool.


Colour both dominoes with Sharpie markers, most of them are from the newest Limited Edition set called 80's Glam.  I used Orange, Leg Warmer Orange, Banana Clip Yellow, Jellie Pink and Argyle Green on the cat and Stingray and Valley Girl Violet on the sky and touched up some of the stamped image with a Black sharpie.


I used Orange, Leg Warmer Orange and Slate Grey on the sky.  Stingray, Valley Girl Violet and Argyle Green on the Witch Hat.  Brown, Coconut and Jellie Pink on the dog.  I coloured the sides of the both dominoes with a Black Sharpie oil-based paint pen and added silver metallic touches to both with an extra-fine point paint pen.  I then sealed both dominoes with a coat of Judikins Diamond Glaze.  I embellished the dominoes with a decorative brad at this point so that they would adhere to the dominoes as the glaze dried.  I used the Fleur De Lis on the dog and the Flourish on the cat.  Both are brads and I just cut off the brad arms.


While the dominoes dried I stamped the Boo Postal Service stamp on to a piece of DCWV patterned mat stock with Versafine Onyx Black ink and cut it out with scissors.  I then coloured the circle behind the ghost with the green glitter Jelly Roll pen and the ghost with a white Prismacolor pencil and attached it to the ATC with permanent adhesive tape.


I then adhered the dominoes to the ATCs with permanent glue dots.  I finished off the Trick ATC with 3 tiny white button brads on the left hand side. 

I hope you enjoyed checking out my DominoART ATCs and if you want to see more spooktacular DominoART eye candy then stop by my DominoART Blog for 31 Days of Halloween for a scary good time!  The fun starts Oct 1st of course  ;0)

Happy Stamping!
THE SHARPIE DOMINO QUEEN

I design for Blockheads Paper Arts * Third Coast Rubber Stamps * About Art Accents