News
The Summer BUZZ Collection
Re-Release Sale-bration thru July 19!
The Gilded Raven Release!
"Rocky Mountain Christmas"
Winter 2025 Collection
Adopt all the Loveleigh Kitties, they're PURRfect for every occasion!
Showing posts with label Cards. Show all posts

Saturday, July 1, 2017

Smeared Ink Reunion Blog Hop + LeighSBDesigns Art Stamps July New Release #1 - Tangled Rose Collage!

Howzit Stamping Friends!
Happy July 4th weekend to everyone in the USA!

 Today is a fabulous day coz fans of Smeared Ink are participating in a reunion blog hop, just like in the good old days!  Plus today is the first of LeighSBDesigns Art Stamps new releases for July, more coming tomorrow so don't forget to pop back in😊

Hop along the blog roll below today's projects for lots of Smeared Ink fabulousness!
I'm participating with 2 of my blogs today so stop by Velvet Paw Creations if you're not hopping with us to see my two Edgar Allan Poe themed ATCs😉

I made two projects to share here today!


 First up I'm sharing a Poe inspired card featuring Tangled Raven from the Autumn's Pencil rubber stamp set I designed for Smeared Ink and is now available as a digi stamp in my Etsy Boutique!  The "Nevermore" text is from Smeared Ink's Quoth The Raven rubber set.


 My next project celebrates Christmas in July Smeared Ink style...a Creepmas ATC featuring a portion of today's LeighSBDesigns new digi release - Tangled Rose Collage....also originally from my Autumn's Pencil rubber set and the Creepmas skellie is from Smeared Ink's Very Skelly Christmas rubber set.


Tangled Rose Collage is a whimsically dark and quirky collage of tangled designs.   There's eyeballs, blood drips, flowers with human teeth for petals combined with elegant tangled patterns and a large stylized rose, all of which make this collage stamp perfect as the main focus or background of your Half-O-Ween, Halloween and Creepmas creations or for those in between projects when you just feel like creating creeptastic dark art😋

https://www.etsy.com/listing/526259948/tangled-rose-collage-a-whimsically-dark?ref=shop_home_feat_1

Tangled Rose Collage is now available in my Etsy Boutique for a special intro price for a limited time!  See you again tomorrow for the next new release!


 Here's one of my favourite past Smeared Ink projects featuring Tangled Rose Collage!

Terra
Alison
Leigh - Velvet Paw Creations
Leigh SB Designs - you are here
Fiona
Shell
Kim
Kapree
Julia
​Val
​Dream In Darkness
​Ike
Kelli
Milo
Nan
Monique
Susan
Kristy

Thanks for stopping by to see my projects today, your next stop is Fiona!
Happy Stamping!
THE SHARPIE DOMINO QUEEN

Sunday, January 1, 2017

"Ride the Leaf" Inspirational project for The East Wind DT!

Happy New Year Everyone!
How many of you have declared your New Year resolutions already?   How about instead of saying you're turning over a new leaf this year and actually take that leaf and RIDE it into the New Year with a calm mind full of confidence and determination to succeed at everything you put your mind to in 2017!  Yeah!  Let's do this😉

UPDATE
Some changes are being made over at The East Wind so there isn't a January Challenge!  Stay tuned for more updates!

It's time for our first challenge of the year over at The East Wind and the theme for #70 is Anything Goes.  


Here's my inspirational project to get the new year rolling featuring our January Newsletter freebie digi called "Calm Mind" MAC0341.  I designed the layout in Photoshop CS6 and added some leaf flourishes taken from another TEW digi called, "Aurora, Kingdom of Kitties"
  
I printed out the design on Neenah solar white cardstock and coloured with Copics.
More project details to come ;0)

Come and join the fun at The East Wind...we have 2 blog challenges every month and fun challenges on on our TEW Facebook Group too!

http://www.theeastwind.com/
Thanks for stopping by to see my project today!
Happy Stamping!

 Leigh S-B

THE SHARPIE DOMINO QUEEN
I design for * Lost Coast Designs * Carmen's Veranda * The East Wind * Delicious Doodles *

Tuesday, May 31, 2016

Moongirl and Bird card for Dark Attic DT!

Howzit Everyone!
It's time for a new challenge over at Dark Attic Challenges where you can enter Anything Goes as long at it's creepy, dark or alternative in nature.  Our challenges always start on the LAST Tuesday of every month! 

  Our June challenge is sponsored by PPinky Dolls and Lacy Sunshine and my project today features a gorgeous digi called Moon Girl and Bird by


 I just adore PPinky Dolls whimsical and quirky digis and fell in love with their BJD dolls too, I'm going to be getting a redheaded Miko soon!  Isn't she adorbs!!!!!


 Now for my project!  I've been doing a lot of intricate 3D paper art lately involving a lot of fussy cutting but this digi has such a haunting quality to it that I decided to keep things clean and minimalist...not simple...coz I still did some fussy cutting and layering on this one.


 I coloured Moongirl and Bird using a stylus on my iPad in the art app called Paper 53.


I then printed her out onto Neenah solar white cardstock 3 times:  the first print was of the entire image, the 2nd print was just the girl and the bird and the 3rd print was just the bow.  Here's a photo of all the pieces I fussy cut out for this one...don't know why the colour went wrong in this photo but you get the idea. 


The elements were layered onto the image with a combo of pop dots and Quick Dry Adhesive.  I used lavender and black cardstock for the card mats and embellished the corners with decorative Spellbinders die cuts.


I completed my card with touches of shimmer and shine by applying Judikins Diamond Glaze to the girl's and the bird's eyes, Viva le Pearl 3D Magic Transparent White to the stars and the corner die cuts and clear Wink of Stella to the bow and the bird's wing.


 It was super hard to photograph all the subtle sparkle and shimmer so you'll have to trust me that it's really pretty in person ;0)


Thank you for stopping by today and I hope you'll come and play in our Dark Attic Challenges!
Before you go I'd like to remind you that I have 3 new Facebook Groups that you might like to check out if you're into Gothic or art genres ending in "-punk" and Egyptian inspired art!  Come and share your art with us!

Which covers everything from Steampunk to "insert-cool-historical-period-or-innovative-concept-here-punk"!

Happy Stamping!

Leigh S-B

 THE SHARPIE DOMINO QUEEN
I design for * Lost Coast Designs * Carmen's Veranda * Rick St Dennis EDT * Dark Attic Challenges *

Saturday, August 8, 2015

Memorial Hop for Lily Chilvers of Octopode Factory

Hello Everyone!

Today we are remembering Lily Chilvers a truly beautiful artist and soul taken from us too soon.
To honour Lily we are sharing projects we have made in her memory using the wonderful, whimsical and wacky art she shared with us all.


Today I'm sharing 2 notecards featuring Lily's quirky Alice with a Long Neck and Cheshire Cat and the matching verses.  I just adore these designs! More photos and deets are below the Blog Hop list.

Blog Hop List

Leigh Snaith-Brunton - you are here!


I designed the layout of my notecards in Photoshop CS6, the Cheshire Cat is ATC size (2.5 x 3.5") and the Alice is slightly longer than an ATC and printed them out onto white Neenah cardstock.  The images are coloured with Copic markers and the backgrounds coloured with a Derwent chalk pencil and blended with a Dove Blender pen.  Tea Dye Distress Ink was applied with a foam applicator and I applied Vive Pearl Magic Transparent White to small areas of each image to add a touch of magical sparkle.  Both panels were then mounted onto white folded cards with Scotch Quick Dry glue.

Thank you for hopping with me in loving memory of Lily and sharing your wonderful creations.
Lily will live forever in our hearts and in our art!  

Happy Stamping!
 THE SHARPIE DOMINO QUEEN
I design for Smeared Ink * Lost Coast Designs * Altered Eclectic Challenges * Forever Dark Challenges

Friday, May 15, 2015

"Putting the Pieces Back Together" Smeared and Smudged DT inspiration!

Hello Friends!
Today I'm sharing some Smeared and Smudged DT inspiration over on our Smudgy Antics Challenge blog.  The current challenge is Anything Goes and projects must always be dark and twisty.  Even though Smeared Ink has ceased trading as of May 5th 2015 we are still offering Smeared Ink prizes!  There's been some other changes to the challenge rules to give you more creative freedom too so pop on over and check it all out!

The digi image I'm featuring today is from the Other Side of Fear set and is one of the prizes up for grabs plus there's also a rubber stamp from SI ATC Letterbox set up for grabs too!

I've called this one "Putting the Pieces Back Together" after a broken heart so I assembled only some of the pieces and displayed the others in a partially fragmented pattern.


I printed out the image and then coloured her with Copics markers.  I adhered the white cardstock to black cardstock to give the image more weight before running it through my Cuttlebug and die cut out the jigsaw puzzle pieces.  I applied Fired Brick Distress Ink to all the puzzle edges and adhered them to the card front with Scotch Quick Dry adhesive.  The folded card was prepared with a mat cut from Valentine patterned paper which I toned down and darkened with Black Soot Distress Ink and I also applied the Fired Brick to the edges of the white card as well.


Thanks for stopping by and I hope you have a great weekend!  Also, don't forget to stop by DominoART and check out my 15 Days of Terror - Half-O-Ween in May scarefest currently underway!  There's lots of wicked altered game being shared all month long ;0)

Happy Stamping!
 THE SHARPIE DOMINO QUEEN
I design for Smeared Ink * Lost Coast Designs * Altered Eclectic Challenges *About Art Accents

Monday, March 2, 2015

Winter Raven - a Smeared Ink DT card

Happy Monday to you all!
It's a new week of a new month with a new Smudgy Antics challenge so here's my Smeared Ink DT inspiration for you!  Smudgy Antics challenges are always Anything Goes and the darker and twistier the better but we do welcome all sorts so come and play with us!

Winter Raven
A card featuring the Raven and portions of the tall and narrow border image from my Zentangled inspired exclusive Smeared Ink rubber stamp set, Autumn's Pencil.


I stamped the Raven twice onto Neenah Solar White cardstock in Tuxedo Black Memento ink and used Copic markers to colour them in shades of blue-green and touches of warm grey to add some shadows and his eye is yellow to enhance his piercing gaze.  I then fussy cut out the whole Raven and just the wings from the 2nd.  I left a narrow border around the Raven and coloured just that portion with brown Derwent Pastel pencil and blended with a Dove Blender pen.


I used a blank white folded card and ran just the front of the card through my Cuttlebug to emboss it with the floral design.  The embossing folder left a narrow border on the top and bottom so I stamped portions of the tall and narrow border stamp and coloured with the same Copic colours.  I then added a touch of Pumice Stone Distress Ink to enhance the embossed design.  I distressed the edges of the Raven, wings and the card and applied Black Soot Distress Ink to all the edges.  The Raven was adhered to the card with Scotch Quick Dry adhesive and the wings were first gently folded in the middle and adhered with dimensional silicone glue to give the impression the Raven is fluttering his wings.  I embellished the card with 3 smokey-grey self-adhesive pearls as my finishing touch.

Showing the fussy cut out Raven and layered 3D wings!
Thank you for visiting me today and before you go, just in case you didn't know, our Smeared and Smudged Forum has a new home on Facebook so stop by and join our new group where you can play in lots of themed challenges, swaps and blog hops galore too!

Have a great week and
Happy Stamping!
 THE SHARPIE DOMINO QUEEN
I design for Smeared Ink * Lost Coast Designs * Altered Eclectic Challenges *About Art Accents

Wednesday, November 2, 2011

"Tanglelicious Pumpkins" Thanksgiving inspiration featuring Blockheads New Digi Stamps!

Happy November Everyone!

Thanksgiving is a few short weeks away and I had fun today creating this card featuring Blockheads Paper Arts new digi stamps.  I used their Pumpkin and Happy Thanksgiving images and manipulated them in Photoshop.  I composed a scene of 3 pumpkins and altered their shape and size and changed the size of the sentiment digi stamp and printed both images out on Neenah Solar White cardstock.


TIP:  Don't be intimidated by the digital stamps!  You don't have to have fancy art editing software to be able to create and have fun with them.  You can print out the images in the sizes they come but if you want to alter them then look for free or shareware art software downloads on the web, there's quite a few available that will allow you to manipulate the size of digi stamps!

I decided to go with a black, white and orange colour scheme and used a black Micron pen and an orange Zig pen to draw the Tangle patterns on the pumpkins.  In the center segments of each pumpkin I drew organic 'living' tangles:  Growth, Pendrills and Scrawlz and Hollibaugh in all the other sections and alternated the sections between black and orange.  I used Black N910 and Orange O835 Marvy Le Plume Permanent markers to colour in all the areas and Ash Grey AG873 for shadows.


I used a Spellbinders Label 8 die as a template to make the Pumpkin panel coz the actual die was too big for what I wanted.   So I just shrunk the size down by moving the die around and tracing the shape to the size I needed and cut it out with scissors.  I then die cut another panel from Neenah Solar White cardstock with the largest Labels 8 die and created the striped Tangle border with the same three Le Plume Permanent markers.  Next I used the Pumpkin panel as a stencil and lightly traced the shape onto the larger panel and drew the shadow line with AG873 and AG875.  I edged both panels with a metallic gold paint pen and adhered the Pumpkin panel to the striped panel with permanent adhesive tape.


I adhered the panels to a black folded card blank and drew in the white free-form border with the new Marvy Le Plume Pigmented marker OP920.  I then coloured in the 'Happy Thanksgiving' sentiment with O835, created shadows with AG873 and 875, added highlights with a white gel pen and coloured in 'Happy' with an orange glitter gel pen.  I finished off by cutting out the sentiment and adhering it to the card with pop dots.

It's a simple layout for a highly detailed image that packs a punch and I'm really pleased with how this one turned out!

I've got another Thanksgiving inspired card to come that's just for the guys so stay tuned!

Thanks for visiting with me today and as always....Happy Stamping :0)


THE SHARPIE DOMINO QUEEN
I design for Blockheads Paper Arts * Third Coast Rubber Stamps * About Art Accents

Monday, October 31, 2011

Kid's Treat Box Card featuring Third Coast Rubber Stamps!

The Trick or Treating continues with a definite treat in this case ;0)

Check out the Treat Box Card I designed for the Third Coast Creative Coterie design team that's perfect for kid's of all ages ;0)


I made this one especially for my 4 year old nephew, Daniel, and it went all the way to the UK and arrived in time and in one piece, phew! 

All the stamps used are by Third Coast Rubber Stamps:
AP-479-P Free Parking
AP-523 Broomstick Dog
VB-041-EE Happy Bat Sm


I stamped the scene onto white cardstock with a Tuxedo Black Memento ink pad and did all the colouring with Derwent Watercolour pencils and a Dove Blender pen.   I drew in the curvy trail line with a few scattered leaves to give the impression that the Broomstick Dog had just whooshed in then added highlights with a white gel pen.  I then distressed the edges of the panel with Black Soot Distress Ink.


I cut some panels from Halloween themed decorative paper and adhered them to the black folded card and mounted the panel onto the card with double-sided tape.


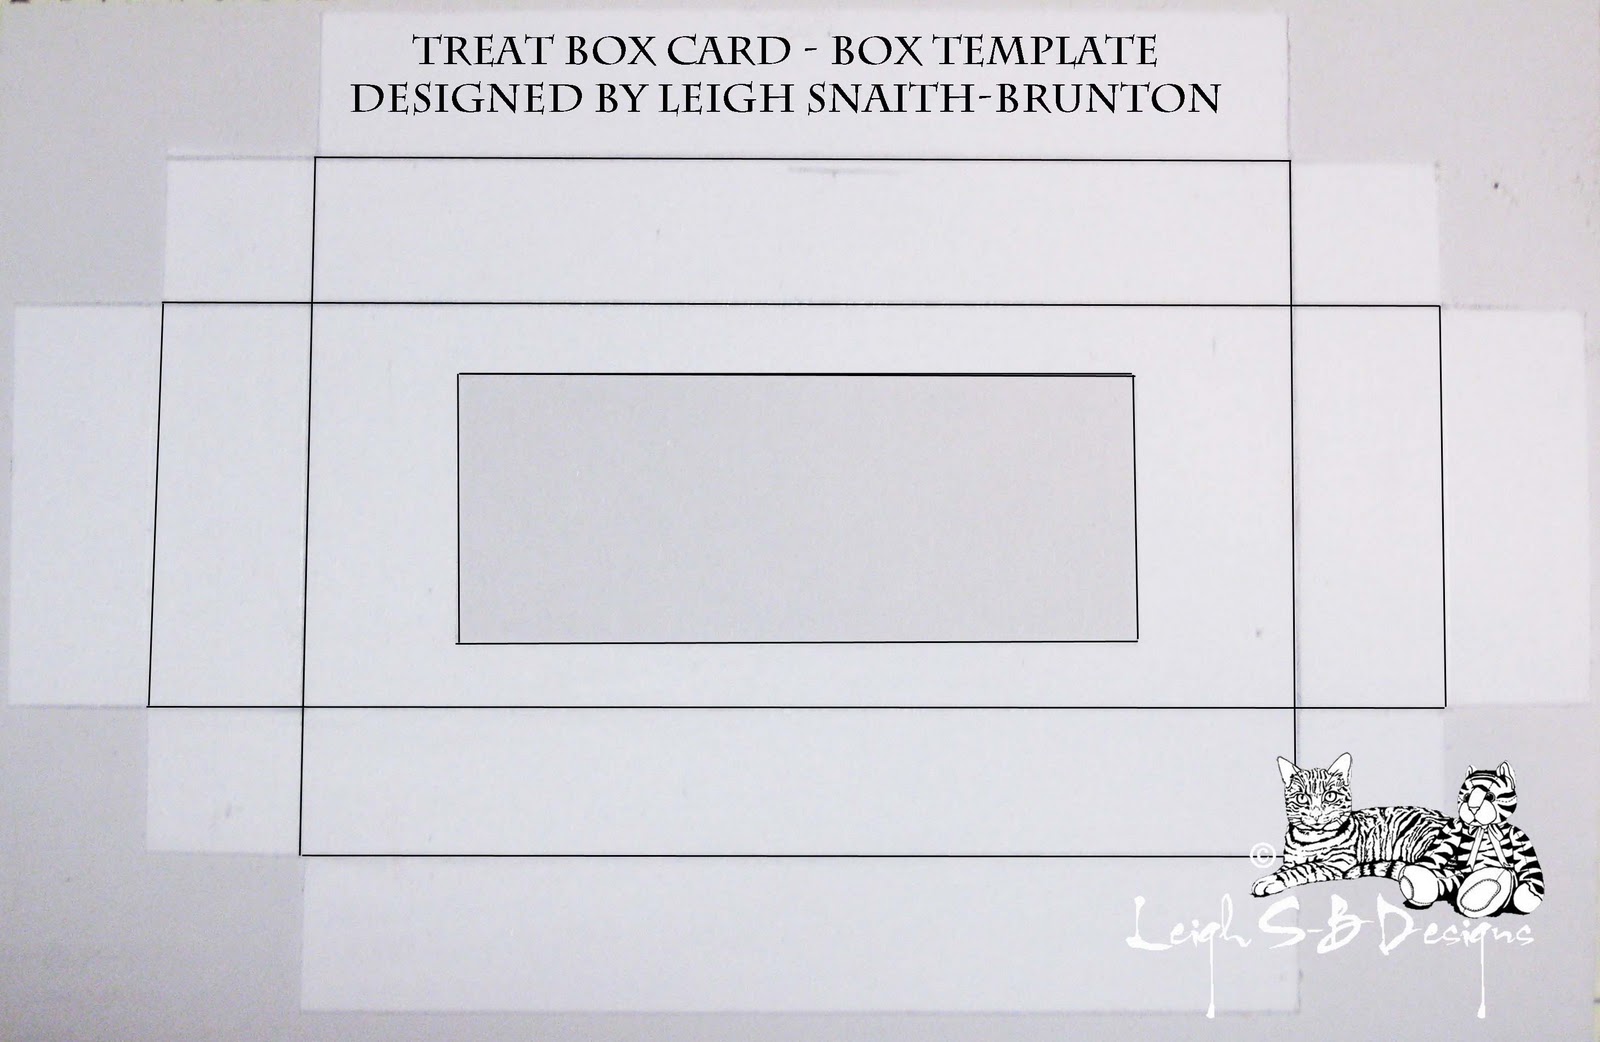
I then constructed a box for the treat based on the size of the actual chocolate from white cardstock which I then covered with the decorative spider web paper.


I cut an X slit in the window, trimmed the flaps, folded and adhered the flaps with a glue stick.


I then constructed the box and adhered the sections together with a glue stick. 


Only one side of the box can be opened to get the chocolate out so I drew in an arrow and wrote 'Open' on the side to be opened.  


I then adhered the treat box to the front of the card with double-sided tape and added the Martha Stewart Crafts self-adhesive bat border along the top of the card and the skulls border on both sides of the treat box.

After I took all my photos I decided to bling the card up a bit and made it more magical!  I added glitter glue around the edge of the stamped panel, edged the matte bats, edged the window on the treat box and also added glitter glue to the moon.  It was just the finishing touch that was needed ;0)

Thanks for joining me on this spooktacular Halloween night!
Sleep tight and don't let the boogie man bite ;0)

THE SHARPIE DOMINO QUEEN
I design for Blockheads Paper Arts * Third Coast Rubber Stamps * About Art Accents