Join us for our annual Edgar Allan Poe Appreciation Month & Mini Poe Hop!
 Play in our January Challenge!
Poe inspired Digi Stamp release!

December's Special Release Digi Stamp!
Festive Felines 2024 Christmas Release!

Tuesday, September 26, 2017

Tutorial Tuesdays: Oddleigh Witchiepoo time lapse Copic Colouring with Leigh!

Howzit Stamping Friends!
 WOW, can't believe it's Tuesday again already, time really does fly when you're having fun😆

lil Miss Oddleigh Witchiepoo coloured by Leigh

It's my turn to bring you


October is fast approaching and something wicked definitely this way comes so I've got a Copic time lapse speed colouring of lil Miss Oddleigh Witchiepoo for you today to get you in the Halloween mood😊


I had so much colouring her and you'll be seeing lots of wonderful projects featuring her during the upcoming annual 31 Days of Halloween blog hop, Oct 1-31!  Mark your calendars and join us!
FYI...I started with E40 on her skin!


I hope you enjoy my video and will add lil Miss Oddleigh Witchiepoo to your collections today....she's on FLASH SALE for one day only so snap her up quick!
Sale ends 9/27 at noon PDT!


I used the following Copic markers:
Skin
E40, 41, 42, 43 and YG00
Eyes
BG45 and 49
Lips
R22, 24, 27 and 59
Hair and Eyebrows
BV01, 02, 13, W1, 5, 7 and 9
Hat
Black 100, W5, 7, 9, YG00, 03, G07, Y13, 15, 17, 38 and 0 colourless blender
Top
YG00, 03, G07 and W5
Skirt
BV01, 02, 13, W5 and 0 colourless blender
Belt
BG45 and 49
Stockings
 YG00, 03, G07, BG45, 49, R22, 24, 27 and 59
Shoes
Black 100, W5, 7, 9, BV01 and R22
Broomstick
Y13, 15, 17, 38, E 17, 18
Finishing highlights
Copic Opaque White paint
 
Thanks for stopping by to see my video tutorial today!
Give me a thumbs up if you enjoyed it and subscribe to my YouTube channel for more creative adventures😊

Happy Stamping!
THE SHARPIE DOMINO QUEEN

Tuesday, September 19, 2017

Tutorial Tuesdays: "Sleep Well Little One" acrylic painting by Nan!

Howzit Stamping Friends!
YAY, it's Tuesday and this week's wonderful inspirational tutorial is brought to you by LeighSBDesigner Nan😉


Hi everyone! 
It's Nan here today with this week's
 

 I share such an affinity with this poor Lil Oddleigh Dreaming of Sleep by LeighSBDesigns that I am always drawn to her!  So today I gave her some help with her sleep by giving her a dream catcher!
Sleep well little one and maybe I can, too😴


Use a sheet of Acrylic Artist Pad and cover with turquoise and white acrylic paint.
 

 Take a sea sponge and sponge on white acrylic paint.
 

Use a dinner or paper plate to make a partial circle in the corner.  Space out leaf shapes crossing each other all the way around the dream catcher.
 

Add the hand lettered sentiment with thinned black paint and add black lines between segments of the dream catcher to attach your feathers to.  Paint each feather by dipping the brush into a color and then into white paint, don't mix the two together, to get a feather look.  Paint round beads in various colors where the lines cross on the dream catcher and also at the top of the feathers.   Shade the beads on one side and add a white highlight on the other side.


Print out lil Miss Oddleigh Dreaming of Sleep onto white cardstock suitable for alcohol markers and color her up with Spectrum Noir markers.  
I used FS1, 3, 4 and TN4 to color her skin.
 

HB1, 2 and 3 on her hair.
 

BT 1, 2, 3, 4, 5, 6 and 7 to color her clothes.
 

Fussy cut her out and edge with Distress Ink Mermaid Lagoon.  Adhere her to a blue-green paper that coordinates with the acrylic painted background and fussy cut her out again.
 

Adhere lil Miss Oddleigh Dreaming of Sleep to the dream catcher painting to ensure all her bad dreams are caught!  Sweet dreams little one😴

I hope you enjoyed seeing how much fun it is to use digital stamps in more ways than just cards!  They give you so much freedom to create any kind of project you want and in any size!  The possibilities are truly limitless!
 
Please stop by LeighSBDesigns Etsy Boutique and look around!  I am sure you will find something to suit your fancy....well actually many somethings😋
Hugs
Nan

Thanks for stopping by to see Nan's project today!
Happy Stamping!
THE SHARPIE DOMINO QUEEN

Friday, September 15, 2017

LeighSBDesigns Spooktember New Release - The Halloween Collection!

Hello Stamping Friends!
Sadly I'm starting yet another post by sending out my thoughts and prayers to my family and friends in the UK and everyone impacted by Hurricane Irma!  When will this madness end😞 
STAY SAFE EVERYONE😘

 On to exciting news!!!!
 Halloween is just around the corner, WooHoo👻 and I'm super excited to launch my new


 Sit back and enjoy this little video featuring 6 new spooktacular designs then dash on over to LeighSBDesigns Etsy BOOtique and add them to your collections👻
They're now up with special intro pricing thru to Sept 22nd at midnight PDT

   
Introducing
Spell Caster - Dark Fairy 
Kitty Luna
lil Miss Oddleigh Witchiepoo set
Wiccan Moon
Tangled Border
Tangled Witch Hat
Bizarre Beasties 

 Join us Oct 1 - 31 for the annual 31 Days of Halloween Blog hop to see these wicked cool designs in action!  My LeighSBDesigners and I are hard at play creating spooktacular eye candy for you to enjoy all October long!
Here's a sneaky peek👻
 

 Ready to go shopping?  I hope you are👻
Don't forget to snap them up before the specials end on Sept 22 at midnight PDT!

KITTY LUNA
https://www.etsy.com/listing/544476616/kitty-luna-whimsical-digi-art-stamp-of-a?ref=shop_home_active_1
 Kitty Luna is a whimsical kitty on a midnight prowl by the light of the Halloween moon!
PURRfect for your Halloween projects😻 
 
 SPELL CASTER - DARK FAIRY
https://www.etsy.com/listing/544465022/spell-caster-dark-fairy-a-spellbinding?ref=listing-shop-header-1
 Spell Caster Dark Fairy is a beautiful & spellbinding Gothic fairy!  
She is perfect for your Halloween and Gothic projects😃  

WICCAN MOON
https://www.etsy.com/listing/558274183/wiccan-moon-whimsical-grunge-style-digi?ref=listing-shop-header-3
 Wiccan Moon features a cat and moon with a grunge style background decorated with surrounded Wiccan Runes!  Also PURRfect for your Halloween projects😋

 ODDLEIGH WITCHIEPOO SET
https://www.etsy.com/listing/544458718/lil-miss-oddleigh-witchiepoo-a-whimsical?ref=listing-shop-header-2
Of course there'd be a new Oddleigh character in this release!
lil Miss Oddleigh Witchiepoo is fun, whimsical, quirky and super cute flying around on her broomstick!  She comes with 2 separate digis, an Oddleigh Moon & a cluster of 3 Oddleigh Stars, so you can have fun creating a night scene for her.  She's a must for your cute and quirky Halloween projects😀 
 
TANGLED BORDER
https://www.etsy.com/listing/558268447/tangled-border-is-a-whimsically-dark?ref=shop_home_active_7
 Tangled Border is a whimsically dark & elegant collage of tangled designs!
Perfect for your Halloween & Winter themed projects & pretty much any time in between when you get chance to create some creeptastic dark art!  There's blood drips mixed in with the elegant tangles and if you look closely...those pretty flowers have teeth for petals too bwahahaha ;0)
Pair this digi stamp up with the Tangled Witch Hat below plus the other Tangled designs in my collection!

TANGLED WITCH HAT
https://www.etsy.com/listing/544469326/tangled-witch-hat-whimsically-dark-digi?ref=shop_home_active_6
Tangled Witch Hat is a whimsically creepy & quirky collage of tangled patterns!  The hat band is embellished with a large tooth & yes, you guessed it, there's pretty teeth petals here too!
 Smeared Ink fans will recognize these 2 tangled designs from my Autumn's Pencil rubber stamp set.  I'm pleased to now bring you them both as digis.  I changed the Witch Hat and removed all the black areas so now can colour every inch of it!

BIZARRE BEASTIES
https://www.etsy.com/listing/558279349/bizarre-beasties-a-trio-of-scary?ref=shop_home_active_5
 Bizarre Beasties is a trio of scary creatures perched in a tree!
Ever get that feeling like you're being watched?  Yep, its probably these wicked creatures checking you out bwahahahaha!  This digi art stamp is so creeptastic you NEED it for your wicked cool Halloween projects👻

I hope you will get lots of enjoyment out of these newbies this Halloween and for years to come👻
Don't forget to return on Oct 1st for 31 Days of Halloween👻

http://leighsbdesigns.blogspot.com/2017/09/leighsbdesigns-free-digi-never-forget.html

In case you missed my September 11 post....I have this special 9/11 tribute design up for you!
Click HERE to get the FREE digi!


Many Hugs, Stay Safe and as always, Happy Stamping😘
THE SHARPIE DOMINO QUEEN

Tuesday, September 12, 2017

Tutorial Tuesdays: "Tangled Maple Leaf" Art Journal Page by Bonnie!

Howzit Stamping Friends!
YAY, it's Tuesday and you know what that means right😉it's time for a new tutorial and this week's fabulous installment is brought to you by LeighSBDesigner Bonnie!


Hi everyone! 
It's Bonnie here today with this week's

I chose to feature the gorgeous Tangled Maple Leaf image from LeighSBDesigns which Leigh created for a Facebook contest at Markers! Papers! Digis!  I didn't get a chance to play along but couldn't resist this maple leaf...especially being a Canadian.  I'll explain how it shows up in three different ways in my art journal page.


To begin, I printed a larger version on Neenah Cloud White card stock which I coloured with Prismacolor pencils.  This is an amazing image to colour...filled with wonderful detail and tangles.  I think I could colour it over and over and never have it look the same twice.  Once coloured, the leaf was fussy cut leaving a narrow white border.  It was then matted with black card stock and fussy cut again leaving a narrow black border.  I like how this frames the image and also strengthens the stem so it won't tear with handling.


Smaller leaf images were printed onto white card stock and cut out a few at a time until I had enough to cover my 6 x 8 inch background.  I taped a paper to the back of my 8 x 10 inch gel plate which was the same size as the mixed media one I would be gel printing on.  This served as a guide for placing those fussy cut leaf masks which I then layered onto the top of the plate.


When I roll out paint to apply to my larger gel plate, I do so on my smaller gel plate so that I can create a print from it with any left over paint.  Above, you can see the Naples Yellow Hue, Cadmium Orange, and Napthol Crimson Liquitex Basics Paint both rolled out on the small plate on the left and then rolled over the leaves on the larger plate on the right.


Once the leaves were peeled off the paint covered larger plate, the mixed media paper was placed onto the plate lining it up with the white paper taped to the back. The painted leaf masks were set aside to dry because they would be included in the design in a later step. See all that yummy paint left on the smaller gel plate?


I layered TCW Mayan Calendar over the small gel plate and rubbed a piece of white card stock over it picking up the positive print. Then I turned the paper 90 degrees and printed what was left on the plate which was the negative impression on the right above.  That's how I build up my stash of background papers for future mixed media projects.


Gel plate prints dry quickly because the paint is usually a thin layer.  Once dry, four colours of Archival Ink (Sunflower, Tiger Lily, Coffee, and Geranium Red) were applied through Carabelle Studio Weft Fabric & Numbers template to create pattern and texture both on the white leaves and on the painted background.


Jet Black Archival Ink was used to edge the outside edges of the leaf masks as well as the main page background.n Black pen was also used to draw a border on the leaves and eventually around the page as well.


The leaves were adhered to the background so that each leaf touched either the coloured leaf or another painted leaf to break up the background and also help with flow.


A black card stock mat was added to the back of the page to frame the page and add contrast.  The hand coloured image was popped up on foam tape to adhere it to the page and create dimension and natural shadow.


The sentiment was printed onto white card stock and then cut into individual words.  These were then matted with black card stock and popped up on foam tape to adhere them to the page.


And here is the finished page with the three different versions of the same beautiful image, Tangled Maple Leaf, all used in the same design. 

Be sure to stop by Leigh's Etsy shop, LeighSBDesigns, where you can check out the other fabulous images which she has designed for us.  There is inspiration a-plenty there and wait until you see the new releases later this week!
Oh my!  I can hardly wait😉

Products used

https://www.etsy.com/listing/555335255/tangled-maple-leaf-digi-download?ref=shop_home_feat_2
Tangled Maple Leaf - by LeighSBDesigns
 5 x 7 inch and 8 x 10 inch Gelli Gel Printing Plate
Speedball Brayer
Liquitex Basics Acrylic Paint: Naples Yellow Hue; Cadmium Orange; Napthol Crimson;
Archival Ink: Jet Black; Sunflower; Tiger Lily; Red Geranium; Coffee; 
Carabelle Studio Weft Fabric & Numbers Art Template
TCW Mayan Calendar Stencil
Adhesives: foam tape; Scotch Quick Drying Glue; Scor Tape;
Sponge Finger Daubers or Ink Blending Tools
Cutterbee Scissors;
Black Card stock
White Card stock
Prismacolor Premier Coloured Pencils
Black pen

Thank you for supporting LeighSBDesigns by shopping for your favourite products via my affiliate links with Joggles and Blick Art Materials!


 Thanks for popping by today for Tutorial Tuesday. Happy Stamping!
THE SHARPIE DOMINO QUEEN

Monday, September 11, 2017

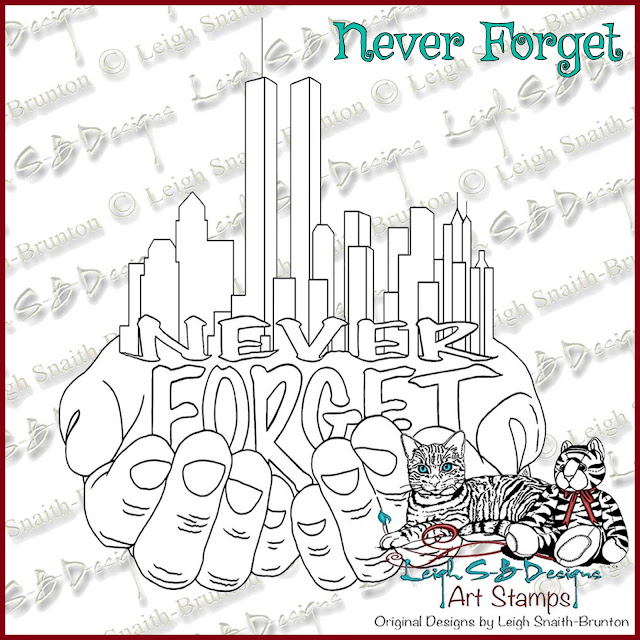
LeighSBDesigns Free Digi : Never Forget - Sept 11 Tribute!

Hello Stamping Friends!
I've just finished drawing a Sept 11 tribute in remembrance of loved ones lost 16 years ago today😔 

This design is FREE for you to use for your personal projects!
If you'd like to share online please only use the watermarked digi and send your friends to this post to get the free design for themselves!
Thank you😉
Please don't share this digi on social media (Facebook, Pinterest, Instagram, etc) 
Please use this watermarked photo for online sharing!
Many Hugs!
 
Happy Stamping!
THE SHARPIE DOMINO QUEEN

Tuesday, September 5, 2017

Tutorial Tuesdays: Maple Leaves Fall with the Autumn Breeze - Wall Hanging tutorial by Val!

Howzit Stamping Friends!
 It's Tutorial Tuesday time and LeighSBDesigner Val is here today to show you how she made her beautiful Fall/Autumn inspired Wall Hanging🍁


Hi Everyone, 
This is Val and I'm excited to share my second tutorial here at LeighSBDesigns today featuring the wonderful new LeighSBDesigns release, Tangled Maple Leaf, which is currently available at a special promo price of only $1!!!!  This fantastic price ends TONIGHT at midnight PDT🍁

https://www.etsy.com/listing/555335255/tangled-maple-leaf-digi-download-weekend?ref=shop_home_active_1
BOTH NEW RELEASES ARE ON SALE FOR ONLY A $1 EACH!  Special release promo ends at midnight PDT Sept 5!

 
For my tutorial today I made an autumn inspired Wall Hanging.

 I started by printing out the Tangled Maple Leaf digi onto Neenah white cardstock and coloured it up with Spectrum Noir Markers and Colorista Markers by Crafter's Companion.  


I used the following colours from each marker range:

Spectrum Noir Markers
 GB1, GB4 and TN5

Colorista Markers
Sandstone and Rose Red

Tip:  I like to scribble my colours next to my image so I can plan which colours I want to use and where.
 

Prepare 3 mats for the wall hanging by cutting two panels from black cardstock measuring 6 inches by 9 inches and 7 inches by 10 inches and one white panel measuring 6.25 inches by 9.5 inches.

I fussy cut out the leaf leaving a narrow white border so the leaf would stand out nicely from the black background and then adhered the leaf to the first black panel using PVA tacky glue. 

I then mat and layered the black card onto white and again onto black card.   I used red ribbon for the hanger and inserted the ribbon ends and adhered them in place between the black and white panels using double sided-tape. 
 

I used Serif CraftArtist2 software to create the wording and printed out the text onto Neenah white cardstock.  I cut out each word separately and adhered them to the wall hanging with tacky glue. 

Materials used:
LeighSBDesigns Tangled Maple Leaf digi stamp
Spectrum Noir Markes
 Spectrum Noir Colorista Markers
Serif CraftArtist2 software
Red Ribbon
Black and white cardstock
PVA Tacky Glue
Double sided sticky tape
Thanks for stopping by to see my project today!
Happy Stamping!
THE SHARPIE DOMINO QUEEN