


Hello Everyone!
Here's my second project example for Blockheads current Blog Hop Bleach Technique Challenge and this card is called "Spring Is Coming!". Oh please tell me its coming coz I'm cold here in 'too wintery for my liking' San Diego LOL, but it's supposed to warm up for the weekend and then get cold again, ugghh ;0)
Check out my other design team example "Is Spring Here Yet?" and also pop on over to Blockheads for the technique demo and challenge details too.
I used Blockheads Paper Arts Daisy Collage stamp on this one and I love how well it worked with the Bleach Technique! This time I decided to work with white embossing powder and alcohol-based permanent markers and the result reminds me of silk paintings.
Daisies Flower Set
Marvy Le Plume Permanent Markers
ColorBox Fluid Chalks ink pad - Warm Green
White Fine Detail Embossing Powder
Spellbinders dies - Squares and Lacey Squares
Household liquid bleach
Something to apply the bleach with like a Tiny Touch Applicator or Tsukineko Fantastix
White folded card blank - square
Dark olive green and a lighter green cardstock
Tim Holtz Idea-ology Paper Stash cardstock
Double sided tape
Glue Dot
Quickie Glue Pen
Yellow Polka Dot Ribbon
Heat It Embossing Tool
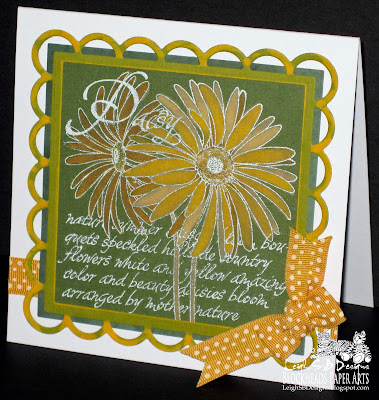
Spring Is Coming!

Stamp the Daisy Collage onto the dark olive green cardstock in Warm Green Fluid Chalks ink and emboss with white fine detail embossing powder. Carefully apply the bleach in small amounts to ensure you stay within the embossed lines but it's okay if the bleach goes beyond because I think it gives it that hand-made 'silk painting' look. I used a Tiny Touch applicator to apply the bleach. Apply more bleach in some areas to get a mottled effect coz the cardstock gets lighter the more bleach you use.

I love how the bleached image looks and it would be really cool to leave it as is but I wanted to see if alcohol-based markers would work and decided to colour the image with Marvy Le Plume Permanent markers. I coloured the main daisy with a combination of Yellow 625 and 627 and also left some of of the petals the raw bleached colour. I then coloured the other daisy with Y627. I also left the stems the raw bleached colour too.

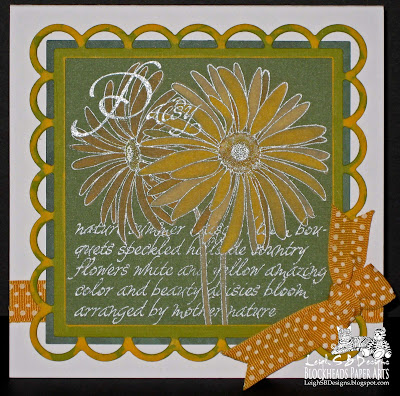
Die cut out the image with a Spellbinders Square die. Then die cut out a Lacey Square panel from the lighter green cardstock and turn it into a frame by die cutting out the interior with a slightly smaller square die. Apply bleach randomly to just the lacey loops on the die cut frame and also run bleach around the inside edge of the frame to highlight it. I love the bright yellow this cardstock bleached to and the way it brings out the colour of the yellow in the main daisy. Adhere the frame to the Daisy panel with a Quickie Glue pen.


The photo above gives you a closer look at the mottled effect on the lacey loops and the highlighted edge of the frame interior.

Die cut a slightly larger mat from a sheet of Tim Holtz' Idea-ology Paper Stash cardstock. I used a sheet of dirty greenish-blue from his Retro Grunge set. Adhere the mat to the back of the frame with double sided tape.

Cut a length of yellow polka dot ribbon and adhere it to the white folded card with double sided tape and trim the excess off on the edges of the card. Then adhere the finished Daisy Collage to the card with double sided tape. Make a bow from the same ribbon and adhere it upside down on the bottom right corner of the card with a glue dot.

I think this card turned out well. It has an elegant freshness to it but it's still very artsy which I just love ;0)
Thanks for stopping by today to see my bleach creations and don't forget to also check out all the Bleach Challenge info and all the examples that my fellow design team mates will be adding to the blog hop!
Challenges for this card:
Pals Paper Arts - Colour Challenge With A Twist (PPA130)
Divas By Design Challenge 24 Spots and/or Stripes - I used the polka dot ribbon of course ;0)
Simon Says Stamp Anything Goes Challenge
Paper Crafting Journey - Challenge 4 Anything Goes
Happy Weekend and as always Happy Stamping!

THE SHARPIE DOMINO QUEEN
Gorgeous, Leigh! And I love that you used Copics - I tried them with black embossing and got black streaks all though my moth! I guess the lighter embossing helps? At any rate, your card is very elegant and I love it! :)
ReplyDeleteThanks Leslie! I used the Marvy LePlume Permanents which are identical to Copics so I don't think that made a difference. I decided to give it go when I read that you'd had a problem with it so I made sure I didn't hang around the embossed lines too long so maybe that helped. I will try it with black and see what happens and let you know!
ReplyDeleteOh, I really love this! The stamp is wonderful, and the way you removed the color of the paper, then filled in with those markers is just a dream!
ReplyDeleteLove how this turned out using the green cardstock!! So, the LePlumes worked okay! Really like the effect of the white embossing. Gorgeous!
ReplyDeleteSuch fun techniques... thanks for joining us at Simon Says Challenge blog
ReplyDeleteBeautiful technique! I love the results!
ReplyDeleteI forget about trying other colors of cs for the bleaching! This is fabulous!
ReplyDeleteAbsolutely stunning Card. Just love your bleaching technique and layering. Very very pretty ;-) xx
ReplyDeleteLovely card, I like the lacy edging and the daisy stamp is wonderful, I think I will have to get this one!
ReplyDeleteIt's amazing how various types and colours of cardstock reacts with bleach... this looks super.
ReplyDeleteChrissie