News
The Summer BUZZ Collection
Re-Release Sale-bration thru July 19!
The Gilded Raven Release!
"Rocky Mountain Christmas"
Winter 2025 Collection
Adopt all the Loveleigh Kitties, they're PURRfect for every occasion!

Tuesday, November 16, 2021

Falling into Winter 2021 Hop+Challenge: Have a Very Yeti Christmas - Tag by Guest Designer Tee!

Howzit Creative Friends!
 

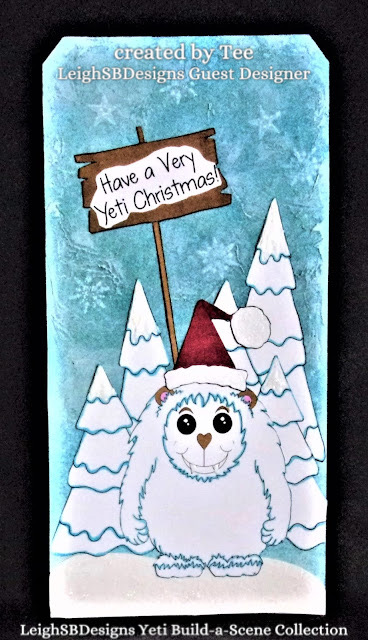
"Have a Very Yeti Christmas"
Yeti Build-a-Scene Tag
by Guest Designer Tee
 
Tee is joining us today as Guest Designer with her FROSTastic inspirational Tag for our November "Falling into Winter Hop+Challenge"❄️
 
 
 Tee made an X-large size 12 tag that measures 5 1/8" x 10 1/2" featuring the Yeti Build-A-Scene Collection for her make today!
 
The tag is made of thin cardstock so Tee covered it first with heavy watercolour paper and then created her background with texture paste, Lindy's Hydrangea Blue Starburst spray and a couple of spritz of pearl mist spray.  Once dry she rubbed Picket Fence Distress Ink on top and used it to stamp icicles and stars onto the background.  She then cut a piece of watercolour paper and added glitter to make some snow for the Winter Yeti to stand on.  Tee then printed out the Yeti and Trees from the Winter Yeti Build-a-Scene set, the Santa Hat from the A Very Yeti Christmas Add-on Pack and the festive senti and Sign Post from the Yeti Senti Sign Post Add-on Pack, fussy cut everything out and coloured them up with markers.  She then adhered all the elements to the tag with tacky glue and embellished the Tree tops and the Santa Hat with Nuvo crystal and glitter drops and the Yeti's fangs with white crystal drops to create some frosty fun dimension! 

What a fabulously festive make Tee, thanks for being our Guest Designer today!


Check out my fun animation video for the Yeti Build-A-Scene Collection❄️


Shop the Yeti Build-A-Scene Collection and more in LeighSBDesigns Falling into Winter Sale on now through Nov 26❄️ 
 
https://www.etsy.com/listing/735150454/yeti-build-a-scene-collection-bundle?ref=shop_home_active_4
 
The "Yeti Build-A-Scene Collection" bundle includes FREEBIE horizontal Yeti Senties!

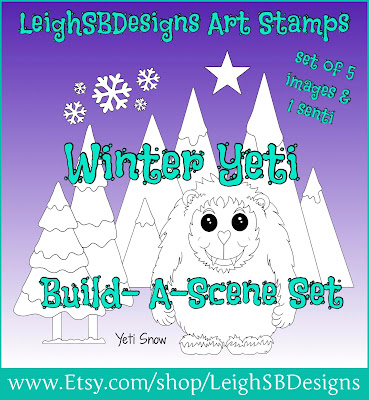
https://www.etsy.com/listing/749025867/winter-yeti-build-a-scene-set-cute?ref=shop_home_active_3
Winter Yeti set includes the Yeti
https://www.etsy.com/listing/735165898/a-very-yeti-christmas-festive-add-on?ref=shop_home_active_2
Add-on Pack doesn't include the Yeti!
https://www.etsy.com/listing/735166770/yeti-senti-sign-post-set-add-on-pack?ref=shop_home_active_1
Add-on Pack doesn't include the Yeti!


Shop the new Winter 2021 release, A Charming Christmas


Thanks for stopping by to see today's featured make!
Happy Creating!
THE SHARPIE DOMINO QUEEN

Saturday, November 13, 2021

Winter Snowmen - A Charming Christmas Lace SVG Cutz Cards by Val!

Howzit Creative Friends!


 LeighSBDesigner Val is back today with more inspiration for our November "Falling into Winter Hop+Challenge" featuring a SVG Cutz set from my new Winter 2021 release,

"Winter Snowmen"
A Charming Christmas 
Lace SVG Cutz Cards
by Val
 
Both of Val's gorgeous Wintery cards today were made using one of the 2 slimline card versions included in the Snowmen Slimline Make-a-Card Layered SVG Cutz!


This Make-a-Card Lace SVG Cutz set features a wonderful whimsical scene of 2 snowmen hanging amongst pine tree branches and includes 2 versions to make 2 slimline cards from start to finish.  Card #1 includes a wonderful lace overlay card topper with a border, a matching mat layer and a slimline folded card base with a built in perforated fold.  Val used the Card #1 version to make both a slimline and a mini slimline card.

 
Val cut her card lace overlays from Canson Mixed Media cardstock and the mat layers and folded slimline cards from Hobby Craft Pastels cardstock using her Silhouette Portrait 3 electronic cutting machine.  She then mounted the overlays onto the mat layers and on to the folded cards and embellished them with Crystal Stickles glitter for lots of pretty frosty sparkle.  Val's mini slimline is a wonderful reminder to never toss a cut job that doesn't cut perfectly.  She cleverly salvaged the upper portion of the design and adhered the elements to the mat layer!

The "A Charming Christmas" Collection is currently up at LeighSBDesigns Etsy Boutique on special release sale through Friday Nov 12 midnight pacific❄️ 


Thanks for stopping by to see today's featured makes!
Happy Creating!
THE SHARPIE DOMINO QUEEN

Thursday, November 11, 2021

A Charming Christmas Elegant Snowflake Ornament Stand 3D SVG Cutz Assembly Tutorial with Leigh!

Howzit Creative Friends!
I've got a step-by-step tutorial for you today to show you how to assemble the fabulous new Elegant Snowflake Ornament Stand 3D Lace SVG Cutz set from my new Winter 2021 release,

A Charming Christmas
"Elegant Snowflake Ornament Stand"
3D Lace SVG Cutz Tutorial
with Leigh
 
The Elegant Snowflake Ornament Stand 3D Lace SVG Cutz set includes 18 cut elements for you to fully customize your 3D snowflake and stand.  9 of the 18 elements are mirror images to ensure perfect alignment when assembling.  The cut file opens with one set of 9 elements grouped on the left and the mirror image of each element grouped on the right.  For this tutorial I'm demonstrating the assembly of the 3D Snowflake Ornament and the 3D Stand.
 
 
I recommend you make a stand with a minimum of 4 sides so you will need to cut 4 stand base panels out of heavy weight cardstock.  I used Crafter's Companion Centura Pearl 310gsm cardstock cut on my Silhouette Cameo 4 using the heavy coverstock 105lb to 122lb material setting with a 31 force and 2 passes.  Always do a tiny test cut in the corner of your material to ensure you get a nice cut to avoid wasting an entire sheet of cardstock!
 
 
Step 1
Cut 2 of the stand panel from the left group and 2 from the mirror image group (right hand side group).
 
  
Step 2
Fold all the stand panels along the center perforated fold line. 
 

Step 3
Cut 4 of the stand base mat layers.  In the SVG Cutz set there is one mat layer with a perforated fold line for use with cardstock and a mat layer without for lighter weight mats.  I used a beautiful Crafter's Companion snowflake themed vellum for my mats.  I folded each piece in half and creased nicely with a bone folder.
 
  
Step 4
Apply dabs of glue to the back of one stand base panel at a time.
 
 
Step 5
Adhere the vellum mat layers to all 4 stand base panels.
 
 
Stand Assembly
Step 6
Apply dabs of glue to one half side of a folded stand base panel and adhere it to a second folded stand base panel.  Start by lining up the base and then press the circle frame together working your way up to the snowflake finial. 
 
TIPS:
I highly recommend wet glue for assembly coz it gives you more time to wiggle the pieces and line them up nicely and I've got some tiny plastic pegs I use to clamp the pieces together while they dry.
 
 
Step 7
Adhere 2 stand base panels together and while they dry adhere the other 2 together.  Then adhere them all together leaving one side un-glued.
 
 
3D Snowflake Ornament Assembly
 Step 8
Start by cutting 2 of the snowflake mat layers from the left group and 2 from the mirror image group on the right.  In the set you will find one snowflake mat layer with a perforated fold line for use with cardstock and one without for use with light weight materials.  I cut mine out of vellum and folded them equally in half and pressed the fold nicely with a bone folder.

 
Step 9
The Snowflake Ornament is hand drawn and not symmetrical so you do need to take a minute to dry fit the pieces and lay them all out ready to make assembly easier.
 
 
Step 10
Apply dabs of glue to one side of a folded snowflake mat layer and adhere it to one folded side of it's mirror image.  Repeat the process for the other 2 pieces.
 
 
Step 11
Then adhere them altogether leaving one side of the snowflake mats un-glued.
 
 
Step 12
I then cut 4 Snowflake lace overlays out of the same cardstock I used to make the stand.
 
 
Step 13
Cut 2 snowflake overlays from the left group and 2 from the mirror image group.  Dry fit them together to make sure they perfectly align.  You will notice that there is one snowflake point that is more narrow and pointer than the rest (in the photo below you can see this point nicely at the bottom of the snowflake on the right).  This is a good visual reference to use for the top of the snowflake ornament to ensure you line up the pieces correctly.
 
 
Step 14
Before gluing dry fit the overlay in place on the vellum snowflake to make sure you've got the alignment right....doesn't hurt to check twice!  
 
 
 Step 15
Apply dabs of glue to the snowflake overlay and adhere it to one side of the vellum snowflake.


In the photo below you can see the snowflake alignment reference point nicely at the bottom of the snowflake.  See how it's a lot more narrow and pointier than the opposite end.
 

Step 16
Adhere all of the snowflake overlays to the vellum snowflake still leaving one side un-glued.
 
 
Step 17
Flatten out the snowflake and make sure all the folds are nicely creased.
 
 
Step 18
Apply glue down the spine and lay in a length of fishing line to create the ornament hanger then adhere the last side of the snowflake together.
 
 
TIP:
I really love my little pegs for clamping!
 
 
The 4 sided 3D Snowflake Ornament is complete.  Now is a good time to customize it further if you want to bling it up with glitter and gems.
 
 
Step 19
Now it's time to hang the snowflake ornament inside the stand.  Flatten out the stand and the snowflake ornament and clamp the sides together to make things easier! 
 
 
Step 20
Apply a line of glue inside the spine of the snowflake finial at the top of the stand and press in the fishing line hanger and leave it to glue in place for a few minutes before trimming away the excess line.
 
 
Step 21
Apply glue to the last side of the stand and adhere the panels together and you're done!
How easy was that!  The Elegant Snowflake Ornament Stand looks like a more advanced 3D paper art project but once you know how armed with these instructions it's pretty easy to do with just a bit of time and patience to get all the elements lined up nicely!
 

TIP:
If the stand wobbles a bit then it's because the alignment at the point between the 2 stars along the bottom edge is off a bit.  You can snip off the bit that sticks out too much with pointy detail scissors and viola, wobble fixed!
 
 
 Now is good time to embellish the stand with glitter and gems if you want to.  Plus, if you choose to customize the stand with the other cut elements included in the SVG Cutz set you can do that now or as part of Step 5!
 
 
The finished Elegant Snowflake Ornament Stand is so beautiful and will take your holiday decor to the next level plus imagine the joy you'll bring to your family and friends who will be in awe if you give them one of these as your Christmas cards this year coz yep, the entire stand folds flat for mailing!  Awesome right๐Ÿ˜‰


The Elegant Snowflake Ornament Stand 3D Lace SVG Cutz and the rest of the "A Charming Christmas" Collection is currently up at LeighSBDesigns Etsy Boutique on special release sale through Friday Nov 12 midnight pacific❄️ 
 
 
Shop the Fall and Winter Sale and come play in our November Hop+Challenge!


Thanks for stopping by to see today's featured make!
Happy Creating!
THE SHARPIE DOMINO QUEEN

Wednesday, November 10, 2021

Silver Christmas Baubles - A Charming Christmas Lace Window SVG Cutz Slimline Card by Val!

Howzit Creative Friends!


 LeighSBDesigner Val's inspiration for our November "Falling into Winter Hop+Challenge" is a gorgeous Winter slimline card featuring an SVG Cutz set from my new Winter 2021 release,

"Silver Christmas Baubles"
Lace Window Slimline SVG Cutz Card
by Val
 
Val's gorgeous Wintery Christmas slimline card is breathtaking in it's elegant silver frostiness❄️  She used one of the 2 slimline card versions included in the Christmas Baubles Slimline Make-a-Card Layered SVG Cutz set to create this beauty!


This Make-a-Card Lace SVG Cutz set features a wonderful whimsical scene of baubles hanging amongst pine tree branches and includes 2 versions to make 2 slimline cards from start to finish.  The Card #2 design cuts into the cardstock creating an elegant lace cut window in the front of the slimline card.
 
 
Val cut her slimline card from white Hobby Craft Smooth cardstock and the mat layer included in the SVG Cutz set from Hobby Craft Silver Glitter cardstock using her Silhouette Portrait 3 electronic cutting machine.  She then adhered the mat layer to the inside back panel of the card leaving the front as the lacey cut window.  Val then decorated the baubles and pine branch design with Crystal Stickles glitter for lots of pretty frosty sparkle.

The "A Charming Christmas" Collection is currently up at LeighSBDesigns Etsy Boutique on special release sale through Friday Nov 12 midnight pacific❄️


Thanks for stopping by to see today's featured make!
Happy Creating!
THE SHARPIE DOMINO QUEEN