July CREATivities
The Summer BUZZ Collection
Re-Release Sale-bration thru July 19!
The Gilded Raven Release!
"Rocky Mountain Christmas"
Winter 2025 Collection
Adopt all the Loveleigh Kitties, they're PURRfect for every occasion!

Thursday, March 29, 2012

Faux Metal Postage Stamps Card for Blockheads' Magic Metals Technique Challenge!

Howzit Everyone!

It's technique challenge time again at Blockheads Paper Arts and this one is called Magic Metals!  Karen is hosting the challenge this month and she has an awesome tutorial and technique sample for you to check out over at Blockheads Paper Arts.

Faux Metal Postage Stamps
 

I've been having a ball and my studio has been more like a witch's den or whatever you call the place where witches concoct spells and potions.  I've been creating with embossing powder flying everywhere with a lot of "a sprinkle of this and what would happen if I add a sprinkle of that" going on ;0)


Here's my first design team creation for the Magic Metals technique challenge with more to follow so don't go anywhere!  I created these faux embossed metal postage stamp embellishments for my card with embossing powder.  I'm a stamp collector of the other kind too and I was inspired by my gold plated metal commemorative stamps and this is the result and I hope you like them!


All the stamps used are exclusive to Blockheads Paper Arts.  I used sections of the Botanical Silhouettes stamps to create my faux metal postage stamps and cut outs, the French Script from Backgrounds for All Occasions and the Postcard stamp from the Vintage Light and Form set to create my faux vintage ledger paper background.


Saturday, March 17, 2012

"Proud Of You" Art Deco Accordion Card!

Hello Bloggers!

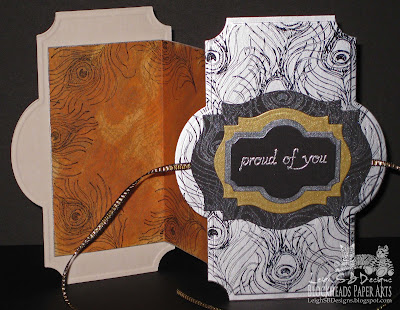
 Over the last few days we've (the Blockheads Design Team) been sharing our 'Different Points of View' in celebration of the launch of the "Proud As A Peacock" stamp set!  It's a horrible wet and wintery day here in San Diego and I'm so happy I'm indoors and sharing my 3rd Peacock inspired
project that has an Art Deco feel to it and this one also features a stamp from Blockheads "Botanical Silhouettes" set which launched last week!

"Proud of You" Art Deco Accordion Card

Click on the pics below of my first two projects if you missed them:  
"Twilight Serenade" and "We're So Proud"

"Proud As A Peacock"
"Botanical Silhouettes" 

Friday, March 16, 2012

"We're So Proud" A Clean & Simple Card that packs a punch with a splash of colour!

Hello Bloggers!


I'm back with another Peacock themed project featuring Blockheads Paper Arts stamp set 'Proud As A Peacock' which will be available for purchase next week!  Woohoo!

My first card, "Twilight Serenade", was quite an involved project with lots of different techniques going on so I thought I'd share a clean and simple card today that still makes a statement with a splash of bright colour!


Make a folded card from white cardstock and mask off a narrow panel down the right hand side with low tack tape or post-it notes.  Stamp the large and small single peacock feather images with Brilliance Purple Pearlescent ink and heat set.  You can see the pearlescent shimmer of the feathers in the photo below.


Colour the centers of the feathers and random feather strands with either dye-based Memento markers or water-based Marvy Le Plume II markers in bright colours.


Adhere a piece of colour co-ordinated ribbon (Target $1 section...one of my fav places!) to the card with double sided tape.  By the way, the ribbon IS straight!  The card had a slight curve/bulge to it along the bottom edge and I couldn't get it to co-operate and stand straight, uuggh.  I'm sure it's bothersome to your eyes and it's still bugging me big time LOL!

Stamp the sentiment "We're so proud" in Brilliance Purple ink along the bottom edge on the left hand side of the card.  If you're not confident about eye balling the placement then use a Stamp Positioner tool to get the sentiment exactly where you want it!


Here's a neat idea for this kind of card especially if lots of people are going to sign it!  You can write messages on the front of the card in the white area as well as all over the inside and the back. Great for large family gatherings like graduations and perfect for a co-worker so the whole company has space to write their kudos in!

Thanks for stopping by today, I've still got more Peacock inspired creations to share...one with traditional peacock colours and another with an Art Deco feel to it...so don't go far ;0)

Now I've got a challenge perfect for this one - thanks for the heads up Colleen!
 Moxie Fab World - Fascination With Feathers Challenge

Happy Stamping!
 THE SHARPIE DOMINO QUEEN
I design for Blockheads Paper Arts * Third Coast Rubber Stamps * About Art Accents

Thursday, March 15, 2012

"Twilight Serenade" - Introducing the New "Proud As A Peacock" Stamp Set by Blockheads Paper Arts!

Hello Bloggers!


I'm thrilled to be showcasing Blockheads Paper Arts newest stamp set release called Proud As A Peacock!  These images are divine and I've been having a great time playing with them!  I've got a couple of projects to share demonstrating the versatility of this set so stay tuned!


Twilight Serenade

My first project is titled "Twilight Serenade", I envisioned that I'm looking out of a brightly lit room onto a balcony where the Peacock and the marble balustrade are bathed in the light and the peacock is singing to the moon in a twilight sky.  I'm really pleased with how it turned out ;0)

Wednesday, March 14, 2012

"The Isle of Aud Parade" Over-sized Card - Spotlight on Lost Coast Designs Rubber Stamps!

Hello Everyone!


I'm featuring Lost Coast Designs Rubber Stamps this week and I've been having a ball!  Here's my second project called "The Isle of Aud Parade".  Also check out my first project, "The Architect Fairy" if you missed it!

These bizarre Isle of Aud Animals are the star of my over-sized card which measures 12" x 5.5"!  I also used the Tree Branch Background stamp again to create the stunning backdrop for this rather quirky card with the Zebra Border centered across the full length of the card.

Lost Coast Designs stamps: The Tree Branch Background, Zebra Border and Isle of Aud Animals - the animals come as a set!

Tuesday, March 13, 2012

"The Architect Fairy" Fancy Fold Card - Spotlight on Lost Coast Designs Rubber Stamps!

Hello Everyone!


I'm featuring Lost Coast Designs Rubber Stamps this week!  I had so much fun creating this first project, "The Architect Fairy".  It's a fancy fold card with the beautiful Winged Girl image as the main focal point!  I also used the Tree Branch Background stamp to create the stunning nature background for the back and inside of my card.

I stamped the images with Memento Tuxedo Black ink and coloured the entire card with Marvy Le Plume Permanent markers.  I used Strathmore Bristol cardstock for the fairy panels to give the card more strength and weight and made the card base from Neenah Solar White cardstock.


Cut the Neenah cardstock to the height of the Winged Girl image and make a gate-fold card base with the overlapping front flaps the same width as the image.   Stamp the Winged Girl image twice and trim the panels down into rectangles, run them through a Xyron to add permanent adhesive and adhere them to the front flaps of the card base.


Stamp the Tree Branch background on the inside middle panel and also on all the back panels.


Colour the Winged Girl image with Marvy Le Plume Permanents which are very similar to Copic markers.  I used the following colours on the Winged Girl:
Body:  OR821, 823 and R815, Hair:  E858 and 859, Dress:  R812 and 815, Wings:  R812, 815, BV733, 736 and B707, Architecture:  AG 871, 873 and G673, Arch Background:  B707, 708 and BV736.
 On the Tree Branch background:
G673, BV733 with AG871 over the entire background to tone down the colours.


Tip:  I also used the thicker cardstock for the fairy panels to ensure the colouring didn't bleed through and ruin the colouring on the other side and vice versa!  But I wasn't concerned about that happening on the middle panel because I just used the colours in the same places and it didn't mess up the effect.  I also didn't want to double up the cardstock on the middle panel because it would have made it harder to do all the cut outs which I did next.


Once everything was cut out I embellished the wings with glitter glue.  I finished off the card wtih some flower embellishments adhered to the front panel with glue dots.  I really couldn't decide if I wanted the flowers or not so I took some photos with and without them so you can decide what look you prefer ;0)

In these next photos I also wanted to show you how versatile this fancy fold card really is!

Sunday, March 11, 2012

Weekly Blockheads Blog Candy & Gift Certificate Up for Grabs!

Hello Bloggers!

You've probably noticed the niffy new Blockheads Blog Candy blinkie in my left hand side bar already so here's the scoop on what that is all about ;0)


Blockheads Paper Arts is now sponsoring a weekly chance to win some Blog Candy, Woohoo!
Simply add their Blog Candy Banner to your side bar for a chance to win the free stamp of the week! The stamp changes each Sunday evening after winners are selected. For now we want you to have a roughly 1 in 10 chance of winning. So if we get 20 particpants we'll select 2 winners and if there are 30, we'll select 3.

To add their banner to the side bar on your blogger page, simply enter design mode and click to add a widget.  Select the HTML/JavaScript widget type and enter the the code into the Content Box (Title is optional).  Click here for the code!  Including the code in your blog post will add the banner which then links to the Blockheads' Blog!

Once you've done that go to Blockheads' Blog and add your blog URL link via the "add your link" button.

Would you like the chance to get even more goodies from Blockheads Paper Arts?
Then read on to find out how you can win an additional $10 gift certificate :0)

If you are one of the random winners and the link you've submitted by clicking the "add your link" button goes directly to a post on your blog with this banner and a nice comment about Blockheads with a link to their web page, Blockheads Paper Arts, you will also be eligible to win an additional $10 gift certificate.  Stacey, the owner of Blockheads, is only asking for truthful comments so if you've ordered from them you can say what you like about their service.  If you haven't ordered from them your comment can simply be that you like a particular set of stamps or an item they carry.  Feel free to add any pictures of their products from their website in your blog post with links directly to them.  Only one gift certificate will be given away weekly so if multiple winners have linked to such a post, they will pick one of them to win the gift certificate.

Kudos for Blockheads!

If you aren't a Blockhead already then I guarantee you will be once you've visited their website!  I've been a Blockhead since as far back as 2002 and possibly earlier ;0)  Stacey will look after you and your order with the utmost care, you couldn't ask for better service.  She is a magician with shipping too coz I'm just amazed at the speed in which I receive my orders!

Blockheads has an exclusive stamp line which I promote in my design team creations!  They also carry other popular stamp companies too:  Lost Coast Designs, My Heart Stamps for You, OnxyXpressions and the coveted Tim Holtz Collection to name a few.  They also carry a wide selection of the most popular "must have" goodies as well as much loved favourites that have stood the test of time.  So grab your favourite beverage, sit back and enjoy a visit to Blockheads Paper Arts!

Happy Stamping!
 THE SHARPIE DOMINO QUEEN
I design for Blockheads Paper Arts * Third Coast Rubber Stamps * About Art Accents

Tuesday, March 6, 2012

"Numerology" DominoART Card featuring a Crafter's Workshop Template!

Hello Everyone!
It's time for DominoART's March DMT which stands for DominoART's Monthly Technique!
This month I challenge you to try using a stencil or a template to create a design on a domino or any other similar game tile!  I'm calling this one the "D'ART Stenciling Technique".


The theme for my DominoART card is Numerology which is a branch of knowledge that deals with the occult significance of numbers.  I had a ball playing around with the various elements and think this card would be suitable for someone who is into Numerology or just as an all occasion card.  You could really personalize it to a number or a date that is significant like a birthday, anniversary or a graduation date.  The possibilities truly are limitless!
Please pop over to my DominoART Blog to see the full tutorial on how I altered the domino and made this card!  I've also got a DominoART Challenge going if you're interested in altering dominoes or other similar game pieces, so come and join us!


Thanks for stopping by today and enjoy the rest of your week!
Happy Stamping!
 THE SHARPIE DOMINO QUEEN
I design for Blockheads Paper Arts * Third Coast Rubber Stamps * About Art Accents

Saturday, March 3, 2012

"Spring Is Coming!" - New Blockheads Blog Hop Challenge - Bleach Rubber Stamping Technique!

Hello Everyone!
Here's my second project example for Blockheads current Blog Hop Bleach Technique Challenge  and this card is called "Spring Is Coming!".  Oh please tell me its coming coz I'm cold here in 'too wintery for my liking' San Diego LOL, but it's supposed to warm up for the weekend and then get cold again, ugghh ;0)

Check out my other design team example "Is Spring Here Yet?" and also pop on over to Blockheads for the technique demo and challenge details too.


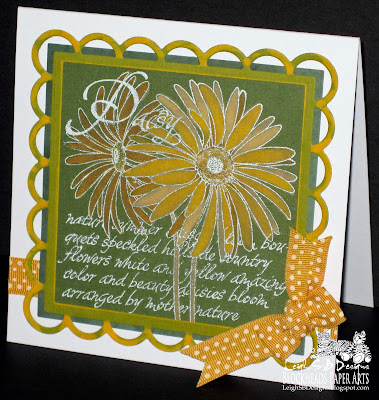
I used Blockheads Paper Arts Daisy Collage stamp on this one and I love how well it worked with the Bleach Technique!  This time I decided to work with white embossing powder and alcohol-based permanent markers and the result reminds me of silk paintings.
Daisies Flower Set
Marvy Le Plume Permanent Markers
ColorBox Fluid Chalks ink pad - Warm Green
White Fine Detail Embossing Powder
Spellbinders dies - Squares and Lacey Squares
Household liquid bleach
Something to apply the bleach with like a Tiny Touch Applicator or Tsukineko Fantastix
White folded card blank - square
Dark olive green and a lighter green cardstock
Tim Holtz Idea-ology Paper Stash cardstock 
Double sided tape
Glue Dot
Quickie Glue Pen
Yellow Polka Dot Ribbon
Heat It Embossing Tool

Friday, March 2, 2012

"Is It Spring Yet?" - New Blockheads Blog Hop Challenge - Bleach Rubber Stamping Technique!

Hello Everyone!
It's Challenge time again over at Blockheads Paper Arts!
My team mate, Leslie, is hosting this one and it's all about using bleach with your rubber stamping and you can see her awesome technique demo and the Challenge details on the Blockheads website here.


I had an absolute ball playing with the bleach and seeing how each colour cardstock magically reveals a new colour.  This is another oldie technique like my Chalk Attraction technique which I hosted last month and it was loads of fun getting re-acquainted with it.  I had forgotten how much fun it is to paint and stamp with bleach and I think newbie stampers and seasoned stampers a-like will enjoy this Challenge so I hope you'll come and join the blog hop for a chance to win a $25 gift certificate to Blockheads Paper Arts!  You can even submit your entry to the Blockheads' Gallery if you don't have a blog and be in the running for a 4" x 5.25" stamp set of your choice...how cool is that!!

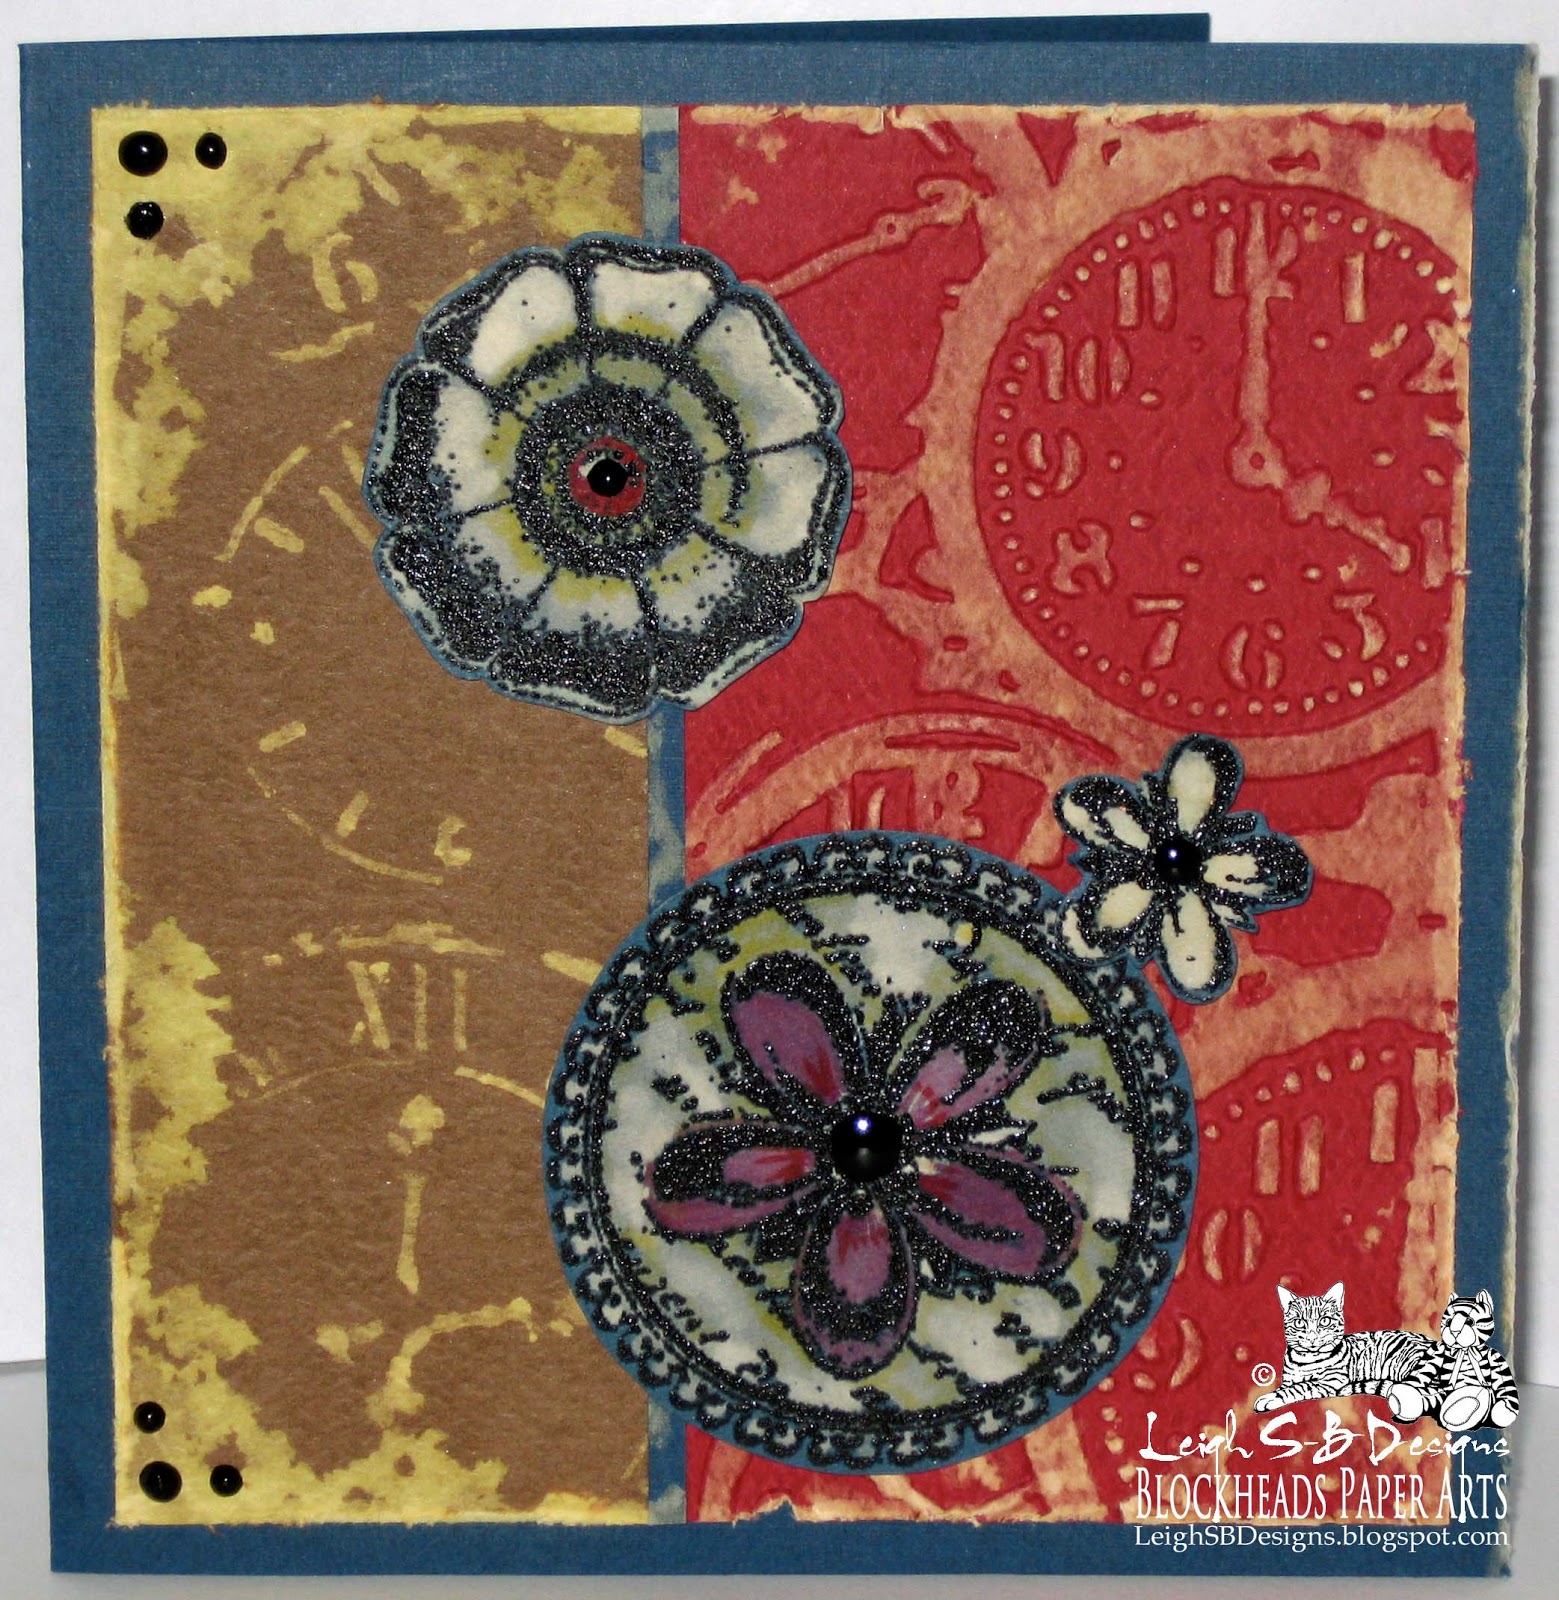
I've got two projects to share featuring the Bleach Technique.  It's been really cold here in San Diego, yes it DOES get cold here LOL, and the titles and themes for my cards are Spring inspired and have a floral-time theme going on.  Here's my card called "Is It Spring Yet?"  This one is dark for a spring theme with my choice of colours coz it was a very wintery day when I made it.  I'll put my other card tutorial titled "Spring Is Coming!" in a separate post after this one to help keep this one relatively short ;0)

The floral medallion and blossoms I used are from Blockheads Paper Arts exclusive stamp set called Nature Medallions and a grungy corner stamp from the Grunge It Up set and I also continued with more Crafter's Workshop Template fun and incorporated the Mini Time Collage into my design as well as a Clock Texture Fades embossing folder by Tim Holtz!

Blockheads stamps:
Nature Medallions
Grunge It Up

Crafter's Workshop Mini Time Collage Template
Tim Holtz Texture Fades Embossing Folder - Clock and Steampunk Set
Brilliance Graphite Black Pigment Ink Pad
Ranger Black Embossing Powder
Marvy Le Plume II markers - Victorian Set
Inkssentials Enamel Accents - Black
Tim Holtz Distress Tool
Household liquid bleach
Something to apply the bleach with like a Tiny Touch Applicator or Tsukineko Fantastix
Heat It Embossing Tool
Brown, dark red and dark blue cardstock
Quickie Glue Pen
Double sided Tape
Pop Dots

Sunday, February 26, 2012

"Dream" Steampunk Mini Book

Hello Everyone!
Following on from my last project here's my 'Dream' Mini Book that features the Crafter's Workshop Template Mini Numbers Collage and Steampunk style stamps by Blockheads Paper Arts.


I've been experimenting with Crafter's Workshop Templates for Blockheads Paper Arts' design team using various products to create interesting backgrounds and effects.  I've got a few projects to share and this is my second template project.  I love making tiny books and haven't done so in a while so couldn't resist making this one ;0)

Here's a peek at some of the backgrounds I've made with the Mini Numbers Collage template so keep an eye out for all the projects I've done with them ;0)  If you missed the Steampunk inspired "IMAGINE" card using the background on the left then check it out here.

Here's a list of all the stamps and supplies I used from Blockheads!

 Mini Numbers Collage
Victorian Invention

Feeling Regal
Verses Full Sheet

Quickutz Mini Album Die set - Sugarplum
Tim Holtz Idea-ology Nostalgic Tape
Tim Holtz Idea-ology Film Strip Ribbon
Tim Holtz Idea-ology Charm Clips
Tim Holtz Distress Tool
Penny Farthing Charm (Hobbycraft UK)
Tiny Brass Brads
Tiny Hole Punch
Metallic Gold Rub-ons
Memento Tuxedo Black and London Fog Ink Pads
Versamark Watermark Ink Pad
Perfect Pearls Gold Powder and soft bristle brush
Decorative Chalks or Pebbles Chalks
Sponge Chalk Daubers
Tim Holtz Idea-ology Paper Stash cardstock
Brown, light grey-brown and seafoam cardstock
Bronze-Copper metallic shimmer paper
Metallic yellow ribbon
Brayer
Double-sided Tape
Permanent Adhesive Tape

Tuesday, February 21, 2012

"IMAGINE" Steampunk Card featuring Crafter's Workshop Mini Numbers Template

Hello Everyone!

I've been experimenting with Crafter's Workshop Templates for Blockheads Paper Arts using various products to create interesting backgrounds and effects.  I've got a few projects to share so I'm starting off with this cool Steampunk style card.  You can get a head start on your Father's Day cards with this one but its also suitable for an guy card occasion too.


Here's a peek at some backgrounds I've been creating with the Mini Numbers Collage template so keep an eye out for all the projects I've made with them ;0)

I used the following Blockheads Paper Arts stamps on my "IMAGINE" card!
Victorian Invention
Grunge It Up
Verses Full Sheet
Household Notions
Vintage Light and Form
 Here's a list of all the supplies I also used.
All the linked items are available from Blockheads!
Spellbinders Labels 21 die
Spellbinders Tan Embossing Mat
Tim Holtz Alterations Ticket Decorative Strip
Tim Holtz Idea-ology Film Strip Ribbon
Tim Holtz Idea-ology Charm Clips
Tim Holtz Distress Tool
Clock Charm (Hobbycraft UK)
Tiny Brass Brads
Tiny Hole Punch
Regular/Standard hole punch
Metallic Rub-ons
Memento Tuxedo Black and London Fog Ink Pads
Brilliance Lightning Black Ink Pad
Versamark Watermark Ink Pad
Versmark Watermark Pen
Decorative Chalks or Pebbles Chalks
Sponge Chalk Daubers
Brown, blue, light grey-brown and seafoam cardstock
Double-sided Tape
Permanent Adhesive Tape

Thursday, February 16, 2012

A "Thank You For Everything" Card - Featuring Blockheads Paper Arts!

Happy Thursday Everyone!

I want to share a Thank You card I made for my BFF today!  She's dottie for circles - I mean seriously loves anything with spots on it and all her wall decor, rugs...you name it, has the circle motif going on!  So of course I couldn't resist getting dottie myself when I made her this card ;0)


I incorporated circles, spots and polka dots as much as I could in my card by using Spellbinders Beaded Circles dies, a Cuttlebug Embossing Folder with an interlocking circle and spot design, a multi-circle Blockheads Paper Arts exclusive stamp from their Backgrounds For All Occasions sheet and a polka-dot ribbon!  I did consider making the actual card round too but decided on the rectangular shape coz I wanted to use the whole Cuttlebug E-Folder.

I also used the following on my card:
The 'Thank You for Everything' and 'Thanks' stamps from the
Verses Full Sheet
Backgrounds for All Occasions
ColorBox Fluid Chalks ink pad - Lavender
Memento ink pad - Tuxedo Black
Glitter Glue
Double-sided tape
Pop dots
Spellbinders Tan Embossing mat 
White, pale Lavender and Lavender cardstock
Magic Transparent White Pearl Pen - The Rubber Cafe

Thursday, February 9, 2012

French-African Themed Altered Tissue Box

Hi Everyone!

Feb 7th was my birthday and I had a fabulous day made even better coz I got to spend it stamping :0)
I also got to make something I've had on my list to do for ages too!  Every time I have a cold I always eye up the empty tissue box and say I can totally do something with this and then it gets thrown out.  So I finally did it and made a fancy tissue box to go in my French-African themed guest bathroom!


I designed and decorated my guest bathroom with the large French Black Cat poster as the basis of my inspiration.  Every room in my house also has an African theme going on too so of course I couldn't resist those cream/brown zebra towels and included the zebra ribbon border on the walls to continue the recurring theme.  I also painted the ceramic vase in the photo many moons ago which is a combination of fired glazes and metallic acrylics and I added the zebra ribbon to it and in the poster frame to make everything tie in together nicely.


I then incorporated all the elements of my guest bathroom into my altered Tissue Box!


Supplies used on this project:
 Blockheads Paper Arts exclusive stamp sets:
Feeling Regal
Backgrounds for all Occasions - French Script

Wednesday, February 1, 2012

"Let Love Take Flight" Chalk Attraction Technique Valentine's Card

Hello Everyone!
I meant to get around to sharing my Chalk Attraction Valentine's Day card with you sooner but I've been down with a cold for a few days but I'm getting over it now and ready to share ;0)


So quick recap - I'm hosting the Chalk Attraction Technique Challenge Blog Hop over at
Blockheads Paper Arts!
To take our Challenge...visit Blockheads' Chalk AttractionTechnique page to see my tutorial on how to do this Technique with step-by-step instructions and photos!  Then create your own Chalk Attraction creation, create a blog post that includes the link code, which creates links to other participants in the blog hop, then submit your URL via the inlinkz button.  Links will be removed that don't include the code.  Join the Blog Hop by February 21st for a chance to win a $25 gift certificate.  The winner is selected by me and my fellow design team mates.  You can use any stamps for this challenge - you are not limited to Blockheads stamps, but we always appreciate seeing great art using our stamps!

A summary of the Challenge info including the html code you need to use can be found at the end of this post or here!

Now for my Valentine's Day card  
"Let Love Take Flight"

I used the following supplies:
 All stamps are exclusive to Blockheads Paper Arts:
Vintage Bird Illustrations
Verses Full Sheet
Whimsical Faerie Wings
Versamark Watermark ink pad
Memento Ink Pads:  Rich Cocoa and Rhubarb Stalk
Decorative Chalks or Pebbles Chalks
Spellbinders Dies:   Labels 8 and Circle Hearts
Cuttlebug Embossing Folders:  Victoria and Tiny Bubbles
Various Chalk applicators:  Daubers, Fantastix, Eye Shadow Brushes
Tim Holtz Idea-ology Mini Pin
Black ultra fine Sharpie marker
Brown ultra fine Sharpie marker
White Gel Pen
Red Glitter Pen
Ribbon
Stamp Positioner
White, Russet Brown and Red cardstock
Double sided tape
Pop dots and Glue dots
Eraser
 

Monday, January 30, 2012

Blockheads' Chalk Attraction Challenge Blog-Hop Starts Now!

Hello Everyone!

It's time for our new Technique Blog Hop Challenge over at Blockheads Paper Arts!
I'm hosting this one and I'm calling it the Chalk Attraction Challenge!


The Chalk Attraction Technique is perfect for those of you who like to have instant results without a lot of work or a lot of specialized supplies. I like to call this technique Chalk Attraction because I think it best describes what the technique is about but most of you probably know it as Poppin' Pastels!  Basically the technique involves stamping an image with a clear Versamark Watermark ink pad and the wet ink attracts the powdered chalk making the stamped image pop out from the cardstock.

My card "Let Love Take Flight" incorporates three different ways you can use this super fun technique!  This is definitely one of my favourite techniques!  It's an oldie but a goodie and I'm pleased to bring it back into the limelight for you all whether you are newbie stampers or have been stamping for years!  It's quite a versatile technique that can be adapted to suit any of your projects and I provide some examples in my tutorial of what you can do with it and also check out the examples created by the Blockheads design team along your blog hop!

To Take our Challenge: Visit Blockheads' Chalk AttractionTechnique page to see my tutorial on how to do this Technique with step-by-step instructions and photos!  Then create your own Chalk Attraction creation, create a blog post that includes the link code (below), which creates links to other participants, then submit your URL by clicking the button below.  Links will be removed that don't include the code.

Join the Blog Hop with your example by February 21st for a chance to win a $25 gift certificate.  The winner is selected by me and my fellow design team mates.
Design team members and guest designers are not eligible to win.

All stamps used on my card are exclusive to Blockheads Paper Arts:
Vintage Bird Illustrations
Verses Full Sheet
Whimsical Faerie Wings

You can use any stamps for this challenge, you are not limited to Blockheads stamps, but we always appreciate seeing great art using our stamps!

I will also be sharing my tutorial on how I made my Valentine's Day card so you can see how I combined all of the various Chalk Attraction elements into my design!
 Stay tuned for my Valentine's Day card tutorial and I look forward to seeing all your submissions :0)


Happy Stamping!
 THE SHARPIE DOMINO QUEEN
I design for Blockheads Paper Arts * Third Coast Rubber Stamps * About Art Accents

Thursday, January 19, 2012

My Blockheads "Out Of The Box" Technique Blog Hop Challenge Card!

Happy New Year Everyone!

I'm back from my vacation to the UK where I spent a fabulous Christmas with my family!  I'm finally feeling human again after a week or so of walking around in jet lag zombieland, LOL, and now I'm eager to share the card I made for Blockheads Paper Arts' "Out of The Box" Technique Challenge!


There's still a couple of days left to enter the challenge so pop on over to Blockheads to find out exactly how to do this technique and then visit the Blockheads Blog for more details on how to enter the challenge and see the awesome challenge submissions!

Me and my fellow Blockheads Design Team members will be picking one challenge entry to a win a $25 gift certificate to Blockheads Paper Arts!  So grab your Spellbinders, check out the technique, make your card and post it to your blog.  For your entry to qualify you MUST include this html code in your blog post so that it links up with the challenge blog hop!  If for some reason you don't see the code below once I've published my post then you'll find it on the Blockheads Blog here!  Then submit your blog post URL via the inLinkz 'Add Your Link'  button.  I hope you'll join the fun and I can't wait to see your versions of the "Out of The Box" Technique!

Here's my card I made using the "Out of The Box" Die Cutting Technique!


Spellbinders Labels 14
Memento Tuxedo Black ink pad
Double sided tape
Low Tack tape
Glue Dots
Black and white cardstock
White paper ribbon/raffia or read on to find out exactly what I did use for the bow ;0)
Black Sharpie marker:  ultra fine point
Scissors
Pencil
Exclusive Blockheads Stamps: 
Inspired By Nature Full Sheet

Start by stamping the small Dragonfly and the small Flower stamp onto a piece of white cardstock with Memento Tuxedo Black ink.  Align the Spellbinders Label 14 die over the image so that a portion of the wings are on the 'outside' of the die and trace the interior shape of the die with a pencil.


Closely cut out the wings that are on the 'outside' of the traced die shape ONLY.  Cut right up to the traced line plus about another 1/16th of an inch INSIDE the traced line!  The extra cut allows you to place the wings on the outside of the metal die.  Secure the die in place with low tack tape like Post-It tape or repositionable sticky tape and run it through your die cutting machine.
Viola!  The Dragonfly's wings extend beyond the die cut, how cool is that!  It's a pretty neat technique for using your favourite dies with and you can get quite elaborate with what sections of the stamped images extend beyond the boundaries :0)


I then filled in the rest of the die cut with more flowers and added the small leaf too.


Die cut mats for the main panel from more white cardstock and some black cardstock and I stamped more flowers and leaves onto the 2nd white mat.  I actually cut out the larger of the black shapes with scissors because I wanted the mat border to be smaller.  So I simply used the die as a template and traced it out on the back of the black cardstock and cut it out with scissors.


I made my own folded card from white cardstock and stamped leaves around the outside edge of the front.  I used an ultra fine black Sharpie marker to draw in 'shadows' on one side of each leaf to give them more impact once the card was complete.


Adhere all the mats on top of each other with double sided tape.


You'll never guess what I used to make that really cool paper bow ;0)  My 4 year old nephew got an Ultimate Optimus Prime from Santa...'Ultimate' mind you, not just any Optimus Prime like he LOVES to remind you LOL!  Anyway, the toy was secured in the packaging with these rolled paper strings instead of the usual ties.  I pounced on them immediately and made sure they didn't go out in the trash!  As you can see in the photo above they unravel just like raffia.  I experimented with different bows and settled on the one you can see below which I attached to the card with a glue dot.


And there you have it, what a fun technique to do!  I hope you'll give it a try and share your creations with us at Blockheads Paper Arts!  I'd better dash and add my Design Team sample of the technique to the Blog Hop Challenge ;0)

I've entered my card in CAS-ual Fridays Black and White Penguin Suit Challenge - thanks for the heads up Colleen ;0)


Happy Stamping!

THE SHARPIE DOMINO QUEEN
I design for Blockheads Paper Arts * Third Coast Rubber Stamps * About Art Accents