Join us for our Christmas countdown to Dec 25!
 Play in our big end-of-year Challenge+Hop!
December's Special Release Digi Stamp!
Festive Felines 2024 Christmas Release!

Friday, December 30, 2016

"Crystal Angel" Snowflake Ornament for Lost Coast Designs DT!

Hello Everyone🎄
I hope you all had a wonderful Christmas and Santa was really good to you😉
It's the finale of "It's Beginning to Look a Lot Like Christmas" celebrations over at Lost Coast Portal to Creativity!  The linky party to enter your own rubber stamped Christmas or Winter themed projects is at the bottom of this POST....you have until January 6, 2017 by 5 to midnight to enter for the chance to win LCD/CV Bucks to spend in our Lost Coast Designs and Carmen's Veranda stores!  The more entries the better the prizes so round up all your friends and join the most festive party of the year🎉 
 
 Here's my finale project featuring Lost Coast Designs gorgeous Art Deco Angel.

"Crystal Angel" 
Snowlake Ornament

 I stamped her Onxy Black Memento Ink and coloured her with Copics in a blue and lavender colour palette and added lots of shimmer and sparkle with clear Wink of Stella and Diamond Stickles glitter glue.  I then adhered her to a hanging snowflake ornament.
 
 
Here's a closer look at her showing her true colours.
The following photos show how she transforms when hung in a window under different lighting conditions....sooooo pretty!
 
 
I just love how the snowflake shows behind the angel here, it gives it a stained glass like effect.
 
 
Thanks for stopping by to see my project today!
Have a safe and Happy New Year!

 Leigh S-B

THE SHARPIE DOMINO QUEEN
I design for * Lost Coast Designs * Carmen's Veranda * The East Wind * Delicious Doodles *

Thursday, December 15, 2016

"Lucy Loo's Canadian Winter" TagART for The East Wind DT!

Happy Holidays!
It's time for our last challenge of the year over at The East Wind and the theme for #69 is Tag...You're It!  For this one you can add a tag to a project or create a stand alone tag or a gift tag...you get the idea!
 Here's my DT inspiration project featuring the gorgeous new TEW digi called Lucy Loo "Canadian Winter" With Background (MAC0350), there is also a version without the tree background HERE!


I used a standard sized white shipping tag for the base of my TagART project and then sized and cropped Lucy Loo in Photoshop CS6 to fit.  I printed her out twice and fussy cut out and trimmed the one print out to be the base and the other I fussy cut out just part of Lucy Loo for the 3D layer.  I then got to work on the shipping tag and embossed it with a snowflake design (Die'sire Embossalicious Christmas Elegance embossing folder).  I applied a wash of blue watercolour to the tag and then applied white Dylusions paint to the embossed snowflakes.  Once dry I applied Frosted Lace Stickles Glitter glue for some subtle shimmer.  While that dried I coloured both digi images with Copics and added ultra violet glitter glue (Studio G) and clear Wink of Stella for lots of yummy sparkle and shimmer.  I then adhered the base image to the tag with Scotch Quick Dry adhesive and punched 2 half circle notches in the lower part of the tag, wrapped lavender/white butchers twine around the tag and attached a silver metal snowflake charm.  I then adhered the Lucy Loo cut out to the tag with pop dots.  I finished off by edging the entire tag with more ultra violet glitter, added butcher's twine to the top and embellished with 3 Memory Box snowflake die cuts which I blinged up with Diamond Stickles glitter glue.
 I just adore Unky's Lucy Loo line, she's so beautiful and I thoroughly enjoyed creating this tag!
  
Come and join the fun at The East Wind...we have 2 blog challenges every month and fun challenges on on our TEW Facebook Group too!

http://www.theeastwind.com/
Thanks for stopping by to see my project today!
Happy Stamping!

 Leigh S-B

THE SHARPIE DOMINO QUEEN
I design for * Lost Coast Designs * Carmen's Veranda * The East Wind * Delicious Doodles *

Tuesday, December 6, 2016

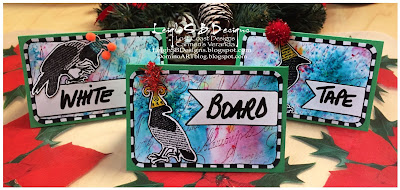
"It's a Crow Party" Re-usable Dinner Party Place Holders for Lost Coast Designs DT!

Happy Holidays Everyone!
It's getting so Christmasy over at Lost Coast Portal to Creativity with our Xmas celebrations underway....see my Day 1 of It's Beginning to Look a Lot Like Christmas projects if you haven't stopped by yet!

This is also the season for lots of dinner parties and guests need to know where they are sitting so how about making some fun place holders that are re-usable by adding banners die cut from Dry Erase White Board tape by Scotch!  I made these for our new LCPtoC Challenge #31 for December...this month's theme is Party Critters!


I used the following Lost Coast Designs stamps:
Crow Party
 and
Loopy Calligraphy


I used Nuance pigment powders by Magenta to create the yummy colourful background.  I love the feeling of celebration they bring to my place holders, the burst of colours look like fireworks...perfect!  I used 3 of the newest colours to the Nuance family:  Aquamarine, Rosebud and Wisteria.  You'll notice there's some extra colours mixed in there too...that's a little surprise you can get with the powders.  Sometimes a speck of powder from another colour gets in by accident during production so you never really know what you're going to get until you start creating.  But it doesn't always happen so each time you use the powders each result will have a different effect...I think that's fun and quite magical.  You can get the Nuance powders at Lost Coast Designs too!


The crows were all stamped with Onyx Black Versafine ink and the Loopy Calligraphy background stamped with Aged Mahogany Distress Ink.  I added touches of colour to the Crow's hats with Prismacolor pencils and embellished with tiny assorted pompoms and tinsel pipe cleaners.  I used a Marvy corner rounder punch on the edges and doodled the black and white borders with Dylusions paint pens.  I made folded cards from green cardstock and adhered the everything with Scotch Quick Dry adhesive.

Thanks for stopping by to see my project today!
Happy Stamping!

 Leigh S-B

THE SHARPIE DOMINO QUEEN
I design for * Lost Coast Designs * Carmen's Veranda * The East Wind * Delicious Doodles *

Saturday, December 3, 2016

"Layered Poinsettia" Hanging Ornament for Lost Coast Designs/Carmen's Veranda DT!

Hello Everyone🎄
Things are getting very festive over at Lost Coast Portal to Creativity!  We are celebrating the season throughout December and into the new year in style and sharing LCDesigner projects all month long so join us, spread the holiday cheer and enter your rubber stamped Christmas or Winter themed projects in our Xmas Linky Party at the bottom of this POST by January 6, 2017 at 5 to midnight for the chance to win LCD/CV Bucks to spend in our Lost Coast Designs and Carmen's Veranda stores!  The more entries the better the prizes so round up all your friends and join the most festive party of the year🎉  


 I'm kicking off the celebrations today with two projects, see my first project HERE and now here's my 2nd!
 "Layered Poinsettia"
 This multi-layered and fussy cut hanging wall ornament features the following stamps:
 Carmen's Veranda: Poinsettia Background 
Lost Coast Designs: new Loopy Calligraphy

This one involves lots of die cutting with nesting Lifestyle Crafts Quickutz inverted squares dies, stamping with black Versafine ink and a combination of Memento and Distress Inks.  The panels are edged in metallic gold for a touch of elegance and matted on die cut black cardstock.  The poinsettia is coloured with Copics, consists of fussy cut layers with a touch of clear Wink of Stella for some Christmas magic.  I added gold eyelets and embellished with a pink tassel and a gold swirl hanger.


Thanks for stopping by to see my project today!
Happy Stamping!

 Leigh S-B

THE SHARPIE DOMINO QUEEN
I design for * Lost Coast Designs * Carmen's Veranda * The East Wind * Delicious Doodles *

"Meowy Snowcat Christmas" card for Lost Coast Designs DT!

Hello Everyone🎄
Things are getting very festive over at Lost Coast Portal to Creativity!  We are celebrating the season throughout December and into the new year in style and sharing LCDesigner projects all month long so join us, spread the holiday cheer and enter your rubber stamped Christmas or Winter themed projects in our Xmas Linky Party at the bottom of this POST by January 6, 2017 at 5 to midnight for the chance to win LCD/CV Bucks to spend in our Lost Coast Designs and Carmen's Veranda stores!  The more entries the better the prizes so round up all your friends and join the most festive party of the year🎉  

 I'm kicking off the celebrations today with two projects and my first one features a brand new rather cool kitty to our Lost Coast Designs line, say hello to our new Snowcat...isn't he a cutie😉  He'll be up in the store soon!

I'm entering this one in my fave challenge blog dedicated just to kitties!
SUYP Challenges - Furrything Goes!

 "Meowy Christmas"
 

This winter themed Christmas card features the following stamps:
 Lost Coast Designs: new Snowcat, Large and Small Snowflakes and the sentiment is a partial of "Merry Christmas" from our Party Words set..."Meowy" was hand written.
Carmen's Veranda: Christmas Tree.
 
showing the dimension and yummy sparkle
Thanks for stopping by to see my project today!
Happy Holidays!

 Leigh S-B

THE SHARPIE DOMINO QUEEN
I design for * Lost Coast Designs * Carmen's Veranda * The East Wind * Delicious Doodles *

Friday, December 2, 2016

"Meowy Christmas" card for The East Wind DT!

Howzit Friends!
It's time for our new blog challenge over at The East Wind!  Here's my DT inspiration project for Challenge #68 Meowy Christmas.  Meowy Christmas has become an East Wind tradition and Unky created this new stocking kitty called "Meowy Christmas #2" for our December Newsletter freebie digi!  So totally cute!  I couldn't resist creating this Christmas card for my nephew😃

I'm entering this one in SUYP's Furrything Goes challenge!


 I flipped and adjusted the size of the image in Photoshop CS6 and printed kitty out on Neenah Solar White cardstock.  I then coloured the entire image with Copics and added highlights with a white Dylusions paint pen.  I used an embossing folder to add subtle embossed snowflakes to the surrounding background which I then treated with a watercolour effect done with blue Faber-Castel Pitt Pastel and Walnut Stain Distress Crayon and a watercolour brush.

I then made a folded card from red cardstock and adhered the image to it with Scotch Quick Dry adhesive.  Then I got down to adding lots of dimension with Inkssentials Matt Accents on the light's wire, Judikins Diamond Glaze on the lights and kitty's eyes and nose, Stickles Diamond Glitter glue on the white stocking fur and the outside edge of the entire card and clear of Wink of Stella on kitty's bow, the paw prints on the stocking, the candy cand, star and the subtle background snowflakes.
Of course the card needed a sentiment so I die cut out the letters from blue cardstock using Sizzix Easy Peasy Alphabet dies, coloured the inside of the letters with white Dylusions paint pen and lots of glitter glue action!
  
Come and join the fun at The East Wind...we have 2 blog challenges every month and fun challenges on on our TEW Facebook Group too!

http://www.theeastwind.com/
Thanks for stopping by to see my project today!
Happy Stamping!

 Leigh S-B

THE SHARPIE DOMINO QUEEN
I design for * Lost Coast Designs * Carmen's Veranda * The East Wind * Delicious Doodles *

"Christmas Lantern" fancy shaped card for Delicious Doodles DT!

Happy December Everyone!
 It's time for our new Challenge over at Delicious Doodles Challenges and this month we challenge you to create Christmas projects using Traditional Colours!

Here's my fancy shaped card project for your inspiration featuring Delicious Doodles digi stamps, Christmas Lantern and the Robin from Jolly Holly Postbox.


  I printed the Christmas Lantern image twice and just the Robin and Holly from the Jolly Holly Postbox onto Neenah solar white cardstock and die cut out the main image with a Spellbinders die.  I coloured the entire lantern on one print out and just the top of the lantern and the bow and holly in the foreground on the second plus the Robin with Copic markers and white highlights done with a white Dylusions paint pen.  The blue background was done with a blue Faber-Castell Pitt Pastel pencil and blended with a Dove blender pen to achieve the watercolour effect.  I then fussy cut out all the pieces for the layers and adhered them in place with pop dots.  It's not Christmasy if it's not blinged up so I added clear Wink of Stella shimmer and Stickles Diamond Glitter Glue sparkle.  I used a snowflake embossing folder to create the background layer and added colour with the same blue Pitt Pastel and touches of Stickles glitter glue too.  The background and the red mats were also die cut out using the same Spellbinders nesting die set and adhered with Scotch Quick Dry adhesive.

I then turned it into a card with an easel back by using another die cut piece folded in half with a sentiment (source unknown) stamped on a piece of white cardstock which was also die cut and then cut in half to match.
 

Thanks for stopping by to see my project today!
 Happy Stamping!

 Leigh S-B

THE SHARPIE DOMINO QUEEN
I design for * Lost Coast Designs * Carmen's Veranda * The East Wind * Delicious Doodles *