Join us for our annual Edgar Allan Poe Appreciation Month & Mini Poe Hop!
 Play in our January Challenge!
Poe inspired Digi Stamp release!

December's Special Release Digi Stamp!
Festive Felines 2024 Christmas Release!

Tuesday, August 31, 2010

My Faerie Cat Domino Ornaments at Third Coast Rubber Stamps!

Hello Stampers!
My Faerie Cat Domino ornaments are currently being featured over at 
Third Coast Rubber Stamps!

You can view them on their website, on their blog Facebook page!


You'll also find the tutorials for my Faerie Cat Domino ornaments here

I'd love to hear what you think so please feel free to asks questions and leave me your comments!
Thanks for stopping by!

Leigh S-B
THE SHARPIE DOMINO QUEEN
www.VelvetPawCreations.com

Monday, August 30, 2010

Stamping Supplies & Product Reviews - DecoColor Paint Pens

Hello Stampers!

As well as sharing my Creative Adventures with you all I will also have Stamping supplies and related product news and reviews to share with you too.  My first bit of news to share isn't very good I'm afraid if you're a fan of DecoColor paint pens and do your shopping at Michaels!

For months now I've been waiting for my local Michaels to get stock in, especially the metallics.  When I asked about their stock situation and if they're discontinuing them all they could tell me was they receive new stock every week.  Well I wasn't convinced so I sent Marvy Uchida an email asking for info but haven't heard anything from them either. But the other day I visited a different Michaels and all the DecoColors had clearance stickers and a sales person confirmed they are discontinuing them :-(  So I managed to get my hands on a few colours but sadly not a single metallic in sight. 


So if you normally buy your DecoColors from Michaels I suggest you stock up on what you can before we have to resort to online ordering in the future :-(  I can't remember if Office Depot/Staples sells the metallics. I know they've got them online but will have to check my local store.  Dick Blick has pretty good prices but I just hate the shipping charges, especially if you just need to order one pen!

Well that's all I've got to share on that subject for now so until next time.....

Happy Stamping!
Leigh S-B
THE SHARPIE DOMINO QUEEN

www.VelvetPawCreations.com

Wednesday, August 25, 2010

Fairy Domino Butterflies
Standing Ornaments
For the August Make & Share on DominoART I challenged my members to create projects based on the poem 'To A Butterfly' by William Wordsworth.   I love fairies and immediately knew I wanted to design double domino Fairy Butterfly ornaments and was inspired by About Art Accents Masked Fairy Girls rubber stamps!
Check out my Design Team Creations page for a mini tutorial on how I made the blue Fairy Butterfly.  Latest tutorials appear at the bottom of the page.  I will also share a mini tutorial on the green Fairy Butterfly soon too!
Thanks for stopping by!
Leigh S-B
The Sharpie Domino Queen

Wednesday, July 28, 2010

Jingle in July Christmas Tree Ornament

Hello Stampers!
I challenged members of my DominoART Yahoo Group to celebrate Christmas in July by creating DominoART with a Christmas or Winter theme.  
I designed a three-sided domino ornament for my Jingle in July project titled "Images of Winter".  I'm really pleased with how this turned out and I hope I will inspire you all to try your hand at creating some DominoART for your Christmas tree this year!  You'll find the tutorial and materials list for "Images of Winter" on my Leigh's Altered World of Game Pieces page.


Happy Stamping!
Leigh S-B
THE SHARPIE DOMINO QUEEN

Tuesday, July 20, 2010

Pocket Fairy Field Journal Tutorial

Hello Stampers!

I'm very excited to be designing for About Art Accents and I've just had the pleasure of creating a project using AAA Fairies from their ATC Fairy Plate # 144


Pocket Fairy Field Journal

This project is perfect for Fairy Watchers & designed specifically for you to be able to keep your Fairy Field Journal with you at all times because you never know when you might spot a Flower Fairy and need to jot down some important notes!  I'm thrilled with the old-world charm of the finished project and the magical vintage quality of each Fairy Note Card!

Please pop on over to my new page called Design Team Creations for Project Photos and a tutorial on how to make my Pocket Fairy Field Journal!


I hope you'll enjoy reading my tutorial and please feel free to leave me your comments.  I haven't figured out yet how to or even if I can have a comments box on a Page so you're welcome to leave your comments at the bottom of this post ;-)

Enjoy!

Leigh S-B 
The Sharpie Domino Queen

Friday, July 16, 2010

New Page - My Altered World of Game Pieces!

Hello Stampers!

I've just created a new page called Leigh's Altered World of Game Pieces and it is listed on the top menu bar.

This page is dedicated to my Creative Adventures involving Game Pieces from dominoes to playing cards!  I will share mini tutorials and also detailed step-by-step directions for my various Game Piece related creations so watch this space for unique and innovative projects ;-)

First up I've added a mini tutorial on how I went about designing the Oriental Trinket Box that won 1st place in the recent Blockheads contest!  

I hope you'll enjoy following me on my Creative Adventures and please feel free to add your comments!

Happy Stamping!

Leigh S-B
THE SHARPIE DOMINO QUEEN

Wednesday, July 7, 2010

I won 2 out 3 categories in the Blockheads Contest!

Hello Stampers!

I'm doing the dance of joy today coz I won 2 out of the 3 categories in the Blockheads Paper Arts contest ;-)  Woohoo!!  Thank you so much to Stacey for hosting the contest!

My Oriental Trinket Box took 1st place in the 3D Altered Objects category and my Serenity card snapped up 1st place in the Cards category.  I was up against some gorgeous artwork so I'm really thrilled ;-)

I had 2 entries in each category and I will upload and share them with you all over the next week or so.

In the meanwhile here's the photos of my 2 winning entries ;-)

Oriental Trinket Box


Serenity


Thanks for stopping by!
Leigh S-B
THE SHARPIE DOMINO QUEEN
www.VelvetPawCreations.com

Friday, July 2, 2010

New Page - Domino Sources!

Hello Stampers!

I've just finished creating a new page "Domino Sources" with tons of links to all my favourite traditional dominoes, unconventional dominoes, other game tiles as well as an assortment of really cool playing cards!  All of these are perfect for altering and adding to your altered art!  Check the page often to see what new and fun games I've found to alter ;-)
Enjoy!
Leigh S-B
THE SHARPIE DOMINO QUEEN

Thursday, July 1, 2010

What I've Been Up To Lately!

Hey Everyone!  

I've been MIA for the last month or so and need to catch up on all my DominoART message reading.  So will be replying and commenting on a ton of posts over the next 2 days I'm sure ;-)

Anyway I just wanted to let you know about what I've been up to and share some advice that I just learnt the hard way!  I've been designing a lot of cards recently and have some that I'm really pleased with to share with you all.  I've also got some Domino related creations to share too but I've decided to submit my most recent artwork for publication so won't be able to share that one with you just yet I'm afraid.  But I promise to start uploading some eye candy over the next few days!

Last week I decided to enter the contest being held over at Blockheads website and have been busy designing a couple of entries.  Wednesday was the deadline to get them all submitted and early yesterday morning I was up and doing just that.  During my first submission upload I realized I didn't know the name of the Blockheads stamp I'd used so went off to get the name only to discover I couldn't find the stamp any where on the site!

Shock! Horror!  I discovered that some of the Blockheads stamps I'd used weren't on the site anymore and therefore no doubt discontinued.  I realized with dismay that that probably meant I've designed my creations with stamps that probably don't qualify for the contest - ear splitting scream!!!!

After some email discussion with Stacey of Blockheads I knew which ones were disqualified and literally spent one day re-creating my submissions that I'd spent about 5 days working on and got them all uploaded last night!  Phew, that was one whirlwind of a crafting session, LOL!

THEN...wait for it.....just after that I checked my email and discovered an announcement from Blockheads that the contest deadline had been extended until Friday - aaaaarrrrggghhhhh!

So the moral of my story is - make sure the stamps you're using for a contest
are still available BEFORE you start working on your submissions ;-)

So Stacey is busy still uploading my entries but one has shown up in the ATC section already.  I hope you'll all pop on over to the Blockheads website when it's time to vote and hopefully you'll like some of my creations enough to head some votes my way ;-)  You have to be a member of the Blockheads newsletter to be able to vote so you'll know when voting starts coz it will be in the newsletter!

Now I've got to go and tidy up my studio, it looks exactly like a whirlwind hit it yesterday, LOL!

Happy Stamping!
Leigh S-B
THE SHARPIE DOMINO QUEEN

Saturday, April 17, 2010

Spring Fling Felt Clip Dangle 
featuring an Altered Chekit Game Tile
Hello Stampers!

To celebrate the arrival of Spring I challenged DominoART members to design a Spring themed altered domino or game tile creation.  For my project I decided to 'dress up' a felt clip dangle I bought at Michaels with an altered Chekit game tile.  I knew the felt flowers would go perfectly with the stamp I had in mind!

I hope my project will inspire you to look at all the inexpensive goodies you can pick up at stores like Michaels and Target, then make them your own by adding your personal touch with an altered game piece or two!  These felt clip dangles make perfect whimsical little gifts for friends and family and will look good attached to keychains, purses or totebags!


They definitely announce Spring has arrived!  
Enjoy


MATERIALS & SUPPLIES YOU'LL NEED

Flower - clear stamp by Autumn Leaves
Ancient Page Dye Ink - Coal Black
Chekit game tile
Embossing Heat Gun
Sharpies
Gold & Silver Metallic Paint Pens
Delta Ceramcoat Gloss Varnish
Paint brush
Flat back pink Cabochon Jewel
E6000 Adhesive
Felt Clip Dangle
Wooden Dowel
Prestick aka Poster Putty
Scissors


INSTRUCTIONS


Start off by stamping the image of the flower in black ink onto a new shiny Chekit game tile.  The clear rubber stamp helps you center the flower image just right on the Chekit.  You also don't need to worry about doing any kind of surface preparation to the Chekit for this project.  
Heat set the ink with an embossing heat gun or just leave it to dry over night.
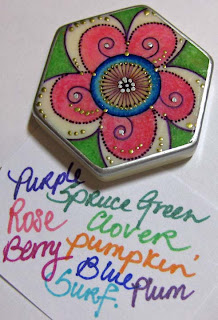
Now you can add colour with Sharpie markers.  I began by adding two shades of blue to the center circle.  I started by mapping in the darker blue around the edge of the circle line then blended with the light blue Sharpie called Surf to add shading and depth.
I then coloured the petals of the flower with two shades of pink.  I randomly scribbled a few lines of Berry onto each petal, which is the darker pink, and blended with Rose to achieve various shades of pink as I coloured. 
 Tip:  You'll notice that the curly flourishes in the petals have a darker pink dot in the center.  When you colour with Sharpies the last place where the point of the marker rests is always darker when you lift the marker away from the Chekit.  So plan ahead as you're colouring so that you can either incorporate the darker dot into the design or 'hide' it in the black ink of the stamped image!
To add just a touch of colour to the center of the flower I drew single lines of Pumpkin orange between the black stamped lines ending in the center so that the darker 'finishing dot' actually creates a darker shade of orange in the middle of the flower.
I decided to leave the rest of the petals the natural colour of the Chekit and moved onto the background which I coloured with two shades of green.  I drew a line of the darker Spruce Green colour along the stamped edge of the petals and blended with Clover green Sharpie.
To give the stamped image a bit more dimension and to darken the black ink, gently outline the entire image with an extra-fine point Plum Sharpie.  This also adds another touch of colour too instead of just using black again.
The next step is to add the bling to the design with touches of metallic gold and silver paint!  Use the extra-fine point pens to add dots to the image.
Finish off the Chekit by edging the piece in metallic silver.  I used a broad point paint pen on just the edges but you can also colour the sides silver too if you prefer.

Finally, protect the altered Chekit with a coat of glossy varnish or your favourite glaze.  I use either Ceramcoat Varnish or Judikins Diamond Glaze the most and I just decided to go with the varnish for this project, for no other reason than I just felt like it ;-)
TIP
Dominoes, and Chekit game tiles in particular, are rather small to work with so it can get a bit tricky to brush the varnish onto the top and sides without managing to put your fingers into the varnish and making a mess!  So I came up with a neat trick to solve all our problems ;-)  Stick the game
tile onto a piece of wooden dowel with a lump of prestick aka poster putty and you're good to go!  I actually recycled the handle of one of those black foam brushes to use as my stick ;-)  You will then, of course, have to stand the dowel/handle into something to keep it level and from falling over while
the varnish/glaze dries. 
While the varnish dried on my altered Chekit I removed one of the felt flowers off of my dangle thingie with a sharp pair of scissors.  On the other side of the dangle, pictured above, there was a white felt flower in the center of the blue flower.  I liked the pink flower best so removed the white one.  I then adhered the Chekit to the blue felt flower with E6000 glue.
 
Once everything was dry I admired my little creation and felt it need just a tiny bit more bling to make it special, so I adhered a flat back pink glass cabochon jewel to the center of the Chekit flower with a tiny dab of E6000.  

Perfect!

I hope this project will inspire you to try your hand at altering other game tiles besides dominoes too!

Thanks for stopping by!
Leigh S-B >^..^<
THE SHARPIE DOMINO QUEEN
www.VelvetPawCreations.com

Wednesday, March 24, 2010

Alice In Wonderland Pencil Holder featuring Altered Dominoes


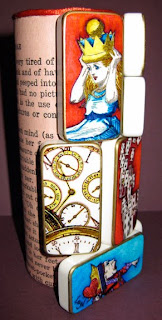
I challenged my DominoART members to an Alice in Wonderland Revival and for my contribution I decided to create a sculpture of altered dominoes.  But after sharing my idea with my sister, Paula, she suggested I make it into a pencil holder!  I'd already contemplated the idea and had decided on the sculpture, so when Paula suggested it too I guessed it was meant to be and went with the pencil holder instead!  Thanks Sissypoo ;-)  I hope you'll all be inspired to get out your rubber stamps and create your own Alice in Wonderland themed creation!

MATERIALS

Various Alice in Wonderland rubber stamps
(these Alice images are now in the public domain and can be found with various stamp companies)
Clock Collage rubber stamp by Frantic Stamper
Standard white dominoes
Ancient Page black dye ink
Sharpies
Heat gun
Blue painters tape
Metallic gold paint pens: broad and extra fine tips
Delta Ceramcoat gloss varnish
Paint brush
Xacto & Craft knives
Cardboard tube
Original/copy page from Alice in Wonderland book
Xyron perm adhesive
Scissors, Ruler, Pencil
Red silky cord
Aleene's Fast Grab glue
E6000 adhesive


INSTRUCTIONS ON HOW TO ALTER THE DOMINOES

Start by stamping all the various Alice in Wonderland images onto the dominoes using black Ancient Page dye ink and heat set the ink.  If you don't have an embossing tool/heat gun then just leave the dominoes to dry atleast over night.  


Once the ink has dried you can begin adding colour with Sharpies.  When I'm working on a bunch of doms at the same time I like to colour them production line style instead of completing each dom separately.  For these dominoes I started by colouring with Dandelion -  these areas I wanted the yellow to represent gold or to act as highlights.  Then added shading/depth to the same areas with Marigold.


For even more depth and shading I worked brown into the same areas.  


I then started adding Red to the various images and used Burgundy to add shading and depth.


I started working on all the blue areas by colouring with Turquoise and the photo shows how I began adding dark Blue to those same areas. 


I like to colour with Turquoise, then map in the dark Blue areas and then go back to using Turquoise to blend in the dark Blue creating shadows and also new shades of blue as I go. 


Once I'm finished with the main details or foregrounds of the images I then move onto the backgrounds.  


When I'm done colouring all areas of the dominoes I like to edge them with metallic paint for a finished look!  You can either just 'outline' the edge of the dominoes like I've done here or you can edge and colour the sides of the dominoes too.  

TIP:  To get a neat outline I suggest you start by masking with blue painters tape!  Once you've got the hang of it you won't need the tape any more.  Wrap the domino with the tape and make sure to burnish the edges with a bone folder or your finger nail.  If you don't burnish the edges down the paint can seep under the tape and make a mess!  Then edge the dominoes with a broad point metallic paint pen and put aside to dry!  

DO NOT BE TEMPTED TO REMOVE THE TAPE UNTIL THEY ARE DRY! 


Finish off the dominoes by adding touches of metallic gold with an extra fine point paint pen and allow to dry before applying a sealer.  I sealed these dominoes with Delta Ceramcoat gloss varnish and a paint brush.  I decided to use the varnish instead of my usual trusty Diamond Glaze coz I've found that the glaze can sometimes make red areas look more orange which just would not be right for Alice In Wonderland!  Yes, you're probably thinking that the red areas in my pics look more orange but trust me, they are red and would look way more orange than this!  The domino with the title "Alice in Wonderland" was hand drawn and based on the font used in the new movie. 


TIP:  Once you've completed all your dominoes you should have a piece of scrap paper that looks something like this:


If you don't have anything that looks like this or no paper at all, then you're not 'cleaning' your Sharpie markers as you're colouring!!  This is a very important and necessary step to keep your images looking clean, crisp and the colours true.  If you'd like to read more about this then please have a look at my Sharpie Domino Queen article 
on my website!  

INSTRUCTIONS ON HOW TO CREATE THE PENCIL HOLDER

Some of you will recognize immediately what I used as the tube for my pencil holder - especially UK & Canadian readers!  Yes, it's the container for Maltesers that I got for Christmas a while ago ;-)  I always stash away things like this coz you just never know when you might need it!  I've also got some Smarties and Jelly Tots containers too, LOL!

To determine where to cut my tube I piled up my altered dominoes and marked on the tube where to cut.  To make sure I cut straight I circled the tube with blue painters tape.  Cut through the layers of cardboard slowly by scoring multiple times with an Xacto or craft knife until you've cut all the way through.  


To hide the printing on the container I scanned and printed out the first page of my vintage Alice in Wonderland book.  I ran it through my Xyron to add adhesive and wrapped the tube with it.  Cut the bottom edge with scissors to create a fringe and wrap the tabs over the bottom rim. 


I then used the title of the page for the circle to hide all the folded tabs and cover the base of the tube.  


To neaten the base I glued in a length of red silky cord inside the lip  


and also edged the top rim with the same cord.


I then built the stack of altered dominoes up one side of the tube and glued them in place with E6000 as I went.


This project requires quite a bit of time but the finished result is worth it! 


I hope you enjoyed my creation :-)


Leigh S-B
THE SHARPIE DOMINO QUEEN

Sunday, February 28, 2010

I'm hosting an Alice in Wonderland Revival at my DominoART group!

Greetings Stampers,
I'm hosting an Alice in Wonderland Revival in anticipation of the new Johnny Depp movie "Alice In Wonderland" coming in March!  

If you'd love to get involved then please pop on over to DominoART and join us!  
All levels of stamping experience is welcome, so newbie dominoians AND newbie stampers are encouraged to join in :-) No need to be afraid, just have lots of FUN ;-)

Once joined you are responsible for making only ONE creation by the specified due date which is Wednesday March 31st!
When you're done the 2nd step is to share your creation with us by uploading photos and posting a detailed description of how you went about making your art. You can create ANYTHING you want as long as it involves dominoes in some way and portrays the Alice in Wonderland theme!  

The best part is that YOU get to keep your art! Just keep in mind that you're making something that pleases YOU, and you don't have to worry about the size or the weight coz you're not mailing it to anyone!! So you can create something small like a magnet or go nuts and create a sculpture!!

Check out my Alice in Wonderland tree sculpture and necklaces on my website!

Ready? Set? Go! Hurry on over to DominoART, join the group and SIGN-UP! The more the merrier ;-)

Happy Stamping!
Leigh - S-B 
THE SHARPIE DOMINO QUEEN